This article was co-authored by Melanie Garcia. Melanie Garcia is the Co-Owner of Oranges & Lemons, a small, family cleaning business based in Downtown Los Angeles, California (DTLA) in operation for over 40 years. Oranges & Lemons operates while partnering with the National Domestic Workers Alliance and Hand in Hand: Domestic Employers Network.
There are 7 references cited in this article, which can be found at the bottom of the page.
wikiHow marks an article as reader-approved once it receives enough positive feedback. This article received 13 testimonials and 86% of readers who voted found it helpful, earning it our reader-approved status.
This article has been viewed 507,920 times.
If you have a water cooler/dispenser, you'll want to clean it regularly. The U.S. Department of Energy recommends cleaning the cooler with every change of the bottle, or every six weeks, whichever arrives first. Keeping the water clean is the most important part of maintaining your cooler. Fortunately, washing your dispenser requires only some time, water, and either bleach or vinegar.[1]
Steps
Preparing the Solution
-
1Pour one gallon of water into a bucket. This step is the same whether you're using a bleach or a vinegar solution. Consider a bucket with a handle, or one that is easy to manage. It's best if none of the bleach solution spills out of the container and onto the floor, or your clothes.
-
2Make the bleach solution. Add 1 tablespoon of bleach to every gallon of water that you choose to use. If possible, use an unscented bleach, as it'll be easier to flush the smell out towards the end.
- Mix the solution gently. Use disposable gloves if available (a recommended precaution, but not necessary). Be sure to do this in a space where you can afford to spill some, such as in a large sink.[2]
Advertisement -
3Make the vinegar solution.[3] For the mixture, you'll need only undiluted vinegar and a bucket. To ease the scent of the vinegar, you can choose to add a tablespoon or two of lemon juice. Mix in one part white vinegar for every three parts water. So if using a gallon of water, use 1/3 of a gallon (5 1/3 cups) of white vinegar. If including the lemon juice, add it after mixing the water and vinegar.
- As a word of caution, using vinegar is only about 80-90 percent as effective as using chlorine bleach to disinfect anything. While bottled water contains a very small amount of bacteria, it's possible for this amount to grow over time if not sanitized totally.[4]

Cleaning the Dispenser
-
1Unplug the water cooler from the wall, and remove the bottle. Make sure there's no other electronics plugged into the same outlet, or near the area where you've chosen to clean your water cooler. This avoids any possibility, however small, of water meeting live electricity.
-
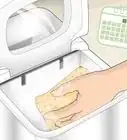
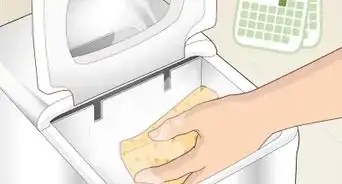
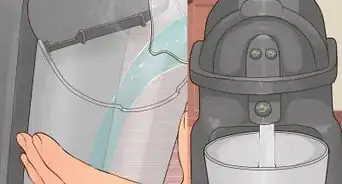
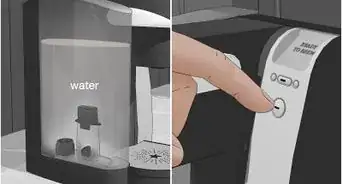
2Wet a sponge to clean the inner surface of the water cooler with the cleaning solution. Let it stand for 2-5 minutes (but no more to avoid wear and tear), then drain the solution through the tap (the cool temperature one if there are two) and into a separate container. Drain this container down a sink or toilet.
-
3Rinse out the remaining cleaning solution. Fill the inner reservoir with water four times and pour it out through the (cooler temperature) tap and into a bucket. Be thorough in this to make sure no bleach or vinegar taste is left behind.[5]
-
4Lift off the drip tray and scrub well. Wash both the tray and the screen (if present) and rinse both in clean tap water before returning them to the dispenser. Be sure to dry thoroughly so as not to leave moisture in any tight spaces.
-
5Wash your hands well, and dry the new bottle with a towel. Be sure to wash your hands before manipulating the bottle again.
-
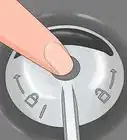
6Remove the cap and place the new bottle. Ensure a snug fit, and watch for air bubbles rising to the top of the bottle, indicating the bottle has made a seal with the dispenser.
-
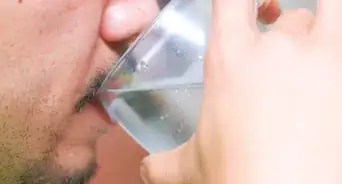
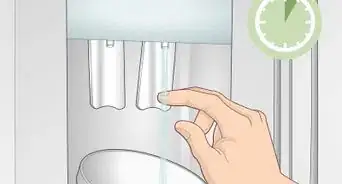
7Check that it works. Fill a glass of water, try both faucets if your dispenser has them. Taste the water to make sure no unpleasant taste has been left behind.[6]


Community Q&A
-
QuestionWill it be safe if there was black mold in the drain?
 Community AnswerBlack mold is a toxic mold. It can grow in houses and is extremely dangerous to humans. If you find any type of mold, you should not drink the water until you are 100% sure the water does not have any type of mold in it and have had the water tested.
 -
QuestionHow do I remove a cap that is stuck in the water cooler?Community AnswerIf it's the little cap/plug that the piercing spike punches when you load in a bottle, the little cap floats to the top of the jug. It can't come out because it's larger than the hole. You do not need to worry about it.
-
QuestionWill cleaning the dispenser help the water taste better?
 Community AnswerDefinitely. If it doesn't, then you may have missed some grime. Do your best to get to all of the crevices for a fresh taste.
Warnings
- Do your best never to touch the spigots themselves, to avoid contamination of another person's drinking water.⧼thumbs_response⧽
- Don't keep water more than 30 days. Like other foodstuffs, bottled water contains bacteria, however few, which can become a problem over long periods of time.⧼thumbs_response⧽


References
- ↑ https://www.bnl.gov/esh/shsd/pdf/bottled_water_hygiene_procedure.pdf
- ↑ http://www.thewaterexpress.com/How-To-Clean-Your-Water-Cooler.htm
- ↑ Melanie Garcia. Professional House Cleaner. Expert Interview. 10 October 2019.
- ↑ http://www.ci.berkeley.ca.us/uploadedFiles/Health_Human_Services/Level_3_-_Public_Health/9.%20SanitizeSafely_9.09.pdf
- ↑ http://www.drinkmorewater.com/technology/clean-water-cooler
- ↑ https://www.diamondsprings.com/page/Cleaning_Your_Water_Cooler.html
- Videos provided by ReadyRefresh
About This Article

To clean a water dispenser, unplug the cooler from the wall and remove the bottle. Use a sponge to wipe down the top of the water cooler. Then, mix 1 tablespoon of bleach into a gallon of water, and fill the inner reservoir of the cooler to the top with this mixture. Let it stand for 2-5 minutes before rinsing the water through the “cool” tap. Fill and rinse the reservoir 4 times with plain water to flush out the cleaning mixture. Clean the drip tray and replace the water bottle to finish cleaning the dispenser.