This article was co-authored by Marcus Shields. Marcus is the owner of Maid Easy, a local residential cleaning company in Phoenix, Arizona. His cleaning roots date back to his grandmother who cleaned homes for valley residents in the 60’s through the 70’s. After working in tech for over a decade, he came back to the cleaning industry and opened Maid Easy to pass his family’s tried and true methods to home dwellers across the Phoenix Metro Area.
There are 7 references cited in this article, which can be found at the bottom of the page.
This article has been viewed 150,537 times.
To keep your Cuisinart coffee maker in its best condition, you should clean it regularly with some simple household products. Whether your Cuisinart has a self-cleaning option or not, you should clean your coffee maker regularly by decalcifying the water reservoir with vinegar and washing the other pieces of the machine with warm, soapy water. With proper cleaning and maintenance, your Cuisinart coffee maker should continue to provide you with tasty coffee for years.
Steps
Cleaning the Water Reservoir
-
1Decalcify your coffee maker every 1-6 months.[1] If you use your coffee maker more than once a day, you may need to clean your water reservoir once a month to decalcify (remove hard water and mineral build ups from) the machine.[2] If you use it less frequently, however, you can wait up to 6 months between cleanings.[3] Either way, the hardness of your tap water will influence how often you need to clean your machine. If your coffee begins to taste bitter or otherwise off, it may be time to decalcify the reservoir.
- If you have a Clean button on your Cuisinart, it will begin flashing when the machine needs to be decalcified.[4]
-
2Empty the carafe and grounds. If you have any coffee remaining in the carafe, discard it and rinse the carafe with water. Remove the basket from the machine and dump out any coffee grounds or paper filters.[5]Advertisement
-
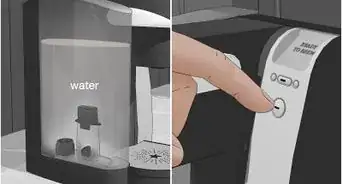
3Fill the water reservoir with 1 part white vinegar and 2 parts water.[6] Mix enough white vinegar and regular tap water to fill the reservoir to its full capacity. You can use the carafe to measure and pour the solution.[7]
- The exact amount of vinegar and water you use will depend on the size of your coffee maker. For a standard 12-cup coffee maker, you will need 4 cups of vinegar and 8 cups of water to fully fill the reservoir.
- Vinegar removes the residue inside the reservoir, and it also prevents the mold from growing.[8]
-
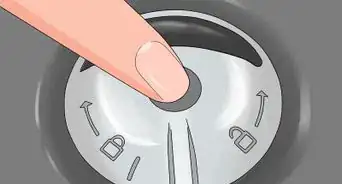
4Press the Clean button if your coffeemaker has one. Once the Clean light glows, press the On/Off button to begin the cycle. The Clean light should shine steadily to indicate that the machine is in CLEAN mode. Once the cycle is finished, the machine should beep 5 times and turn off.[9]
- The CLEAN cycle will take 2-3 times longer than your normal brew, as the machine will pause between every few cups it makes.[10]
-
5Run a brew cycle manually if your coffeemaker doesn't have a self-clean function. Once you've filled the reservoir, simply turn the machine on to run a cycle, just as if you were making a regular pot of coffee.
-
6Repeat the cycle if you can still see build-up inside the reservoir. One cycle of the vinegar-water mixture should be sufficient to clean the machine. However, if you have a particularly dirty coffee maker, you may need to run it again. Once the vinegar-water mixture has finished running and the machine has cooled, inspect the inside of the tank. If any build up remains, let the machine cool fully and then run another cycle with a fresh solution of vinegar and water.
- If your machine has a self-cleaning feature, turn the machine on again after the first cycle of vinegar and water. If the Clean light continues to flash, you should repeat the cycle with a fresh mixture of vinegar and water.[13]
-
7Run a cycle of fresh cold water to rinse. After the brew cycle has completed, discard the vinegar-water solution from the pot. Then allow the coffee maker and the carafe to cool slightly, especially if you have a glass pot. Then fill the water tank with plain fresh water (without vinegar). Run another brew cycle with just the water.[14]


Washing the Rest of the Machine
-
1Turn the coffee maker off and unplug it from the wall. If you used the machine recently, allow it to cool fully before removing pieces or beginning to wash it. Most machines will take at least 30 minutes to completely cool once they are turned off and unplugged, but some can take longer. Test yours by lightly touching the back of your hand to the body of the water reservoir after 30 minutes.[18]
- Since the base of the coffee maker includes electrical heating equipment, it can be dangerous to get the machine wet while it's plugged in. If you try to clean the machine while it's plugged in, you could damage your coffee maker or receive a nasty shock.
-
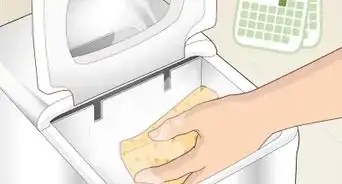
2Remove the filter basket and carafe. On most Cuisinart models, the filter basket will either lift or slide out from the machine. Discard any remaining coffee from the carafe and dump out any grounds or filters from the basket.
- If you have a model with a built-in coffee grinder, take that basket out as well. Some models may also have a removable reservoir lid that you can take off.[19]
-
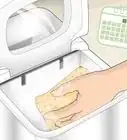
3Wash the removable items in warm, soapy water and let them dry fully. Use a sponge, soap, and warm water to wash the filter basket, carafe, and other items in your sink, just as you would wash regular dishes. Avoid using any harsh cleansers or scouring agents, such as steel wool. Rinse the pieces thoroughly and dry them before placing them back into the machine.[20] [21]
- If you have serious build-up on any of the removable pieces, fill your sink with warm, soapy dishwater and soak the items for a few minutes before washing.[22] 20-30 minutes of soaking should lift even the most stubborn build-up.[23]
- Alternatively, you can wash these items in the top rack of the dishwasher.[24]
- Once they're clean, it's best to allow the removable pieces to air-dry, since the unusual shapes can make them difficult to fully dry with a towel.
-
4
-
5Remove stains from the heating plate using soap and a damp cloth. Wipe the area where the carafe sits using a damp cloth and a small amount of dishwashing soap. Once you've removed any stubborn coffee stains, rinse the dishcloth and wipe the plate again with plain water to rinse off the soap.[29]
- Again, ensure the coffee maker is fully unplugged and cooled before touching the heating plate.
-
6Reassemble the coffee maker. Once all the elements of the machine have been cleaned and allowed time to fully dry, you can put the pieces back together. Replace the filter basket by reinserting or sliding it back in and place the carafe back onto the heating plate.
- If you have a model with a built-in grinder, replace the cleaned basket into the machine. If you removed the reservoir or carafe lids, don't forget to put those back as well.


Warnings
- Always unplug the coffee maker from the wall before cleaning the appliance or removing any parts.[30]⧼thumbs_response⧽
- Never immerse the base unit (which contains electrical equipment) in water or any other liquid.[31]⧼thumbs_response⧽
- Avoid using harsh cleansers or scouring agents (such as steel wool) to clean any part of your Cuisinart.[32]⧼thumbs_response⧽
Things You'll Need
Cleaning the Water Reservoir
- White vinegar
- Water
Washing the Rest of the Machine
- Sponge and/or dishcloth
- Dish soap


References
- ↑ James Sears. House Cleaning Professional. Expert Interview. 28 August 2019.
- ↑ https://www.goodhousekeeping.com/home/cleaning/tips/a26565/cleaning-coffee-maker/
- ↑ https://www.cuisinart.com/share/pdf/manuals/chw-12.pdf
- ↑ https://www.cuisinart.com/share/pdf/manuals/chw-12.pdf
- ↑ https://www.thekitchn.com/how-to-clean-a-coffee-maker-cleaning-lessons-from-the-kitchn-200908
- ↑ Marcus Shields. House Cleaning Professional. Expert Interview. 22 September 2019.
- ↑ https://www.cuisinart.com/share/pdf/manuals/chw-12.pdf
- ↑ Marcus Shields. House Cleaning Professional. Expert Interview. 22 September 2019.
- ↑ https://www.cuisinart.com/share/pdf/manuals/chw-12.pdf
- ↑ https://youtu.be/qjpV6wVnaYA?t=117
- ↑ James Sears. House Cleaning Professional. Expert Interview. 28 August 2019.
- ↑ https://www.thekitchn.com/how-to-clean-a-coffee-maker-cleaning-lessons-from-the-kitchn-200908
- ↑ https://www.cuisinart.com/share/pdf/manuals/chw-12.pdf
- ↑ https://www.thekitchn.com/how-to-clean-a-coffee-maker-cleaning-lessons-from-the-kitchn-200908
- ↑ James Sears. House Cleaning Professional. Expert Interview. 28 August 2019.
- ↑ https://www.thekitchn.com/how-to-clean-a-coffee-maker-cleaning-lessons-from-the-kitchn-200908
- ↑ Marcus Shields. House Cleaning Professional. Expert Interview. 22 September 2019.
- ↑ https://www.cuisinart.com/share/pdf/manuals/chw-12.pdf
- ↑ https://www.hunker.com/13419509/how-to-clean-a-cuisinart-grind-brew
- ↑ https://www.cuisinart.com/share/pdf/manuals/chw-12.pdf
- ↑ Marcus Shields. House Cleaning Professional. Expert Interview. 22 September 2019.
- ↑ https://www.hunker.com/13419509/how-to-clean-a-cuisinart-grind-brew
- ↑ Marcus Shields. House Cleaning Professional. Expert Interview. 22 September 2019.
- ↑ https://www.hunker.com/13419509/how-to-clean-a-cuisinart-grind-brew
- ↑ James Sears. House Cleaning Professional. Expert Interview. 28 August 2019.
- ↑ https://www.cuisinart.com/share/pdf/manuals/chw-12.pdf
- ↑ https://www.hunker.com/13419509/how-to-clean-a-cuisinart-grind-brew
- ↑ https://www.cuisinart.com/share/pdf/manuals/chw-12.pdf
- ↑ https://www.hunker.com/13419509/how-to-clean-a-cuisinart-grind-brew
- ↑ https://www.cuisinart.com/share/pdf/manuals/chw-12.pdf
- ↑ https://www.cuisinart.com/share/pdf/manuals/chw-12.pdf
- ↑ https://www.cuisinart.com/share/pdf/manuals/chw-12.pdf
About This Article