This article was co-authored by wikiHow staff writer, Rain Kengly. Rain Kengly is a wikiHow Technology Writer. As a storytelling enthusiast with a penchant for technology, they hope to create long-lasting connections with readers from all around the globe. Rain graduated from San Francisco State University with a BA in Cinema.
The wikiHow Tech Team also followed the article's instructions and verified that they work.
This article has been viewed 1,342,154 times.
Learn more...
Do you need to change or set up your computer's BIOS settings? The BIOS (Basic Input/Output System) boots up your computer and manages the data flow between the operating system (OS) and attached devices. Since the BIOS is tied to a computer's motherboard, the appearance of each computer's BIOS will vary slightly depending on the manufacturer. You should only configure the BIOS settings if you're absolutely certain about the changes. This wikiHow will show you how to access and modify the BIOS page for your Windows 8, 10, or 11 computer.
Things You Should Know
- Never make changes to your BIOS unless you're confident on what it will do.
- To access the BIOS, turn on your computer and press the startup key. In most cases, this is "F2" or "Del".
- Change BIOS settings by using the arrow keys on your keyboard and "Enter".
Steps
Entering the BIOS on Startup
-
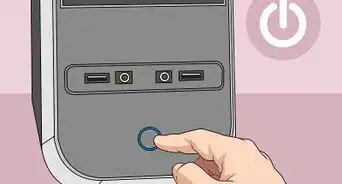
1Turn on your computer. You'll only be able to access the BIOS upon startup.[1]
- If your computer is already on, you'll need to restart your computer.
-
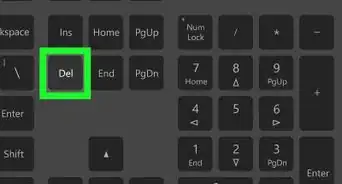
2Press Del or F2 to enter setup. You can press and hold or repeatedly press this button. The setup button is usually Del or F2, but this could vary depending on your device.
- Here's a list of some of the most common setup keys by manufacturer:
- Acer: F2 or DEL
- ASUS: F2 or Del
- Dell: F2 or F12
- HP: ESC or F10
- Lenovo: F2 or Fn + F2
- Lenovo Desktops: F1
- Lenovo ThinkPads: Enter + F1.
- MSI: DEL for motherboards and PCs
- Microsoft Surface Tablets: Press and hold the volume-up button.
- Origin PC: F2
- Samsung: F2
- Sony: F1, F2, or F3
- Toshiba: F2
- It's best to start pressing the setup key as soon as the computer begins to restart.
- If you see "Press [key] to enter setup" or something similar flash across the bottom of the screen and then disappear, you'll need to restart your computer and try again.
- Look at your computer model's manual or online support page to confirm your computer's BIOS key.
Advertisement - Here's a list of some of the most common setup keys by manufacturer:
-
3Wait for your BIOS to load. After successfully hitting the setup key, the BIOS will load. This should only take a few moments. When the loading is complete, you will be taken to the BIOS settings menu.
- You can now update your computer's BIOS.
- This is the quickest way to enter the BIOS, but you can also access the BIOS through the Windows Settings.


Entering the BIOS with Settings
-
1Open Settings on your computer. Click the Start menu, then click the cog icon to open Settings.
- Use this method to enter the BIOS from your Windows Settings rather than a setup key.
-
2Click Update & Security. This will be towards the bottom of the screen.
-
3Click Recovery. This is in the left panel, underneath Troubleshoot.
-
4Click Restart now. This will be underneath the Advanced startup header.
- Your computer will restart, then load a special menu.
-
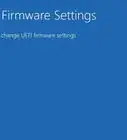
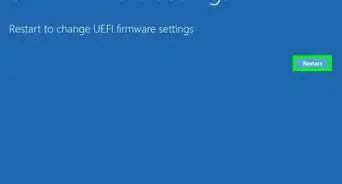
5Click Troubleshoot. Within the Troubleshoot window, select Advanced Options, then UEFI Firmware Settings.
-
6Click Restart. Your computer will restart and enter the BIOS.


Adjusting BIOS Settings
-
1Familiarize yourself with the BIOS controls. Since BIOS menus don't support mouse input, you'll need to use the arrow keys and other computer-specific keys to navigate the BIOS. You can usually find a list of controls in the bottom-right corner of the BIOS homepage.
-
2Change your settings carefully. When adjusting settings in your BIOS, be sure that you certain what the settings will affect. Changing settings incorrectly can lead to system or hardware failure.
- If you don't know what you want to change coming into the BIOS, you probably shouldn't change anything.
-
3Change the boot order. If you want to change what device to boot from, enter the Boot menu. From here, you can designate which device the computer will attempt to boot from first. This is useful for booting from a disc or flash drive to install or repair an operating system.
- You'll typically use the arrow keys to go over to the Boot tab to start this process.
-
4Create a BIOS password. You can create a password that will lock the computer from booting unless the correct password is entered.
- You can always reset your BIOS password later.
-
5Change your date and time. Your BIOS’s clock will dictate your Windows clock. If you replace your computer's battery, your BIOS clock will most likely be reset.
-
6Change fan speeds and system voltages. These options are for advanced users only. In this menu, you can overclock your CPU, potentially allowing for higher performance. This should be performed only if you are comfortable with your computer’s hardware.
-
7Save and exit. When you are finished adjusting your settings, you will need to save and exit by using your BIOS' "Save and Exit" key in order for your changes to take effect. When you save and restart, your computer will reboot with the new settings.
- Check the BIOS key legend to see which key is the "Save and Exit" key.


Community Q&A
-
QuestionI cannot change my BIOS settings. I can still access it, but it's all grayed out. I can only change the date and time. What can I do to fix this?
 TFGCommunity AnswerIf all your BIOS items are grayed out (but you can still access it), you probably have the administrator (or setup) password set. To unlock your BIOS, go to the Security tab , find the "Unlock Setup" (or similar) row and type your password into the box. Note that if you enter the password wrong 3 times, you will have to restart your computer, enter the BIOS and then try again.
 -
QuestionHow can I bypass the BIOS setup screen so that my PC will start up more quickly?
 Community AnswerYou simply cannot. Starting BIOS is a vital part of the start up process of your computer, so you can't skip it.
 -
QuestionHow do I access BIOS in Windows 8.1?Community AnswerThe BIOS depends on your computer's hardware. Try doing a Google search for how to access the BIOS for your computer.
Warnings
- Don't change any settings that you aren't sure about.⧼thumbs_response⧽
- If you are going to flash the BIOS after, do not attempt this. If you have already changed settings, you must reset your BIOS.⧼thumbs_response⧽


About This Article