This article was co-authored by Mia Danilowicz and by wikiHow staff writer, Hunter Rising. Mia Danilowicz is a Master Tailor who works onset and on the red carpet in Los Angeles, California. With over a decade of experience, Mia specializes in bridal and gown couturier fittings, garment reconstruction, and custom design. Mia has worked at the Oscars, Grammys, SAG Awards, and Golden Globes. Her clients include a long list of entertainment and fashion industry headliners, major fashion magazines, luxury consumer brands, and popular media. Mia was trained at the Fashion Institute of Design and Merchandising and received her AA in Fashion Design and BS in Business Management.
There are 15 references cited in this article, which can be found at the bottom of the page.
This article has been viewed 39,565 times.
You’ve probably used Velcro on clothes or shoes before, but there are so many other uses for it around your home. You can use it to hang decorations, to keep your rug from moving around, or to organize a drawer.[1] Adhesive-backed Velcro works great on most indoor and outdoor smooth surfaces. Sew-on strips are perfect for clothing and fabric accessories, but iron-on Velcro is better for thick fabrics or fabrics that are difficult to sew. We’ll walk you through how to use these 3 types of strips so you’re able to keep your items secure!
Steps
Adhesive-Backed Strips
-
1Clean and dry the surfaces where you want to place your Velcro. The adhesive on your strips won’t stick very well if the surfaces are dirty. You can use any multi-surface cleaner to wipe the items you’re attaching the Velcro to. After cleaning off any dust or residue, dry the surfaces completely with a clean cloth.[2]
- Rough up a smooth surface with fine-grit sandpaper for an extra secure hold.
-
2Peel the backing off of one strip. The Velcro’s hook side and loop side will each have their own adhesive backing. Peel the protective sheet off the strip to expose the adhesive underneath. Once you take the backing off, be careful not to touch the sticky sides, or else they might not adhere very well.[3]Advertisement
-
3Press the first strip onto your item. You can use the hook or loop strip on either surface, so it doesn’t matter which one you use right now. Line the strip up with where you want to place it and push it firmly against the surface. Press down on the strip with your palm to make sure it’s flat.[4]
- Adhesive strips don’t work well on fabrics, vehicle dashboards, or flexible vinyl. They may also come loose if they’re left in direct sunlight.
-
4Place the second strip on the second object. Peel off the adhesive from the other strip and position it on the second item. Press the strip down firmly so it makes good contact with the material.[5]
-
5Wait 24 hours for the strongest adhesion. While you can attach the Velcro strips to one another right away, it won’t quite hold at full strength. If you’re worried about the adhesive coming undone, then give it at least a day before putting the strips together.[6]
- Adhesive Velcro strips won’t stick as well if you peel them off and try reusing them.

Sew-On Strips
-
1Cut the Velcro strip to the size you need. Velcro strips work perfectly to secure fabrics without using a button or zipper. Since sew-on Velcro comes in a roll, measure the area of the fabric where you want to attach the strip.[7] Use a pair of scissors to cut the strip to size.[8]
- You can buy sew-on Velcro strips online or from big box stores and craft stores.
-
2Put the hook strip on the side of the garment facing away from your skin.[9] The hook strip is the scratchy side of the Velcro that holds onto the loop, or soft, side. Since it’s easier to pull the loop strip off of the hooks, set the hook strip on the garment so it points away from your body.[10]
- If you’re not attaching the Velcro to clothing, then it doesn’t matter which strip you use.
-
3Sew around the edges of the strip.[11] You can either sew by hand or use a sewing machine to attach the Velcro. Go around each edge of the strip with your needle and thread so the Velcro doesn’t lift up off of the fabric. Be sure you backstitch the seam to make it more secure.[12]
- Try using the same color thread as the Velcro so it blends in.
- You can also sew an X through the center of the Velcro to keep it flat against the fabric.[13]
-
4Attach the other strip of Velcro to the second piece of fabric. Position the second strip on your fabric so it lines up with the first piece when you fasten them together.[14] Use your sewing machine or sew by hand to secure the edges of the strip. Backstitch the Velcro so it’s less likely to tear off after using it repeatedly.[15]
- You can wash and dry the fabric immediately after you sew the Velcro to it.

Iron-On Strips
-
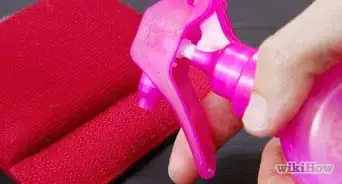
1Wash and dry the fabric. The adhesive on the back of your Velcro strip won’t stick very well if there’s dirt or residue on the fabric, so toss the garment in with your regular laundry. Make sure the fabric feels completely dry before you start, or the strip could come undone.[16]
-
2Heat up a steam iron to the highest heat setting. Fill up your iron with water and turn on the steam setting. Set your iron to the highest heat and let it warm up completely before you start working.[17]
- Make sure you use an ironing board and keep the oven in a heat-safe place so it doesn’t burn anything.
-
3Peel the backing off of the Velcro strip. The iron-on Velcro has a protective backing on both the hook and loop pieces. Only remove the backing off of 1 piece at a time so it’s easier to work with. Once you remove the backing, don’t touch the exposed adhesive or it might not stick against the fabric well.[18]
-
4Press the adhesive strip onto the piece of fabric. If you’re putting the Velcro on a garment, attach the scratchy hook side so it points away from your body. Otherwise, you can use either of the strips. Line the Velcro strip up on the fabric and push down on it firmly so it stays in place.[19]
-
5Flip the fabric over. Since the adhesive is heat-activated, it adheres best when you iron it from behind. Turn your fabric over so the Velcro presses against your ironing board.[20]
- Never iron the front side of the Velcro since you could damage it.
-
6Iron the back of the strip for 90 seconds. Press your iron firmly against the fabric, and rub it back and forth to apply heat. Lift up the iron every few seconds so you don’t burn or damage your fabric. After about 90 seconds, let the fabric cool down.[21]
- If you’re attaching Velcro to delicate fabric, lay a press cloth over the actual fabric for an additional layer of protection.
-
7Try lifting an edge to see if the Velcro stays secure. Since all steam irons are different, you may not have fully secured the Velcro on the first pass. Pick at an edge with your finger to see if it moves. If the edge stays in place, then you’re finished! If it peels back, go over it with your iron before checking again.[22]
- Wait 24 hours after attaching the Velcro to wash or dry your fabric again. When you do, close the fastener so lint doesn’t get caught in it.


Expert Q&A
-
QuestionWhat type of velcro should I use when sewing?
 Mia DanilowiczMia Danilowicz is a Master Tailor who works onset and on the red carpet in Los Angeles, California. With over a decade of experience, Mia specializes in bridal and gown couturier fittings, garment reconstruction, and custom design. Mia has worked at the Oscars, Grammys, SAG Awards, and Golden Globes. Her clients include a long list of entertainment and fashion industry headliners, major fashion magazines, luxury consumer brands, and popular media. Mia was trained at the Fashion Institute of Design and Merchandising and received her AA in Fashion Design and BS in Business Management.
Master TailorThere's several different types of velcro you can purchase. There is the adhesive velcro that already has glue on the back, and there is also the self-fastening velcro that you should use when sewing. Make sure you purchase the right type, as velcro with adhesive can get into your needle and mess up the sewing process. -
QuestionWhich side of Velcro goes on fabric?Mia DanilowiczMia Danilowicz is a Master Tailor who works onset and on the red carpet in Los Angeles, California. With over a decade of experience, Mia specializes in bridal and gown couturier fittings, garment reconstruction, and custom design. Mia has worked at the Oscars, Grammys, SAG Awards, and Golden Globes. Her clients include a long list of entertainment and fashion industry headliners, major fashion magazines, luxury consumer brands, and popular media. Mia was trained at the Fashion Institute of Design and Merchandising and received her AA in Fashion Design and BS in Business Management.
Master TailorPlace the outer, smooth side of the Velcro on the fabric. Make sure the first piece goes on the side of the fabric that faces away from your skin. Then, apply the second piece of Velcro on the spot where the garment will attach.
Warnings
- Adhesive Velcro strips aren’t as effective on fabrics, dashboards, or flexible vinyl. It may also come undone if they’re left in direct sunlight.[24]⧼thumbs_response⧽
Things You’ll Need
Adhesive-Backed Strips
- Multi-surface cleaner
- Cleaning cloth
Sew-On Strips
- Scissors
- Thread
- Sewing needle
- Sewing machine (optional)
Iron-On Strips
- Iron
- Ironing board


References
- ↑ https://www.bobvila.com/slideshow/12-ways-to-hack-your-life-using-velcro-48802
- ↑ https://www.anixter.com/content/dam/Suppliers/Velcro/Adhesive%20Guide.pdf
- ↑ https://www.velcro.com/wp-content/sc_media/Files/TargetPDFs/us/velcro-brand-adhesive-guide.pdf
- ↑ https://youtu.be/LTKJBZIRjCg?t=10
- ↑ https://www.velcro.com/support/application-instructions/
- ↑ https://www.velcro.com/support/application-instructions/
- ↑ Mia Danilowicz. Master Tailor. Expert Interview. 8 January 2021.
- ↑ https://youtu.be/L2kvHL-gOrk?t=44
- ↑ Mia Danilowicz. Master Tailor. Expert Interview. 8 January 2021.
- ↑ https://www.velcro.com/business/customer-service/application-guidelines/
- ↑ Mia Danilowicz. Master Tailor. Expert Interview. 8 January 2021.
- ↑ https://youtu.be/1xcD9PTc3p8?t=13
- ↑ https://youtu.be/tfL4TvJAkFU?t=249
- ↑ Mia Danilowicz. Master Tailor. Expert Interview. 8 January 2021.
- ↑ https://youtu.be/tfL4TvJAkFU?t=367
- ↑ https://www.velcro.com/products/halloween/900200__iron-on/
- ↑ https://www.joann.com/on/demandware.static/-/Sites-joann-project-catalog/default/dwa7e89090/images/hi-res/project/pdf/0565874P66.pdf
- ↑ https://www.velcro.com/support/application-instructions/
- ↑ https://www.velcro.com/support/application-instructions/
- ↑ https://www.velcro.com/products/halloween/900200__iron-on/
- ↑ https://www.joann.com/on/demandware.static/-/Sites-joann-project-catalog/default/dwa7e89090/images/hi-res/project/pdf/0565874P66.pdf
- ↑ https://www.velcro.com/support/application-instructions/
- ↑ https://www.joann.com/on/demandware.static/-/Sites-joann-project-catalog/default/dwa7e89090/images/hi-res/project/pdf/0565874P66.pdf
- ↑ https://www.velcro.com/support/application-instructions/
About This Article