This article was co-authored by Alana Schober. Alana Schober is a Professional Makeup Artist at Pout by Lipsticknick, an inclusive beauty bar in Los Angeles, California. With over a decade of experience, Alana specializes in hair and makeup. As a Licensed Comselotologist, she has worked for both MAC Cosmetics and Paul Mitchell. Alana's celebrity clientele includes Iggy Azalea, Solange, YG, and ASAP Nast. She has worked on campaigns with Nike, Adidas, Morphe, Jaclyn Hill Cosmetics, and Quay. Alana has also worked on countless music videos and photoshoots and her work has been featured on two billboards in Los Angeles.
wikiHow marks an article as reader-approved once it receives enough positive feedback. This article received 19 testimonials and 80% of readers who voted found it helpful, earning it our reader-approved status.
This article has been viewed 2,613,312 times.
Contouring your face helps define your features, creating the appearance of higher cheekbones and a slimmer nose and chin. It's a technique that was popularized by celebrity makeup artists, but with the right products and equipment it's easy to do on your own. Once you've applied your contouring makeup, remember to blend well for a flawless, natural look.
Things You Should Know
- For contouring, you'll need foundation that matches your skin tone, plus foundation that's a few shades lighter and a few shades darker.
- Use the lighter foundation to highlight the parts of your face you want to stand out.
- Use the darker foundation to shade in the parts of your face you want to recede.
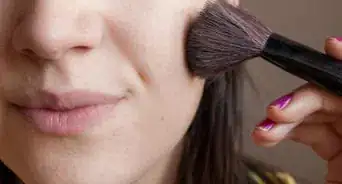
- A big, fluffy blending brush will help you achieve a blended, flawless look.
Steps
Contour Makeup Cheat Sheet
Getting the Right Products
-
1Start with foundation the color of your skin. Using a foundation the same (or close) color as your skin evens your skin tone and provides a base you can build upon when you contour using your lightest and darkest shades. Contouring your face without first applying foundation is much more difficult, since skin tends to be uneven in color. Your face could end up looking patchy instead of smooth and contoured.[1]
- Use a foundation composed of the same material as the other products you'll be using; for example, use all cream products or all powder products, rather than mixing the two. Mixing textures can result in a caked-on look. The only exception is your finishing layer of powder, which you, either way, to help your look last longer.
- If you're having trouble figuring out what color to get, try matching your foundation to the skin on your neck. Your neck skin tends to be a bit paler than your face, and matching your foundation to your neck will ensure your face doesn't end up looking darker when you're finished doing your makeup.
-
2Get foundation a few shades lighter than your skin. Facial contouring consists of highlighting places you want to stand out, and shading places you want to recede. For your highlighting product, you need a foundation that's about two shades paler than your base foundation.
- Don't go much lighter than two shades, or your makeup won't look natural.
- You can use a lighter concealer or eye shadow in place of foundation.
Advertisement -
3Choose a foundation a few shades darker than your skin. The darker tone will be used to shade the parts of your face that you want to draw attention away from. You'll be creating strategic shadows that make your cheekbones appear sharper and your chin more narrow.
- Don't go darker than two shades below your normal skin tone, or your makeup won't look natural.
- Bronzer, darker eye shadow or darker concealer work as well as foundation. Just remember to make sure all your products are either cream or powder; don't mix the two.
-
4Get a good blending brush. Since your face will be wearing several different shades, it's important to get a good blending brush. If the different colors aren't well-blended your makeup will look unnatural. You want a big, bushy foundation brush or blending brush, rather than a smaller brush. Go for one with natural bristles to leave the softest-looking finish.
- If you don't have a brush, the next best tool to use is your fingers. The warmth from your fingers will help the makeup blend smoothly. This is especially useful when you're working with the cream foundation.
Contouring Your Face
-
1It is better to pull your hair away from your face. Contouring makeup reaches up to your hairline at the top of your forehead, past your temples and down the sides of your face. Pull your hair away from your face so you'll be able to see what you're doing without it getting in the way.
-
2Prep your face. When you contour your face, you want to start with a completely blank canvas. Remove all your makeup, wash your face, and pat it dry with a towel. Exfoliate if necessary to remove dead skin, then apply moisturizer. Let your moisturizer soak in for several minutes before you apply your makeup.
- Prepping is essential if you want a smooth, flawless finish. You don't want to go to the trouble of contouring your face, only to have your makeup smudge or look dirty.
-
3Apply foundation in your regular skin tone. Use your fingers or a foundation brush to apply a light layer of your normal foundation all over your face, stretching all the way to the top of your forehead and below your chin. Use a blending brush or your fingers to blend your foundation under your chin and around your neck so there won't be a line separating your face from your neck.
- You may want to apply concealer at this stage as well. Focus on under-eye circles and any blemishes.
-
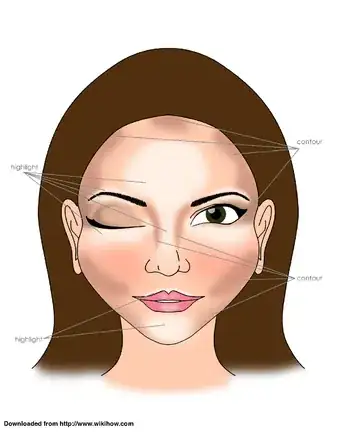
4Apply the lighter foundation. Take the foundation that's a few shades lighter than your normal skin tone. Use your finger or a clean foundation brush to apply a 1/2- inch to 1-inch stroke of foundation to the places on your face where the sun would naturally hit. To help you figure out where the sun would hit, stand in a well-lit room with overhead lighting and look at where it hits your face. Here's where you want to apply light foundation:
- In the center of your forehead.
- Along the top of your brow lines.
- Along the bridge of your nose.
- On the apples of your cheeks (to find them, smile).
- On your cupid's bow (the section between the tip of your nose and the top of your lip).
- In the center of your chin.
-
5Apply the dark foundation. Apply your contour in the shape of a 3, starting from your forehead, coming in just under your cheekbones and going down towards your chin. These are the places your face would naturally be shadowed from the sun. Here's where you want to apply the dark foundation:
- Right below your hairline at the top of your forehead.
- On the right and left sides of your forehead, near your hairline on either side.
- Along the right and left sides of your nose.
- In the hollows of your cheeks (to find them, suck your cheeks in).
- Along your jawline on both sides, from your ears to the tip of your chin.
-
6Blend your makeup well. Use your fingers or the foundation brush to blend the colors for a natural finish.[2] Take care not to spread the colors around too much; you want them to stay in the general area where you placed them. Make sure the edges are blended well so that there are no sharp divisions between the lighter and darker foundation.
- Always blend your contour upward. After all the whole point of a contour is to lift your cheekbone up.[3]
Finishing the Look
-
1Consider adding highlighter. If you want the light areas to stand out even more, add a highlighter product to enhance the look. Cream highlighter is slightly shimmery, so it catches the light more than regular foundation. Apply it in the exact same places where you applied the lighter foundation.
-
2Consider applying blush. If you feel your face looks a little wan without some pink color, apply a small amount of blush to the apples of your cheeks. Be sure to blend the blush well with the other products on your face.
-
3Consider using a matte setting powder. Setting powder is helpful to use when your products are cream-based. It helps to keep everything in place and gives the look a smooth finish. Use a clean powder brush to add a light coating of setting powder over your entire face.
-
4Add shimmer for a night out. If you're going out on the town, you may want to add some shimmer and shine. Choose a shimmery, translucent face powder an apply a light layer to your face, focusing on the highlighted areas. Apply a bit to your neck and chest as well.
-
5Save your eye and lip makeup for last. Make sure everything is completely blended and set before you start applying eye and lip makeup. Contouring is a bold look, so you may want to choose either heavy eye makeup or a bright lip, but not both.[4]
-
6Finished.
Expert Q&A
Did you know you can get premium answers for this article?
Unlock premium answers by supporting wikiHow
-
QuestionDo you contour with powder or cream?
 Alana SchoberAlana Schober is a Professional Makeup Artist at Pout by Lipsticknick, an inclusive beauty bar in Los Angeles, California. With over a decade of experience, Alana specializes in hair and makeup. As a Licensed Comselotologist, she has worked for both MAC Cosmetics and Paul Mitchell. Alana's celebrity clientele includes Iggy Azalea, Solange, YG, and ASAP Nast. She has worked on campaigns with Nike, Adidas, Morphe, Jaclyn Hill Cosmetics, and Quay. Alana has also worked on countless music videos and photoshoots and her work has been featured on two billboards in Los Angeles.
Pout Pro Makeup Artist
-
QuestionWhat can I use instead of countour if I am completely out of my contour powder?
 Camille SangheraCamille Sanghera is the Owner of Lash Envy Cosmetics and Esvee Beauty in the Vancouver, British Columbia area. Camille is trained and certified in microblading, scalp micropigmentation, eyelash extensions, hair and makeup, and lash lifts. She is listed on Microblading Map Canada and has also been featured on TuneIn Radio and in Bridal Fashion Week Magazine.
Beauty Stylist
-
QuestionHow do you blend in contour?
 wikiHow Staff EditorThis answer was written by one of our trained team of researchers who validated it for accuracy and comprehensiveness.
Staff Answer wikiHow Staff EditorStaff AnswerTo blend in contour makeup, use your fingertips or a foundation brush to merge the colors and leave a natural look. When you’re blending, it’s important to not overdo it so the contour color is spread too far away from where it was originally applied or you’ll lose the contouring effect. Take care to blend it in smoothly so there are no visible lines between the contour makeup and surrounding makeup. Step 6 of Part 2 above will provide more detail on ways to highlight your face to boost the effects of the contouring makeup.
References
- ↑ http://www.cosmopolitan.com/style-beauty/beauty/how-to/a16281/how-to-contour-makeup-tutorial/
- ↑ Alana Schober. Pout Pro Makeup Artist. Expert Interview. 15 June 2021.
- ↑ Alana Schober. Pout Pro Makeup Artist. Expert Interview. 15 June 2021.
- ↑ http://makeup.allwomenstalk.com/face-contouring-tips-from-the-experts-that-will-help-you-flaunt-your-best-features/7/
- Videos provided by Jennifer Chiu
About This Article
Before you apply contour makeup, apply a foundation the same color as your skin all over your face. Choose a foundation or concealer that’s a few shades lighter than your normal skin tone and apply it anywhere the sun would naturally hit, like the center of your forehead and the apples of your cheeks. Next, choose a darker shade and apply in the shape of a 3 to the top of your forehead, down to the hollows of your cheeks, and along your jawline. Blend your contour very well with a soft brush. Keep reading for tips on finishing your look!
