This article was co-authored by wikiHow Staff. Our trained team of editors and researchers validate articles for accuracy and comprehensiveness. wikiHow's Content Management Team carefully monitors the work from our editorial staff to ensure that each article is backed by trusted research and meets our high quality standards.
This article has been viewed 69,017 times.
Learn more...
Wet-sanding is a technique that’s used to give wood a fine, smooth finish. It’s important to varnish the wood and dry-sand it carefully first. You’ll also want to choose wet sandpaper and soak it for a while before you use it. Always keep the sandpaper wet, and sand in gentle circles. Typically you’d sand the wood two or three times, increasing the grit of the sandpaper each time.
Steps
Finishing and Dry-Sanding Wood
-
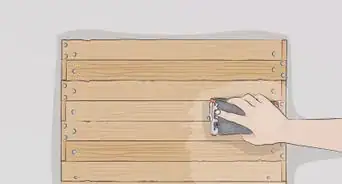
1Apply several coats of varnish or lacquer to the wood. Sanding is taking off a thin layer of finish or wood to smooth it out. Before you dry sand and wet sand, apply lacquer or varnish, depending on your preference. Use a brush or a rag to apply the finish. Make sure you apply enough finish or you’ll sand right through it.[1]
- The finish that you choose is mostly personal preference. Oil-based varnish, oil-based polyurethane, and water-based polyurethane are common finishes.
- Most of the time softwoods take three coats and hardwoods take two to three coats of finish.
-
2Let the varnish or lacquer cure overnight. Follow the specific instructions on the finish you choose, but typically the finish will need to dry for about an hour between coats. Then let it cure overnight before you begin sanding it.Advertisement
-
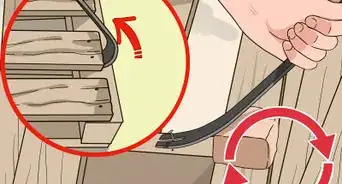
3Dry-sand the wood. Use an electric sander or hold the sandpaper with your hands. Either way, start with 80 grit sandpaper and progress to 100 grit and then 120 grit. If the wood feels fairly smooth when you rub it, you’re ready to wet sand. Otherwise, continue dry-sanding with 150 and 180 grit.
- Dry-sanding knocks down the roughness to a point where wet-sanding is most effective. It’s pointless to wet-sand if you don’t dry-sand first.
- If you use an electric sander, read the operator’s manual carefully and use it with caution. If you sand by hand, use gentle forward and backward motions all the way across the piece.
-
4Clean the dust off of the wood. The most effective way to remove dust is to blow it off with a can of compressed air or a powered air compressor. In a pinch, vacuum the dust off or attach the hose to the blower of the vacuum and blow the dust off.[2]
- If you have no other option, get a clean rag and dampen it with water. Gently wipe the wood to remove the dust. Be sure to let it dry before you continue.


Choosing Your Sandpaper
-
1Choose wet or wet/dry sandpaper. Wet-sanding is not done with the same type of sandpaper as traditional dry-sanding. Wet sandpaper is designed to hold up when wet, while dry sandpaper is not. Wet sandpaper also comes in a much finer (higher numbered) grit, which produces a smoother finish.[3]
- Sanding sponges are commonly used because they conform to the surface better than sandpaper does. Feel free to use these, but keep in mind they might not have the grit you need.
-
2Select high-grit wet sandpaper. Besides using wet sandpaper, you need to make sure to get a high grit to ensure a fine smoothness. The lowest grit you should use is 200, but you’ll find up to about 2000 grit. It comes down to how much time you have available and your preference.[4]
- For example, purchase wet sandpaper that’s 250, 500, 750, and 1000 grit. Start with the lowest, and increase the grit as you go if you want the wood smoother.
- You may find that the second round of wet-sanding does not seem to make the wood any smoother. In this case, stop after using the 500 grit paper.
-
3Soak the sandpaper in water overnight. No matter what you do, the sandpaper will dry out as you use it. To keep it wet longer, soak it overnight so it absorbs as much water as possible. If you are in a rush, soak it for at least 15 minutes while you get everything set up.[5]
- This is not mandatory, because you’ll still dip it in lubricant when you start, but soaking is best when you have the time.


Wet-Sanding the Wood
-
1Dip the sandpaper in lubricant before you sand. While soaking the sandpaper is helpful to prepare it, you still need to dip it in lubricant on occasion as you sand. Mix a solution of water and dish soap for an effective lubricant. Mineral spirits also work well.[6]
- You don’t need to keep the sandpaper dripping wet, but make sure that it doesn’t go dry while you work. Wet the paper again every few minutes, as a general rule.
-
2Wrap the sandpaper around a wood block or sponge. To make sure a few square inches (20 sq. cm) of sandpaper remains in contact with the wood, use a block or sponge. If you simply hold the sandpaper in your hand, you won’t cover as much area.[7]
- Again, this is not absolutely necessary, but it is the most efficient way to sand wood.
-
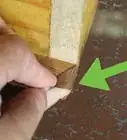
3Sand the surface with circular motions. Holding the sandpaper against the wood, apply a small amount of pressure. Move your hand in circular motions. It is not necessary to follow the grain of the wood while you sand. Make sure to keep your hand moving along the wood, rather than staying in one spot.
- Each spot only needs one or two circular swipes.
-
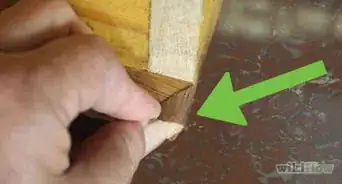
4Work in a pattern so that you sand the wood evenly. Start in a corner of the piece of wood and work along one edge to the other side. Then move down the wood a bit and sand back across toward the corner you started at. Repeat this pattern, sanding from side to side, until you have covered the entire surface.
-
5Increase the grit of the sandpaper as you go. After giving the entire surface an even sanding with the first grit, run your hand across it. If it feels smooth enough to you and it looks good, leave it alone. If you want it smoother, grab a higher grit and repeat the process.
- Each piece of sandpaper should be soaked and kept wet with mineral spirits or water and dish soap.
-
6Clean the wood off when you have finished sanding. Even wet-sanding is sure to leave some dust on the surface of the wood. Use the compressed air or vacuum you used before to remove all of the dust from the wood. In a pinch, use a slightly dampened cloth to clean the wood.
-
7Apply a sealer if you want to. Your wood will be smooth after you wet-sand, but you may want to add more gloss or waterproofing. Use a wood sealer of your choice. Make sure it will go over the finish you already used. Apply it with a rag or paper towel so you don’t leave brush strokes.


Things You’ll Need
- Wood
- Finish (varnish or lacquer)
- Brush/rag
- Dry sandpaper (80-180 grit)
- Electric sander (optional)
- Compressed air/vacuum
- Wet sandpaper/sanding sponge (250-1000 grit)
- Water and dish soap/mineral spirits
- Wood block/sponge
- Sealer (optional)


References
- ↑ http://www.highlandwoodworking.com/woodworking-tips-1202feb/alannoel.html
- ↑ http://www.woodmagazine.com/materials-guide/sanding/wet-sanding
- ↑ http://makezine.com/2016/05/10/wet-sanding-gives-your-projects-a-scratch-free-finish/
- ↑ http://www.highlandwoodworking.com/woodworking-tips-1202feb/alannoel.html
- ↑ http://makezine.com/2016/05/10/wet-sanding-gives-your-projects-a-scratch-free-finish/
- ↑ http://www.highlandwoodworking.com/woodworking-tips-1202feb/alannoel.html
- ↑ http://makezine.com/2016/05/10/wet-sanding-gives-your-projects-a-scratch-free-finish/
About This Article

Wet-sanding your wood helps to give it a fine, smooth finish. You’ll need specifically designed wet-sandpaper or sandpaper that can be used for wet and dry work. Use at least 200-grit paper. Before you can wet-sand your wood, you’ll need to apply a varnish or lacquer and leave it to cure overnight. Soak your sandpaper of choice in water overnight while your wood is curing. Then, dry-sand your wood with regular sandpaper, starting with 80-grit and working your way up to 180 or until the surface is smooth. After that, dip your wet-sandpaper in soapy water or mineral spirits to lubricate it. Wrap it around a wooden block or sponge and buff your wood surface with circular motions. Use increasingly course sandpaper for an even smoother finish. For more tips, including how to seal your wood after wet-sanding it, read on!