This article was co-authored by Laila Ajani. Laila Ajani is a Fitness Trainer and founder of Push Personal Fitness, a personal training organization based in the San Francisco Bay Area. Laila has expertise in competitive athletics (gymnastics, powerlifting, and tennis), personal training, distance running, and Olympic lifting. Laila is certified by the National Strength & Conditioning Association (NSCA), USA Powerlifting (USAPL), and she is a Corrective Exercise Specialist (CES).
There are 11 references cited in this article, which can be found at the bottom of the page.
This article has been viewed 74,230 times.
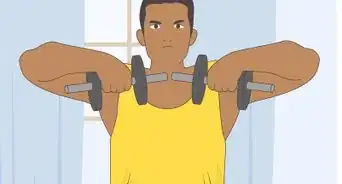
A deadlift is a body-building exercise in which you lift a barbell from the floor to your mid-thigh. Wrist straps are a piece of fabric, one side of which wraps around your wrist, and the other side of which wraps around the barbell you’re lifting. Wrist straps can help you deadlift heavy weights by strengthening your grip and taking some of the weight off of your hands. Using straps, you’ll tire out your grip strength more slowly and be able to keep a good posture for a higher-rep set.[1]
Steps
Putting on Wrist Straps
-
1Make a loop by slipping 1 end of the wrist strap through the other. The wrist strap will be about 2 feet (61 cm) long. One of the ends will have a 2 in (5.1 cm) hole on it, while the other will not. Hold the end with a hole and stick the un-looped end through. Feed about 10 inches (25 cm) of the strap through the small loop.[2]
- Doing this will turn the wrist strap into a large loop about 5 inches (13 cm) across.
-
2Slide your hand through the loop. Shut your hand and slide it through the loop you created in the wrist strap. Slip the strap around the base of your hand. The dangling strap should be hanging down across your palm and hanging past your fingertips. If the cross is on the back of your hand, flip the strap around 180 degrees.[3]
- You can begin with whichever hand you prefer. If it’s easier, start with your non-dominant hand so you can use your dominant hand to put on the strap.
Advertisement -
3Tighten the loop around the base of your hand. Pull on the hanging end of the wrist strap until the loop is snug around your hand. The strap should be tight enough to stay in place but not so tight that it restricts your circulation. Wear the strap relatively low on your hand, in between the base of your thumb and your wrist bone.[4]
- Do not tighten the strap around your wrist. If the strap is too high, it could injure your wrist while you’re lifting.
-
4Apply the second strap to your other hand. Repeat the same steps to apply the second wrist strap to your other hand. Form the strap into a large loop, and pass your hand through. Keep the dangling loose end of the strap hanging downward in front of (not behind) your hand. Tighten the strap using your fingers.[5]
- As with the first strap, do not tighten the strap around your wrist. Keep it low on the base of your hand.


Fastening the Straps around the Bar
-
1Place your right hand over the barbell. To tie the strap around the barbell, begin with the barbell resting on the ground. Place your right hand over the bar, so that the strap hangs down beneath. There should only be about 2 inches (5.1 cm) of room between the bar and your right wrist.[6]
- If you’re planning to deadlift, the weights you’ll use should already be on the ends of the barbell.
-
2Wrap the hanging end of the strap around the bar 2–3 times. Keep your right hand a couple inches away from the bar, and loop the hanging strap up from beneath the bar. Use either hand to do this, either by lifting the strap up and around the bar with your left hand or by using your right thumb and finger to loop the strap around the bar. The loops should overlap one another by about 1⁄4 inch (0.64 cm).[7]
- As you wrap the strap around the bar, keep a tight grip on the loops so that the strap wraps tightly around the bar. There should be no loose material hanging down.
-
3Tighten the loops by rotating your grip on the barbell. Each time you add another loop, rotate your grip on the barbell so your knuckles are moving back toward your body. This constriction will tighten the strap around the barbell.[8]
- If it helps, think of the barbell like the grip of a motorcycle. When you tighten the straps, use the same motion as you would to rev up a motorcycle’s engine.
-
4Attach your left hand’s wrist strap to the barbell. Since your right hand will already be strapped to the barbell, you won’t be able to use it to tighten the second strap. Use the thumb and fingers of your left hand to push the hanging strap under and up around the barbell 2-3 times. Once you’ve looped the strap, grasp the bar firmly and rotate your grip back toward your body. This will tighten the strap around the bar.[9]
- To remove the straps once you’re done lifting, simply let go with your hands and the straps should unravel themselves from the bar.


Performing a Deadlift
-
1Move your feet so they’re shoulder-width apart. Always start a deadlift from this position. This stance will allow you to fully engage your leg muscles and glutes when you’re lifting.
- For most people, your feet should be roughly 3 feet (0.91 m) apart.
-
2Tighten your overhand grip around the straps. If your straps are already attached to the bar, hold the bar as firmly as you can. Deadlifting heavy weights takes a substantial amount of grip strength, although the wrist straps will bear some of the weight for you.
- The grip that you’re using with the straps is called overhand. Bodybuilders who prefer not to use straps sometimes use a reverse grip instead, when one hand grips overhand and the other grips underhand.
-
3Push with your legs and drive your hips forward to lift the bar. Pushing your hips forward will engage your glutes and make it easier to lift the bar. Your arms do relatively little in a deadlift, aside from gripping the bar. Continue to push with your legs until you’re standing erect and the barbell is at the level of your mid-thigh.
- It can also help to keep your eyes focused in front of you through the lift. Don’t look down at the bar or at your hands while you’re lifting.
-
4Hold the weight for in place for 2-3 seconds. Push your chest forward to keep your spine straight and avoid hurting your back muscles.[10] Also pull back your shoulders once the barbell is at your mid-thigh level, so your shoulders and upper chest support some of the weight. You’ll quickly start to feel the burn in your glutes and leg muscles.
- Keep your head up and eyes focused ahead of you as you’re supporting the barbell.
-
5Relax and lower the weight to the ground. Move your shoulders forward, bend your knees, and let gravity pull the barbell down to the ground Keep your back straight as you’re lowering the weight.
- Lowering the weight is an important part of the deadlift exercise. Never drop the weight from a standing position.


References
- ↑ https://www.aworkoutroutine.com/weight-lifting-straps/
- ↑ https://youtu.be/VX-Daef9fSQ?t=57
- ↑ https://youtu.be/cQtgNZ4o5Dg?t=24
- ↑ https://youtu.be/VX-Daef9fSQ?t=63
- ↑ https://youtu.be/cQtgNZ4o5Dg?t=26
- ↑ https://youtu.be/cQtgNZ4o5Dg?t=34
- ↑ https://youtu.be/cQtgNZ4o5Dg?t=38
- ↑ https://youtu.be/VX-Daef9fSQ?t=132
- ↑ https://youtu.be/VX-Daef9fSQ?t=134
- ↑ Laila Ajani. Fitness Trainer. Expert Interview. 31 October 2019.
- ↑ Laila Ajani. Fitness Trainer. Expert Interview. 31 October 2019.
- ↑ https://maxshank.com/strength-conditioning/straps-for-deadlifts-or-not/
- ↑ https://maxshank.com/strength-conditioning/straps-for-deadlifts-or-not/
About This Article