This article was co-authored by Kathy Leader. Kathy Leader is an Artist and the Owner of The Art Process. With more than 36 years of art education experience, she specializes in providing mixed media art workshops for individuals and groups. In addition, she works with businesses and organizations to build morale, encourage creative problem solving, and find de-stressing tools. Kathy holds a BFA in Art Education from The University of Cape Town.
There are 9 references cited in this article, which can be found at the bottom of the page.
wikiHow marks an article as reader-approved once it receives enough positive feedback. This article received 18 testimonials and 87% of readers who voted found it helpful, earning it our reader-approved status.
This article has been viewed 445,907 times.
Pastels have been a favorite medium of many well-known artists, including Manet, Degas and Renoir—and with good reason! Pastels allow you to layer and blend vibrant colors to create a soft look. Feel free to use pastels on different surfaces, such as paper, cardboard, or canvas, or choose a surface with a rough texture to make a grainy drawing, or a smoother texture for a sharper result. Hoping to make a more precise drawing? Pastel pencils could be just what you're looking for.
Things You Should Know
- Play around with different grip styles for your chalk pastels. Thin lines are great for linear objects, while thicker lines are great for textured backgrounds.
- Build up your oil pastel drawing with multiple layers of color to add more intensity and depth to your creation.
- Outline your pastel pencil sketch in black, marking the contours of the item you're sketching. Then, build up your drawing with different layers of color.
Steps
Chalk Pastels
-
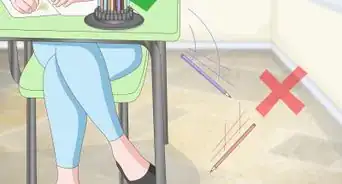
1Choose your grip. Experiment with different strokes on a scrap piece of paper first. Hold the pastel at the back end and color with the point or the edge of the tip to make thin, even lines. Press the stick down on the surface lengthwise and move it sideways to create thick, abstract lines. Hold the stick vertically near the tip and you can make thick, rounded markings.
- Thin lines are useful for linear objects like grass.
- Thick abstract lines are good for making a textured background.
- Big, round strokes can make cobblestones or bricks.
- Clean your pastels, if needed. Pour uncooked rice or sawdust in a box. Put your pastels inside. Close the box and shake it up.
-
2Practice blending.[1] Use a brush to move and blend color evenly. Try a tortillon (blending stump) for more linear blending. Try a lint-free rag for large areas. Use a paintbrush and water to blend a watercolor effect.[2]
- You can also use your fingers, which can push the pastel further into the grip of the paper. Another option is to use a blender or a paper tissue.[3]
Advertisement -
3Correct any mistakes. Brush away excess color with a stiff-bristled brush. Rub a kneaded eraser gently over any mistakes. Try carefully scraping off pigment with a craft knife.
- You may want to practice this first on a scrap sheet.
-
4Make stencils. Cut out cardboard shapes. Trace around them with pastels on your drawing surface. Smudge the borders to achieve a “glowing” effect.[4]
- For example, trace the shapes of Christmas lights or hearts.
- This is a great project to do with kids.
-
5Try mixing chalk pastels with tempera paint. Color a landscape background with your chalk pastels. Dip a finger into tempera paint and rub it over your chalk drawing. Change fingers for different colors.[5]
- For example, make a sunset or ocean scene with pastels. Then use white paint over it.
- This technique is fun for children as well as adults, since it combines finger painting with drawing.


Oil Pastels
-
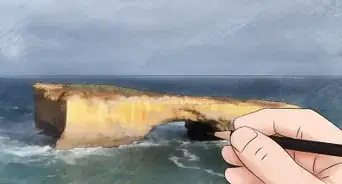
1Layer your drawing. Make the underpainting of your drawing. Then slowly build up layers and colors to create depth and intensity.[6] Add a background last to make your object really stick out with defined edges.[7]
- For example, draw a loose sketch of a light-colored piece of fruit. Create shading with colors. Finish up with a dark background.
- Another technique is to make the background first using oil pastel in one direction. Then layer more colors on top. Try both techniques and see which one works best for you![8]
- Do not mix too many different colors as it can become messy and muddy.[9]
-
2Change the temperature. Put your artwork in the refrigerator for twenty minutes. Then warm your pastels in your hands to achieve better coverage.[10]
- Use this technique if your paper isn’t allowing you to add more layers.
-
3Try different strokes. Draw freehand by sketching with light pressure to the edge of the pastel’s tip. Make choppy, tiny markings to achieve a stippled look.[11] Create “blanket” strokes by making thick, fast squiggles. Use thick, vertical strokes to create hatching.[12]
- Blanket strokes and hatching work well for backgrounds.
- Experiment with different strokes and pressure on a scrap sheet.
-
4Blend your work.[13] You can blend and mix colors on your paper or on a palette first. Practice using blending to make shadows and reflections. You can make a final blending with baby oil or other liquids.[14]
- Try the baby oil blending technique on a practice drawing first. Soak a cotton swab in baby oil. Smooth it over your work to blend. Allow it to dry overnight.
- Use water for a smooth wash of color. Try turpentine, linseed or other oils for oil pastels that aren’t water soluble.[15]


Pastel Pencils
-
1Use a black pencil to outline your work. Make the contours of the objects you’re drawing. Begin sketching loosely. Add a bit more pressure and shading to the areas that will be shadowed.[16]
- Try practicing this technique for a still life, such as a few pieces of fruit.
-
2Layer on the colors.[17] Color in your main color. For example, if you’re coloring an orange, give the body of the fruit its basic orange hue. Add a layer of darker color. Then apply the main color again.[18]
- Hold your pencil as you would a regular pencil, or a bit farther away from the tip. See which way is the most comfortable for you. Make sure to work in a way that the edge of your hand is not smearing the pastels that you have laid down.[19]
- Add accents after you’ve finished the main colors. For example, shades of brown and green for the blossom end of a fruit.
-
3Make highlights and deepen shadows. Add texture and light or “shiny” areas with a white pencil. Use the white pencil in diagonal strokes to develop the background. Add more shadowing under your objects, if desired, with black and/or light blue.[20]
- For example, define the pores of a lemon with bits of white.


Community Q&A
-
QuestionWhich kind of soft pastels are best?
 Constance MaticCommunity Answer"Student quality" pastels tend to be cheaper than, but not as good as, "artist quality" pastels. The pastels you like best will depend on your individual preference, but try looking at reviews online before deciding on what brand(s) to purchase. You can also buy small packs of different brands to find out which you like the most before investing in a full set by a particular brand.
 -
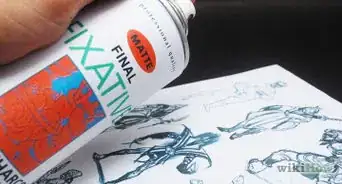
QuestionCan I use anything except a fixture spray?
 Community AnswerHairspray also works well; however, only for things meant to be kept for short term, like experimental sketches. The reason for this is because hairspray is often not acid-free, so over long periods of time it will change the work. In other words: you can use hairspray for sketches or small projects, but stick with fixative for major projects or pieces.
 -
QuestionWhere do I get a fixture?
 Community AnswerAny art supplies store should sell this. Large craft and hobby stores also should sell it.
Warnings
- If you have a sensitive airway, wear a dust mask when using pastels.⧼thumbs_response⧽
Things You’ll Need
Using Chalk Pastels
- Chalk pastels
- Paper or other surface to draw on
- Lidded box
- Uncooked rice or sawdust
- Scrap paper
- Blending stump
- Lint-free rag
- Paintbrush
- Water
- Stiff-bristled brush
- Kneaded eraser
- Craft knife
- Cardboard
- Scissors
- Tempera paint
Using Oil Pastels
- Oil pastels
- Paper or other surface to draw on
- Paper towels or rag
- Plastic gloves (optional)
- Palette
- Baby oil
- Cotton swab
- Water, turpentine or oil
Coloring with Pastel Pencils
- Pastel pencils
- Paper or other surface to draw on
- Pencil sharpener
References
- ↑ Kathy Leader. Artist. Expert Interview. 13 February 2022.
- ↑ http://emptyeasel.com/2013/07/08/how-to-use-water-as-a-blending-medium-with-chalk-pastels/
- ↑ Kathy Leader. Artist. Expert Interview. 13 February 2022.
- ↑ http://buggyandbuddy.com/cool-ways-to-use-chalk/
- ↑ http://buggyandbuddy.com/ocean-scenes-using-chalk-tempera-paint/
- ↑ Kathy Leader. Artist. Expert Interview. 13 February 2022.
- ↑ http://thevirtualinstructor.com/how-to-use-oil-pastels.html
- ↑ https://www.theartofed.com/2015/05/20/7-distinct-techniques-to-transform-your-oil-pastel-projects/
- ↑ Kathy Leader. Artist. Expert Interview. 13 February 2022.
- ↑ http://www.explore-oil-pastels-with-robert-sloan.com/oil-pastels-techniques.html
- ↑ https://www.theartofed.com/2015/05/20/7-distinct-techniques-to-transform-your-oil-pastel-projects/
- ↑ https://www.youtube.com/watch?v=t9DRJu9Kn78&feature=youtu.be&t=54
- ↑ Kathy Leader. Artist. Expert Interview. 13 February 2022.
- ↑ http://www.explore-oil-pastels-with-robert-sloan.com/oil-pastels-techniques.html
- ↑ http://www.explore-oil-pastels-with-robert-sloan.com/oil-pastels-techniques.html
- ↑ http://thevirtualinstructor.com/how-to-draw-pastel-pencils.html
- ↑ Kathy Leader. Artist. Expert Interview. 13 February 2022.
- ↑ http://thevirtualinstructor.com/how-to-draw-pastel-pencils.html
- ↑ Kathy Leader. Artist. Expert Interview. 13 February 2022.
- ↑ http://thevirtualinstructor.com/how-to-draw-pastel-pencils.html
- ↑ Kathy Leader. Artist. Expert Interview. 13 February 2022.
About This Article

If you’re using chalk pastels, experiment with different grips for different effects. Try holding the pastel vertically near the tip, for example, to make thick, rounded markings. If you’re using oil pastels, layer your drawing by making an underpainting before you put several colors on top to give it depth and definition. Working with pastel pencils, instead? Use a black pencil to outline the contours of your work before adding layers of color, highlights, and shadows. For more tips on using pastels, including how to use your fingers or a brush to blend colors, scroll down!