This article was co-authored by wikiHow staff writer, Christopher M. Osborne, PhD. Christopher Osborne has been a wikiHow Content Creator since 2015. He is also a historian who holds a PhD from The University of Notre Dame and has taught at universities in and around Pittsburgh, PA. His scholarly publications and presentations focus on his research interests in early American history, but Chris also enjoys the challenges and rewards of writing wikiHow articles on a wide range of subjects.
There are 8 references cited in this article, which can be found at the bottom of the page.
The wikiHow Video Team also followed the article's instructions and verified that they work.
This article has been viewed 4,638 times.
Learn more...
Giving your anime creation black hair can make a real character statement, especially when you use shading to help define elements like lighting, movement, and mood. Whether you’re drawing digitally or by hand, we’ll guide you through the process of going from your initial line drawing to a properly shaded anime hairstyle. So grab your pencils (or drawing software) and let’s get to work!
Things You Should Know
- Begin with a consistent base color that isn't too dark, such as gray or purple.
- Identify where the light source in your drawing is coming from. This will help you maintain consistent shading.
- Shade the hair tips and strands on the far side of your light source. In addition, lighten any areas that fall within the light source.
Steps
Shading a Digital Drawing
-
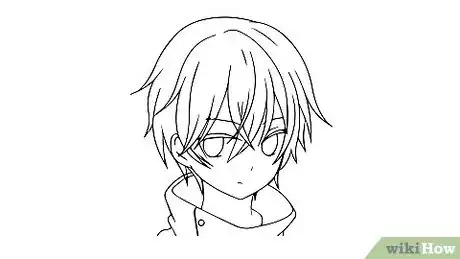
1Use the drawing tool to sketch the line art of the hair in black. The term line art refers to the outline and interior structure of the hairstyle, and digital drawing programs make it easy to sketch out the straight lines, sharp edges, and/or wavy curls often associated with anime hairstyles. Set the drawing tool to black and, in most cases, at a medium line thickness.[1]
- While they’re focused on drawing by hand, the wikiHow articles on drawing anime hair and drawing manga hair are good resources for choosing hairstyles and sketching outlines.
- Anime hair is often jagged or spiky, or sometimes curly and flowing, but it’s always noticeable!
-
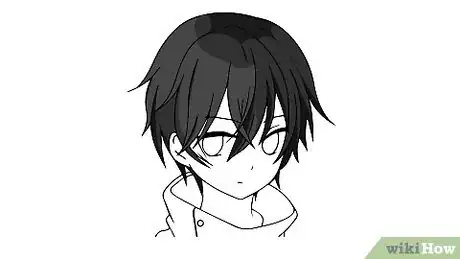
2Fill in the line art with a dark gray or dark purple-gray color. Using your program’s fill tool makes it easy to give the entire head of hair a consistent base color. The important thing here is to choose a base color that isn’t too dark. Aim for a mid-range dark gray that doesn’t obscure the details of your line drawing—once you add darker layers of shading later on, you’ll end up with the black hair effect you’re looking for.[2]
- You can also add a touch of color here—purple-gray, for example, is a popular choice for anime. Alternatively, choose a shade of gray that incorporates some of the color you’ll use for the character’s clothing or accessories.
Advertisement -
3Identify the location of the light source in the drawing. Even if you won’t see the light source in your drawing, it makes the shading much more effective if you define a particular location for the light source. For convenience, let’s assume that the light is coming from the top left of the drawing.[3]
- Adding some areas of shine (due to light reflection) will make your areas of shading that much more impactful.
-
4Shade the top of the head and behind the neck in very dark gray. Unless your light source is coming from directly above, make the top of your character’s head one of the darker areas. Use a brush or blending tool to add a gray color that’s nearly as dark as the line art. Also, if your character has longer hair to the sides of their neck, shade these interior areas in the same dark color as well.[4]
-
5Darken the hair tips and strands on the far side of your light source. For a light source coming from the top left, focus your shading along the bottom and right sides of your line art. Use a draw, fill, or blending tool and choose a dark gray color that’s just a bit lighter than the one you used in the fully shaded areas (like to the sides of the neck).[5]
- For instance, say your character has spiky bangs that look like shark teeth. In this case, shade in along the line art to fill the tip and right edge of each “tooth” with a dark gray color.
- This process is going to take some time if your anime hairstyle has a lot of individual layers, strands, curls, etc. But wait until you see the results!
- Keep referring to the location of your light source as you decide where to add shading.
-
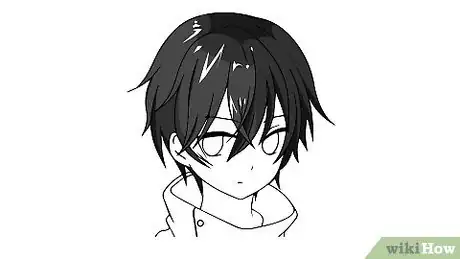
6Airbrush a light flesh tone into areas where you want some shine. Use the “soft airbrush” (or similar) feature to add a thin “halo effect” around the crown of the head, especially on the side facing the light source. Blend in more touches of this shine effect in other areas that are facing the light source—for instance, along sections of flowing locks or wavy curls.[6]
- But use a “less is more” approach here—keep the shine areas to less than about 10% of the total hairstyle.
- If your character has a light skin tone, choose that same color here; if they have a darker skin tone, choose a light shade in the same color family.
- If your character has soft or straight bangs (instead of jagged ones), blend in a bit of the skin tone to help ease the transition between hair and skin.
Shading a Hand Drawing
-
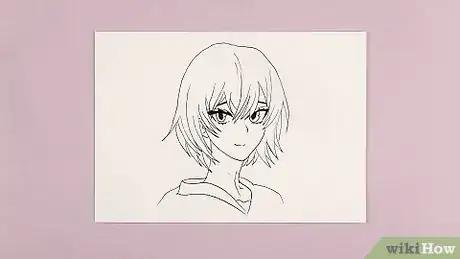
1Sketch out the line art for the hairstyle in black. There are many different ways to draw anime hair, of course, but the style tends to have a jagged, sometimes spiky look that might be combined with softer curls for longer hair. Whatever particular hairstyle you choose, sketch out the outline and interior sections (such as parts, curls, or layers) in black.[7]
- If you’re drawing hair for manga (Japanese-style graphic novels), you’ll find many stylistic similarities with anime (which most specifically refers to Japanese-style animated films).
-
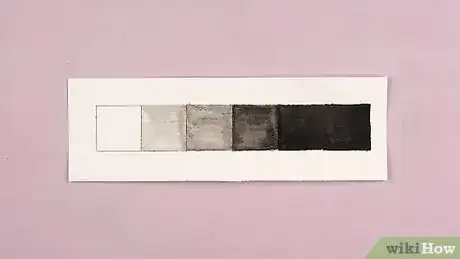
2Create a shade scale from white to black to help guide you. On a separate sheet of white paper, sketch out a line of at least 10 square boxes. Leave the far left square blank (and therefore white), and fill in the far right box with your darkest black drawing pencil. Fill in a range of lighter-to-darker grays between these end points. Refer to the scale as you add layers of shading to your anime hair.[8]
- Applying more pressure creates a darker shading with the same pencil. If you’re using a set of graphite drawing pencils, soft pencils (labeled with a “B”) work best for shading. The higher the number (4B, 5B, 6B, etc.), the darker the shading.
- The shade scale doesn’t have to be strictly white-to-black with shades of gray between them. If you want your anime hair to have, for instance, a purple-gray element to it, add this color range to your scale.
-
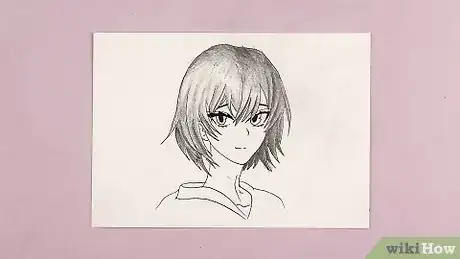
3Color in the line art with a medium-light gray or mixed gray. Use the “hatching” technique to shade in the drawing—draw a series of closely-packed parallel lines that follow the outlines of your existing line art. Hatching creates a base layer of shading while also creating the look of individual hair strands.[9]
- Choose a starting shade color that’s about halfway between the left end and the center of your shade scale.
-
4Pinpoint the drawing’s light source and add reflective areas. In other words, choose where the light is coming from in your drawing, then figure out where this light source would create high reflection (or shiny) areas on your anime hairstyle. (If the light is coming from the top left, for instance, the light fall areas will probably be around the crown and along the left side of the head.) Show the light reflecting off the hair by using one of the following techniques:[10]
- Use an eraser or smudge stick to reduce the appearance of hatching in the reflective areas.
- Blend in some of the character’s flesh tone color (or a lighter shade of the flesh tone color) in the reflective areas as well as along the bangs.
-
5Add hatching in very dark gray to define heavy shadow areas. Aim for the shade that’s second from the right (that is, second darkest) on your shade scale. Use it to shade (with the hatching technique) those areas that are the most concealed from your light source—for instance, long hair to the sides of the neck or the bottom right edges of bangs and curls (for light coming from the top right).[11]
- This shading represents the darkest you want the hair to be (other than the line art that defines the shape and structure of the hairstyle). Don’t make it fully black (like the line art) unless you want your character to have a jet black hairstyle.
-
6Add layers of shading between the lightest and darkest areas. For example, say you have a lightly-shaded reflective area above the right ear and a very dark shaded area along the neckline. In between these points, essentially replicate your shade scale by making the shading increasingly darker as it gets closer to the darkest shaded area. Create similar layers of shading throughout the hairstyle to give it an appearance of layering, fullness, and even movement.[12]
- Especially when you’re shading by hand (as opposed to digitally), it’s easier to darken shading that’s too light than to lighten shading that’s too dark. Err toward making your black hair shading a little lighter than you think you want it, then add more dark layering as needed to get the proper shading.
References
- ↑ https://youtu.be/aAl87Vo4rlI?t=183
- ↑ https://www.deviantart.com/kouribird/art/shading-black-hair-682326223
- ↑ https://www.youtube.com/watch?v=aAl87Vo4rlI&t=14m38s
- ↑ https://www.deviantart.com/kouribird/art/shading-black-hair-682326223
- ↑ https://www.youtube.com/watch?v=aAl87Vo4rlI&t=15m16s
- ↑ https://www.youtube.com/watch?v=aAl87Vo4rlI&t=15m45s
- ↑ https://www.deviantart.com/kouribird/art/shading-black-hair-682326223
- ↑ https://www.thedrawingsource.com/value-scale.html
- ↑ https://www.erikalancaster.com/art-blog/guide-to-shading-techniques-hatching-cross-hatching-scribbling-and-others
