X
wikiHow is a “wiki,” similar to Wikipedia, which means that many of our articles are co-written by multiple authors. To create this article, 10 people, some anonymous, worked to edit and improve it over time.
This article has been viewed 102,136 times.
Learn more...
The most common way to deliver a batch of files from a Linux system is by using the tar command. When you tar a directory, you can easily roll up a group of files into a single file. This file can then be transferred or stored, or it can be compressed to reduce its size.
Steps
-
1Understand the format. In Linux, archiving multiple files is accomplished using the tar command. This command will combine multiple files into a single file, allowing for compression or easier transfer to another computer. The resulting file will have a .tar extension. .tar files are often referred to as tarballs.
- The tar command will only archive the files. It will not perform any compression, so the archive will be the same size as the original files. You can compress the .tar file using gzip or bzip2, resulting in a .tar.gz or .tar.bz2 extension. This will be covered at the end of the article.[1]
-
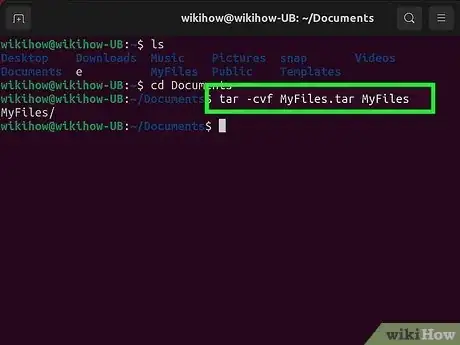
2Create a tarball from a single directory. There are several parts to the tar command when you are creating a tarball from a directory. Below is an example tar command:[2]
tar -cvf tarName.tar /path/to/directory
- tar - This invokes the tar archiving program.
- c - This flag signals the "creation" of the .tar file. It should always come first.
- v - This indicates that the process is "verbose". This will display a readout of all the files that get added to the .tar file as it is being created. This is an optional flag.
- f - This flag signifies that the next part will be the new .tar file's file name. It should always be the last flag.
- tarName.tar - You can choose any name that you'd like. Just make sure that you include the .tar extension at the end. You can add a path to the file name if you want to create the tarball in a different directory than your current working one.
- /path/to/directory - Enter in the path of the directory that you want to create the .tar file from. The path is relative to your current working directory. For example, if the full path is ~/home/user/Pictures, and you're currently in the /home directory, you would enter /user/Pictures. Note that all subdirectories will be included as well.
Advertisement -
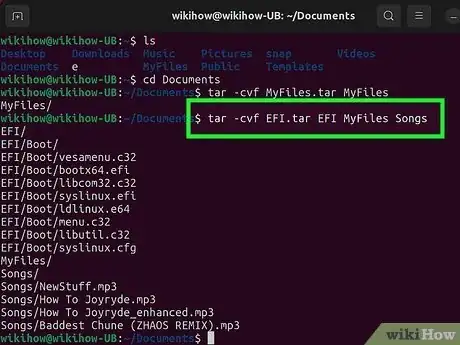
3Create a tarball that includes multiple directories. Adding multiple directories is pretty much as simple as adding all the paths to the end of the tar command:
tar -cvf tarName.tar /etc/directory1 /var/www/directory2
-
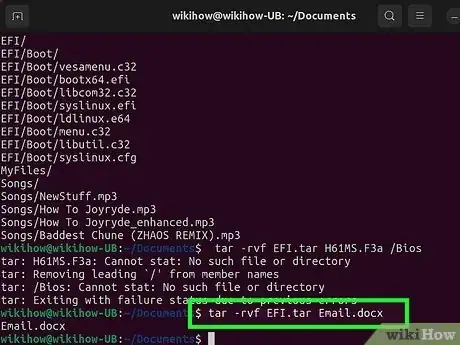
4Add files or directories to an existing tarball. You can continue to add files and directories to your .tar archive files by using the "append" flag:[3]
tar -rvf tarName.tar textfile.txt path/to/another/directory
- r - This is the "append" flag. It replaces the c flag from the tarball creation command.
-
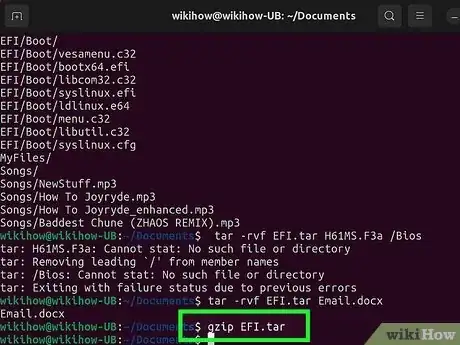
5Compress an existing .tar file. You can use "gzip" to quickly compress your .tar archive file. If you need more compression (smaller output file), you can use "bzip2" instead. bzip2 will take longer to compress the file than gzip.
gzip tarName.tar
bzip2 tarName.tar
- gzip will add the .gz extension to the file name: tarName.tar.gz
- bzip2 will add the .bz2 extension to the file name: tarName.tar.bz2
-
6Compress the tarball when you create it. You can use the commands in the step above to compress existing tarballs, but you can also compress them as you are creating them by using the right flags:
tar -czvf tarName.tar.gz /path/to/directory
tar -cjvf tarName.tar.bz2 /path/to/directory
- z - This flag will compress the new .tar file using gzip. Make sure to include the .gz extension at the end of the file name.
- j - This flag will compress the new .tar file using bzip2. Make sure to include the .bz2 extension at the end of the file name.[4]
Advertisement
References
About This Article
Advertisement

