This article was co-authored by Rishabh Mehan. Rishabhn Mehan is a Cricket Systems Operator in the United Kingdom. He has been coaching cricket in London since 2016, when he received his Level 2 Certificate in Coaching Young People and Adults Cricket (QCF).
There are 7 references cited in this article, which can be found at the bottom of the page.
This article has been viewed 220,456 times.
Cricket bats are prone to cracking, especially if they aren’t strengthened properly before use. To harden your cricket bat, you’ll need to apply linseed oil to the bat first. Then, you can harden, or knock the bat in, by flattening out the wood fibers in the bat with a wooden mallet. You should always strengthen your cricket bat before you use it, even if the label says “pre-knocked.” If done correctly, it will strengthen your bat and reduce the chance of it cracking while you play.
Steps
Oiling Your Bat
-
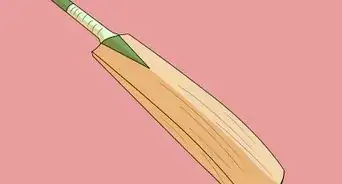
1Purchase raw linseed oil. You can purchase raw linseed oil at cricket stores, sports stores, and online. Raw linseed oil will help the wood in your bat bind together and expand, which will prevent cracking as you knock your bat in.
- Other oils will not work.
- Do not get boiled or cooked linseed oil because it’s not as effective.
-
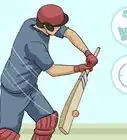
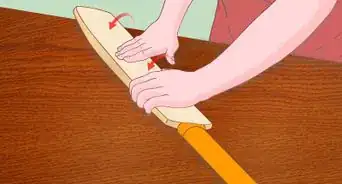
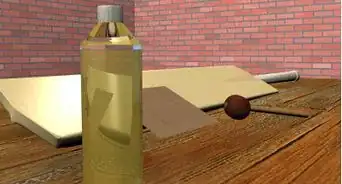
2Rub 1 teaspoon (4.9 ml) of oil into the bat with a clean rag. Pour 1 teaspoon (4.9 ml) of raw linseed oil directly onto the flat side of the bat. Then, use a clean rag to rub the oil equally over the face and edges of the bat. Do not apply over 1 teaspoon (4.9 ml) of oil on the bat or you will over-oil it.[1]
- Over-oiled bats will look dark, feel slick to the touch, and will smell of linseed oil.
- The bat should get slightly darker once you apply oil to it.[2]
- Do not rub oil into the handle, toe, or rounded backside of the bat.
Advertisement -
3Let the oil dry for 24 hours and repeat the process 2 times. The oil will absorb into the fibers of the bat. Repeat the process with the linseed oil over 2 more days to ensure that the bat is completely oiled.
- Multiple applications will allow more oil to be absorbed by the bat.


Knocking Your Bat in
-
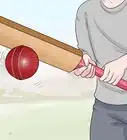
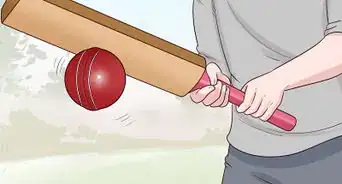
1Hit the face of the bat with a wooden mallet. Hit the face with moderate force so that it creates a shallow indent in the bat. Start soft and hit the face harder as you get more comfortable with the mallet. You may have to hit the bat fairly hard to indent it, but don't do it hard enough to break the bat.[3]
- Hold your cricket bat up to a light to see whether you made the indent.
-
2Continue hitting the face of the bat until it’s completely level. The goal is to get the face of the cricket bat the same height as the initial indent that you made. Keep knocking down on the face of the bat with moderate force. Start from the top and keep knocking it until the entire face of the bat is the same height.[4]
- This process takes around 6 hours to properly complete. The more time you spend knocking the bat in, the less likely it is to crack.
-
3Knock the edges of the bat. Do not hit the edge of the bat directly or you could crack it. Instead, knock the area where the face and edge of the bat meet on a 45-degree angle. Start from the top of the bat and work your way down. When you’re done, work on the other edge until both of them have been knocked in.[5]
- The edges of a cricket bat commonly crack when they aren't knocked in.
-
4Hit the toe of the bat with the mallet. The toe is on the end of the bat’s blade and is usually the thinnest part on your cricket bat. Use the same method as you did on the face of the bat, by making an initial impression and then leveling out the rest of the toe.


Finishing the Hardening Process
-
1Use liquid super glue to fill in any cracks. If your bat develops any cracks during the knocking in the process, you can fill them with liquid super glue. Purchase the superglue online or at a hardware store. Squeeze a small amount of the glue into the crack and spread it around with the cap of the glue.[6]
- Let the glue dry for 24 hours before using the bat.
-
2Let the bat dry for a week. You’ll want to allow your bat to absorb all of the linseed oil completely, which will take about a week. When it’s completely dry, you can use the bat as is or apply a face tape to the bat to prevent cracks while you play.
- Keep the bat out of direct sunlight as the oil dries.
-
3Apply bat face tape to the bat to prevent future cracks. Cricket bat face tape can be purchased at a cricket store or online. Peel the back of the face tape off and lay the sticky side down on the flat side of your bat. Wrap the edges of the tape around the edges of the bat.
- Use a credit card to smooth over any bubbles in the tape.
-
4Glue a toe guard to the end of your bat to repel moisture. You can purchase a toe guard online or at a cricket store. A toe guard is made of rubber or plastic and fits on the end of your bat. Apply superglue to the back of the toe guard and onto the flat end of your bat. Glue the toe guard to the bat and cut off the excess around the bat with scissors.[7]
- A toe guard will prevent water from being absorbed when you hit your bat against the wet ground.


Expert Q&A
Did you know you can get expert answers for this article?
Unlock expert answers by supporting wikiHow
-
QuestionFor how much time should I knock the bat with a mallet?
 Rishabh MehanRishabhn Mehan is a Cricket Systems Operator in the United Kingdom. He has been coaching cricket in London since 2016, when he received his Level 2 Certificate in Coaching Young People and Adults Cricket (QCF).
Cricket CoachAt a minimum, plan to spend 6 hours knocking in the bat. You can break up the time over several days if desired.
Support wikiHow by unlocking this expert answer.
-
QuestionCan I use the oil process on a bat with fiber sheet?Rishabh MehanRishabhn Mehan is a Cricket Systems Operator in the United Kingdom. He has been coaching cricket in London since 2016, when he received his Level 2 Certificate in Coaching Young People and Adults Cricket (QCF).
Cricket CoachThe bat should be oiled first, then add the fiber sheet. Don't put the oil over the fiber sheet.Support wikiHow by unlocking this expert answer.
-
QuestionWhen I have cracks in the bat, should I use oil or should I cover it with wax or glue?Rishabh MehanRishabhn Mehan is a Cricket Systems Operator in the United Kingdom. He has been coaching cricket in London since 2016, when he received his Level 2 Certificate in Coaching Young People and Adults Cricket (QCF).
Cricket CoachIt's best to use glue to seal the cracks. Don't oil a cracked bat. Check out "How to Repair a Cricket Bat" for more information.Support wikiHow by unlocking this expert answer.
Things You’ll Need
- Raw linseed oil
- Clean rag
- Wooden mallet
- Cricket bat face tape (optional)


References
- ↑ https://youtu.be/aEbEENWnICo?t=5m2s
- ↑ https://youtu.be/BCfOQpwqp8I?t=31s
- ↑ https://youtu.be/BCfOQpwqp8I?t=3m22s
- ↑ https://youtu.be/BCfOQpwqp8I?t=3m34s
- ↑ https://www.kingsgrovesports.com.au/cricket-bat-repairs/bat-preparation.html
- ↑ https://youtu.be/aEbEENWnICo?t=11m10s
- ↑ https://youtu.be/cmIeoQ1Hixo?t=2m46s
About This Article

To strengthen a cricket bat, pour 1 tablespoon of raw linseed oil directly onto the flat side of the bat and use a clean rag to rub it into the face and around the edges. Allow the oil to dry for 24 hours, and repeat the process 2 more times to allow more oil to absorb into the bat. Finally, using moderate force, hit the face of the bat with a wooden mallet repeatedly until it is completely leveled. For more strengthening tips from our Cricket Coach reviewer, like how to use super glue to fill in any cracks, scroll down!