This article was co-authored by wikiHow Staff. Our trained team of editors and researchers validate articles for accuracy and comprehensiveness. wikiHow's Content Management Team carefully monitors the work from our editorial staff to ensure that each article is backed by trusted research and meets our high quality standards.
There are 13 references cited in this article, which can be found at the bottom of the page.
This article has been viewed 242,970 times.
Learn more...
One-button LED watches are super useful and simple to use. Press the button once to display the time, and then press and hold the button for 3 seconds to select the right hour and minutes. You can even set the date by doing the same thing. Once your watch has the correct time and date, avoid touching the button to save the settings.
Steps
Setting the Time
-
1Press the button once so your watch shows the time. Click the button below the LED screen. The preset time should appear, showing you the hour and minutes.[1]
- Pressing the button again after the time appears will show you the date.
- If you accidentally press the button more than once and are now on the time screen, just keep pressing the button until it takes you back to the time.
-
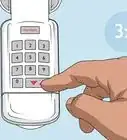
2Hold down the button for 3 seconds until the hour starts blinking. If the hour starts flashing after you’ve pressed down on the button, this means it’s ready to be changed. Don’t let go of the button until the hour starts blinking, even if it’s been more than 3 seconds.[2]Advertisement
-
3Click the button until it displays the correct hour. With the hour flashing, click the button to navigate through the numbers. If you pass the correct hour, don’t worry, you can scroll through the numbers again easily.[3]
- Pay attention to the A or P below the hour to select AM or PM.
-
4Press and hold the button again for 3 seconds until the minutes blink. Once you’ve selected the correct hour, hold down the button again until the minutes start flashing. This will tell you that the watch’s minutes are ready to be set.[4]
- If you waited too long to set the minutes and your watch already saved the settings, just press and hold the button until the hour starts flashing again before pressing and holding to get to the minutes.
-
5Click the button to select the right minute. Scroll through the minute numbers by clicking the main button. Reference a clock near you so you’re sure to choose the correct minute number.[5]
- Take your time clicking through the minute numbers so you don’t pass the right one and have to scroll through all of them again.
-
6Avoid touching the button for several seconds to save the settings. Once the right hour and minute are selected, don’t press the button. Watch for the time to stop flashing, telling you that your watch has been set with its new time.[6]
-
7View the time by pressing the button if the screen goes dark. The time may disappear when the watch isn’t in use. To see what time it is, simply press the button once so it appears.[7]


Changing the Date
-
1Tap the button twice so the date is displayed. The date is the second display that will pop up, right after the time. Click the button two times for the date to appear.[8]
- If you're setting the date right after setting the time, click the button once after the time has been set to get to the date.
-
2Press and hold the button until you see a 'Y' flash for 'years'. Hold down the button for 3 seconds and the blinking 'Y' should appear. This is the years setting.[9]
-
3Click the button until the correct year number appears. Only the last two digits of the year will appear under the 'Y'. Press the button until the right year number pops up to set the year correctly.[10]
- For instance, if the year is 2019, click the button until you get to 19.
-
4Hold down the button again to set the month. After you've chosen the year, press and hold the button again for 3 seconds until you see the month setting begin flashing. Click through the numbers 1-12 to choose the current month.[11]
- For example, if it's September, you would choose the number 9.
-
5Press and hold the button one last time to select the day. Hold down the button for 3 seconds until the date starts flashing (these are the numbers right below the month). These numbers will go from 1-31. Click the button until you reach the correct day.[12]
- Don't worry if you scroll past the right day, just keep clicking the button to go through the numbers again.
-
6Avoid pressing the button to save the date in your watch. Once the correct year, month, and date have been selected, don't touch the button for several seconds. The numbers will stop flashing, telling you that your watch's date is officially set.[13]


Community Q&A
-
QuestionWhat happens if I can't change the seconds?
 Community AnswerYou usually can't, but it will only be a maximum of 59 seconds off, so it doesn't really matter. Also, you can take out the battery and put it back in, the seconds will turn to "00" most of the time.
 -
QuestionMy watch light suddenly become low, and some lights are not glowing. What can I do?
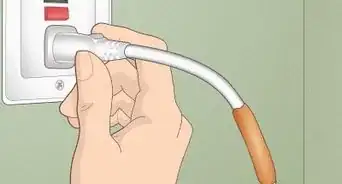
 Community AnswerBring your watch to a battery store, such as Batteries Plus, to have the watch battery replaced.
 -
QuestionCan I set an alarm on an LED watch?
 Community AnswerNo, you cannot set an alarm.


References
- ↑ https://www.youtube.com/watch?v=LFMPt8yjJGk#t=13s
- ↑ https://www.youtube.com/watch?v=qgZ3gPGgPQA#t=52s
- ↑ https://www.youtube.com/watch?v=QoxPzt_qPcw#t=2m47s
- ↑ https://www.youtube.com/watch?v=LFMPt8yjJGk#t=50s
- ↑ https://www.youtube.com/watch?v=qgZ3gPGgPQA#t=1m23s
- ↑ https://www.youtube.com/watch?v=uk_y7Qu-mrU#t=56s
- ↑ https://www.youtube.com/watch?v=qgZ3gPGgPQA#t=1m40s
- ↑ https://www.youtube.com/watch?v=LFMPt8yjJGk#t=19s
- ↑ https://www.youtube.com/watch?v=QoxPzt_qPcw#t=3m9s
About This Article