wikiHow is a “wiki,” similar to Wikipedia, which means that many of our articles are co-written by multiple authors. To create this article, 28 people, some anonymous, worked to edit and improve it over time.
This article has been viewed 492,488 times.
Learn more...
Imagine you are on business overseas working to secure a new account with an offshore supplier. This is a big meeting for you and your company. If you clinch the deal, you are in line for a big promotion. The morning of the presentation, you turn on your laptop and discover your hard drive has crashed. Panicking, you call your office to request an electronic copy of your presentation, but because of the time difference, your call goes unanswered.
However, if you knew how to set up a virtual private network (VPN), you could access the file from any computer in the world! A VPN allows you to connect to a computer from anywhere in the world and access the files. Setting up a VPN in Windows is a two step process. 1) Set up one computer to share files (server). 2) Set up another computer to access them (client).
Steps
Setting Up the Server
-
1Open your web browser and go to www.whatismyip.com. Write down the IP address. You will need it to configure the client.
-
2Click the Start button and click Run.Advertisement
-
3
-
4Click Network and Internet Connections.
-
5Click Network Connections.
-
6Click Create a New Connection, which is the first option on the left toolbar.
-
7The New Connection Wizard will open. Click Next.
-
8Choose Set up an advanced connection, the last element on the list. Click Next.
-
9Choose Accept incoming connections. Click Next.
-
10You will see the Devices for Incoming Connections screen. Do not select anything on this screen. Click Next.
-
11Select Allow virtual private connections. Click Next.
-
12Select to whom you want to give access. Click Next. If a user is not listed, you will have to add an account. See “Related Wikihows” for more information.
-
13Do not change anything on the Networking Software screen. Click Next.
-
14That's it! Your computer is now set up to allow for VPNs. Click Finish to complete the wizard.


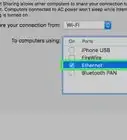
Connecting the Client
-
1Click the Start button and click Run.
-
2
-
3Click Network and Internet Connections.
-
4Click Network Connections.
-
5Click Create a New Connection, which is the first option on the left toolbar.
-
6The New Connection Wizard will open. Click Next.
-
7Select Connect to the network at my workplace and click Next.
-
8Select Virtual Private Network connection and click Next.
-
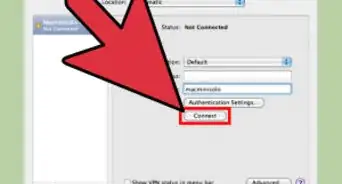
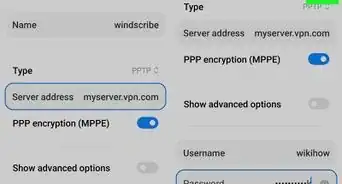
9Type the name of your network in the blank box. Click Next.
-
10Enter the IP address you wrote down earlier and click Next.
-
11Select Add a shortcut to this connection to my desktop and click Finish.


Community Q&A
-
QuestionHow do I set my computer IP address so that it does not change on each open network?
 Community AnswerThis isn't necessarily possible. IP addresses are assigned dynamically (through DHCP) in most cases. In some cases, IP addresses can be assigned manually but this must be done through the router of the network, which is inaccessible in most cases (like a cafe's network). In short, you cannot set it to be the same for each network.
Warnings
- Do not give access to the “guest” account. It does not require a password, allowing anyone to access the VPN.⧼thumbs_response⧽
Things You'll Need
- Two computers with Windows XP
- The server's IP address
- High speed internet connection