This article was co-authored by wikiHow staff writer, Janice Tieperman. Janice is a professional and creative writer who has worked at wikiHow since 2019. With both a B.A. and M.A. in English from East Stroudsburg University, she has a passion for writing a wide variety of content for anyone and everyone. In her free time, you can find her working on a new crochet pattern, listening to true crime podcasts, or tackling a new creative writing project.
There are 20 references cited in this article, which can be found at the bottom of the page.
This article has been viewed 37,468 times.
Learn more...
Grease guns help keep your equipment and machinery running in tip-top shape. While these tools look intimidating to refill, you can easily reload your grease gun within a matter of minutes. If you’re using a new tool, check the model to see if it needs to be refilled with a cartridge or bucket. If you’re using an old tool, remove the top of the grease gun and pump the plunger to see if an empty cartridge comes out.[1] If no cartridge appears, you can assume that your tool needs to be refilled with a bucket. With a bit of practice, you can put your best forward when using your grease gun in future projects.
Steps
Installing a New Grease Cartridge
-
1Unscrew the main canister from the head of your grease gun. Rotate the grease gun’s base, which looks like a large cylindrical canister, counterclockwise. Continue twisting the canister until you’ve detached it from the head and nozzle of the gun.[2]
- The top portion of the grease gun is often referred to as the head.
-
2Pump the plunger to remove the empty cartridge. Once the the top of the gun is removed, extend and push in the plunger along the bottom of the tool. Watch as the empty cartridge is partially forced out of the grease gun, then use your hands to remove it completely.[3]
- If the empty cartridge has a lot of grease on it, use a paper towel when removing it.
Did you know? Most grease guns are operated with cartridges. If pumping the plunger doesn’t release an empty cartridge, then you can assume that your grease gun can be refilled with a bucket.[4]
Advertisement -
3Extend the plunger from the back of the gun and secure it in place. Wrap your pointer and middle finger beneath the grease gun’s handle and pull upwards. Remove the plunger completely, then listen for a sound of air releasing, which means that it’s fully extended.[5]
- Some grease guns have a groove near the base of the plunger, which helps secure and lock the plunger into place. If your tool has this feature, push the plunger into the groove as an extra security measure.
-
4Twist the cap off the bottom of the new cartridge. Examine your new cartridge of grease to find an end with a metal tab, as well as an end with a plastic cap. Rotate the plastic cap counterclockwise to remove it all the way.[6]
- The cartridge is always installed in the grease gun with the cap side down.
- You might need to apply a lot of force to twist off the cap completely.
-
5Slide the capless side of the cartridge into the canister. Center the new cartridge over the top opening of the canister. Double-check that the section of the cartridge with the removed cap is facing downwards, then push the cartridge into the grease gun. Once the entire item is in the grease gun, press along the top to ensure that the cartridge is firmly installed in the tool.[7]
- The side with the metal tab needs to be facing upward.
-
6Remove and peel away the tab on the top side of the cartridge. Pretend you’re opening a can of soda or cat food, and remove the tab on the grease can in the same way. Once you’ve loosened and popped the tab, peel the metal lid off of the cartridge. If there’s a lot of grease stuck to the inner lid, be sure to scrape it into the open container of grease.[8]
-
7Screw the head of the grease gun partially onto the canister. Take the top portion of the grease gun and arrange it on top of the canister. Use clockwise motions to twist the head partially back onto the gun. Don’t completely reattach it—instead, screw it about halfway onto the grease canister.[9]
-
8Push on the locked plunger to get rid of any air bubbles. While keeping the plunger locked in the groove, press on the handle to create tension in the base of the grease gun. The plunger itself won’t move, but you’ll be removing any leftover air bubbles from inside the gun.[10]
-
9Secure the grease gun head onto the canister. Twist the top of the tool clockwise to tighten and completely reattach it to the rest of the grease gun. Before you use the tool, double-check that the head is completely secure and that there are no gaps or leaks present.[11]


Refilling a Gun with a Grease Bucket
-
1Unscrew the canister from the top of your grease gun. Use both hands to rotate the main section, or canister, counterclockwise from the head of your tool. Continue twisting until both parts of the grease gun are completely separated from one another.[12]
- With this style of grease gun, the grease will fill the canister itself instead of a separate cartridge.
-
2Rotate the bottom cap to remove it from the canister. Examine the canister to find a sturdy cap attached to the bottom of the tool. Twist counterclockwise to loosen the cap, which will make it easier to remove the piston and spring from the grease gun.[13]
-
3Slide the piston out of the main canister. Use 1 hand to slowly pull the piston and its accompanying spring out of the grease gun. Try to keep the tool as level as possible while you work.[14]
-
4Flip the rubber seal up so it covers the end of the piston. Find the metal circle along the edge of the rod, which has a black seal surrounding it. Use your fingers to push along the edges of the piston seal, creating a partition around the edge of the piston. By doing this, you create a secure seal for when the canister is filled with grease.[15]
- When the seal is turned downwards, the grease gun can hold a cartridge.
-
5Reattach the cap to the central canister. Slowly push the piston back into the canister. Turn the cap clockwise to connect it to the central canister so there won’t be any grease leaks later on. At this point, check that the plunger is fully inserted in the back of the grease gun.[16]
- Make sure that you’re connecting the cap tightly and securely, or else air bubbles might form in the grease later.
-
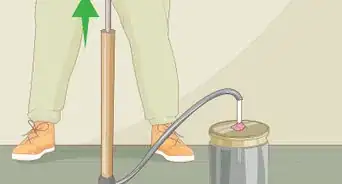
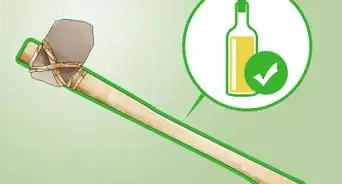
6Dip the canister into a grease bucket and extend the back plunger. Hold the canister in 1 hand while using your opposite hand to hold the base of the plunger. Place the tip of the canister about 2 in (5.1 cm) into an open bucket of grease, then pull slowly on the plunger. Extend the plunger to its full length to create a suction force, which sucks grease into the tool.[17]
- Try to pull on the plunger slowly.
-
7Wipe off any excess grease with an old cloth or rag. Grab an old rag and mop up an extra grease coating the sides and rim of the canister. Once you’ve wiped up the tool, you can discard the rag or place it in a bin to wash later.[18]
-
8Reconnect the grease gun head partially to the filled canister. Center the top portion of the grease gun on top of the canister, then rotate it clockwise several times to begin reattaching it. Stop rotating once both components are partially secured together.[19]
-
9Push the plunger into the canister to get rid of any excess air. Use 1 hand to hold the grease gun in place, and another to reinsert the plunger into the canister. Apply a slow, steady pressure to the plunger as you stick it back in the grease gun so the grease won’t have any air bubbles.[20]
- If your grease gun has air bubbles inside, it might not work properly or efficiently.
-
10Tighten the grease gun head to the canister. Finish twisting the top portion of the tool clockwise until it’s firmly attached to the canister. Before you use your grease gun, check that there are no gaps between the top and central portions of your tool.[21]
- If there are any gaps between the head and canister portions of the gun, air bubbles could form later.


Things You’ll Need
Installing a New Grease Cartridge
- Grease canister
Refilling a Gun with a Grease Bucket
- Grease bucket
- Old cloth or rag


References
- ↑ https://m.youtube.com/watch?v=q4FeaYOZGoo&t=1m0s
- ↑ https://m.youtube.com/watch?v=q4FeaYOZGoo&t=0m45s
- ↑ https://m.youtube.com/watch?v=q4FeaYOZGoo&t=1m0s
- ↑ https://www.greaseexpert.com/how-to-use-a-grease-gun-tips-for-beginners/
- ↑ https://m.youtube.com/watch?v=q4FeaYOZGoo&t=1m17s
- ↑ https://m.youtube.com/watch?v=40W6R93OR1o&t=0m40s
- ↑ https://m.youtube.com/watch?v=40W6R93OR1o&t=0m46s
- ↑ https://m.youtube.com/watch?v=40W6R93OR1o&t=0m53s
- ↑ https://m.youtube.com/watch?v=q4FeaYOZGoo&t=2m17s
- ↑ https://www.greaseexpert.com/how-to-use-a-grease-gun-tips-for-beginners/
- ↑ https://m.youtube.com/watch?v=q4FeaYOZGoo&t=2m58s
- ↑ https://m.youtube.com/watch?v=WgCkdXLvL08&t=0m39s
- ↑ https://m.youtube.com/watch?v=WgCkdXLvL08&t=0m42s
- ↑ https://m.youtube.com/watch?v=WgCkdXLvL08&t=0m47s
- ↑ https://m.youtube.com/watch?v=WgCkdXLvL08&t=1m2s
- ↑ https://m.youtube.com/watch?v=WgCkdXLvL08&t=1m18s
- ↑ https://m.youtube.com/watch?v=7alXII2wWtY&t=0m18s
- ↑ https://m.youtube.com/watch?v=7alXII2wWtY&t=0m26s
- ↑ https://m.youtube.com/watch?v=7alXII2wWtY&t=0m34s
- ↑ https://m.youtube.com/watch?v=7alXII2wWtY&t=0m42s
- ↑ https://m.youtube.com/watch?v=7alXII2wWtY&t=0m54s
- ↑ https://m.youtube.com/watch?v=40W6R93OR1o&t=0m58s