This article was co-authored by Maggie Moran. Maggie Moran is a Professional Gardener in Pennsylvania.
wikiHow marks an article as reader-approved once it receives enough positive feedback. In this case, several readers have written to tell us that this article was helpful to them, earning it our reader-approved status.
This article has been viewed 502,976 times.
Do you want a piece of paradise in your yard? Palm trees are popular landscaping landmarks in tropical regions. Resistant to storm winds, and offering great shade and cover, palm trees are reliably no-fuss once you've put them into the ground.[1] So if you want to get started planting a palm tree somewhere on your property, see the details and issues below.
Steps
Selecting Species, Size, and Location
-
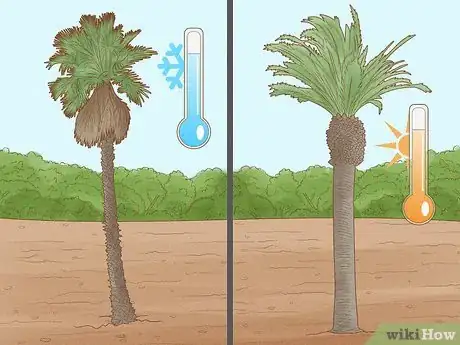
1Select the variety of palm you want to plant. Palms vary in size from relatively small Windmill and Sago Palms, to giants like Royal Palms and Queen Palms which, when grown, may tower fifty feet in the air. The amount of sunlight palm trees require, as well as the amount of cold they tolerate, also depend on species. Consult a list[2] of some common palms used in landscaping, and their sunlight requirements and cold tolerances:
- Warm weather palms:
- Cuban or Florida Royal Palm. Cold tolerant to 22° F (-5° C); full sun to partial shade.
- Sago Palms. Cold tolerant to 20° F (-6° C); filtered sunlight to full sun.
- Canary Island Date Palm. Cold tolerant to 19° F (-7° C).
- Queen Palm. Cold tolerant to 18° F (-7° C); full sun.
- Cold weather palms:
- Mexican Fan Palm. Cold tolerant to 15° F (-9° C).
- Cabbage Palms. Cold tolerant to 12° F (-11° C); full sun.
- Pindo Palm. Cold tolerant to 10° F (-12° C).
- Chinese Windmill Palm. Cold tolerant to 8° F (-13° C); full sun.
- Warm weather palms:
-
2Opt for a small, medium, or large palm depending on budget, aesthetics, and maneuverability. What size palm you select will depend largely on just three things:
- Budget: Small palms cost less money; big palms cost more. Small palms can cost as little as $100 while big behemoths can cost thousands of dollars.
- Aesthetics: Do you want to watch your palm grow, or do you want it to immediately fit into your landscape? Mature trees cost much more than immature trees.
- Maneuverability. Starting with mature palms is expensive, sometimes so big that they need to be trucked and craned into the site.[3] If you're trying to plant in a location where maneuvering big trees is going to be hard, you may want to opt for a smaller one.
Advertisement -
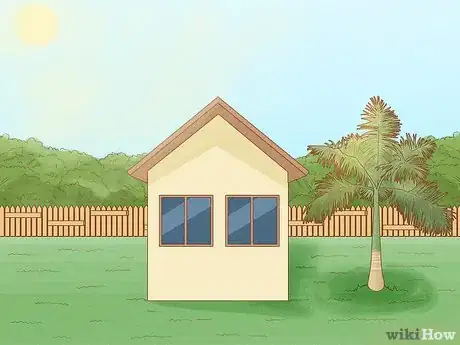
3Choose the location for your palm. Because large palm trees are extremely heavy and you may need to use heavy equipment during the planting process, it's best to look for an area that is easily accessible. Planting on an even, low slope in the front yard will be much easier than planting on a steep grade or in the back.EXPERT TIPMaggie Moran is a Professional Gardener in Pennsylvania.Home & Garden Specialist

 Maggie Moran
Home & Garden SpecialistPalm trees are good landscaping plants because their roots are non-invasive. Horticulturalist Maggie Moran explains, “Palm trees have shallow roots that usually reach depths of 36 inches (91 cm) or so. Their roots are relatively non-invasive, meaning that you could potentially plant them near pools and other structures. However, I’d still recommend planting the trees at least 6–10 feet (1.8–3.0 m) from your pool.”
-
4Do not dig a hole or drive vehicles where underground utilities can present hazards in the location you choose. Check into the property plat plan. See city or county permits, maps and utility plats, and call your local utility for locating service to be sure of routing of underground utilities, if there is any doubt. Hitting an underground water, natural gas, petroleum, power, or telephone line can cause real problems, liability and unnecessary headaches.
Digging and Fitting the Hole
-
1Maneuver the tree close to the location you will be planting. This will make digging the hole the proper size much easier, since you can measure the root ball of your tree and compare that to the hole as you dig. Some palm trees can be buried above their root ball.
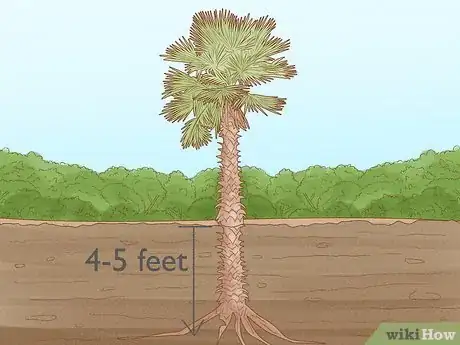
- For example a Mexican Fan Palm (Washingtonia robusta) can be buried 4 to 5 feet (1.2 to 1.5 m) deeper than the original top of the root ball. This can be advantageous when you are trying to match all trees to a specific height. It would also eliminate the need for bracing.
- Do not bury the root crown (top of the tree ball) or trunk of any other palm trees; please consult with a certified arborist prior to planting if you have any doubts about how deep your palm can be planted.
-
2Dig your hole so that it's at least six inches wider on all sides and six inches deeper than the plant’s existing root ball. Then put 6 inches (15.2 cm) of sand in the bottom of the hole. With a tape measure, determine the width and height of the palm's root ball and then dig accordingly.
- Try a quick drainage test, if where you're digging the hole is poorly drained clay or has much exposed rock or stone ledges. Dig a hole 16 inches (40.6 cm) deep, in soil with normal moisture, then fill it with water (extremely arid, dry or wet/soggy soil is not able to give a good test result). If it drains within an hour or two, you have excellent drainage. If it drains within 12 hours, you have acceptable drainage. If it hasn't drained after 24 hours, you have a drainage problem, and you probably shouldn't plant at that location without fixing it first.
- Be sure that the hole is deep enough to barely cover the top of the palm's root ball, but not so deep that the trunk can be drowned and rot. Exposed top of the tree's root crown is good -- but grading soil up to and exposing the root ball is a no-no. Palms with exposed root balls are said to be “on their tiptoes,” and are less stable. On the other hand, palms planted too deeply risk rot on their trunks, also destabilizing them, causing disease and rot.
Planting the Palm
-
1Remove the root ball cover (usually burlap or plastic) to expose the roots. Avoid shaking the soil from the roots any more than necessary, since this will allow them to dry and cause the delicate, hairlike feeder roots to die. Also avoid splaying the root ball before planting; although it may seem like you're giving the roots room to breathe, this process actually does more to hurt the root ball than help it.
-
2Ease the tree into position, making sure the top of the root ball is slightly lower than the level of the adjacent ground. Typically, the top of the tree's root ball should remain only 1 or 2 inches (2.5 or 5.1 cm) below the ground when the tree is seated and the hole is filled all around (backfilled).
-
3Straighten the tree. Palm trees often have curved trunks, so the plant may not be plumb (vertical) when you finish the project.
- Also make sure to find the front side of the palm, e.g. the side that has been given the most sunlight. Depending on your preference, you'll probably want the sunny side of the palm facing a spot where you can enjoy it. If the palm is in the front yard, that probably means facing the street; if it's in the backyard, that probably means facing the house.
-
4Backfill the hole barely covering crown. Fill the hole with a washed plaster-grade sand backfill, watering as you go. The sand backfill will ensure good drainage plus provide rigidity so you may not have to brace the tree.
-
5Build a soil barrier. Build a soil barrier a bit like a berm or dam all the way around the outside of the hole. This will help retain water for the newly planted tree. Once you’ve finished the barrier, you are ready to water. The barrier will guarantee enough moisture to keep the palm’s roots from hardening.[4]
Finishing Up
-
1Stake the tree to keep it standing, if necessary. Palm trees do not have large tap roots that support it, so they must be temporarily braced to keep them standing until their roots become established. That is, unless you are using the washed plaster sand backfill. This normally provides enough rigidity to avoid using braces.
- Wrap the trunk at least 1/4 up the tree's height with a 16 inch (40.6 cm) wide piece of burlap to keep the bracing board cleats from chaffing the bark when the tree tries to sway in high winds.
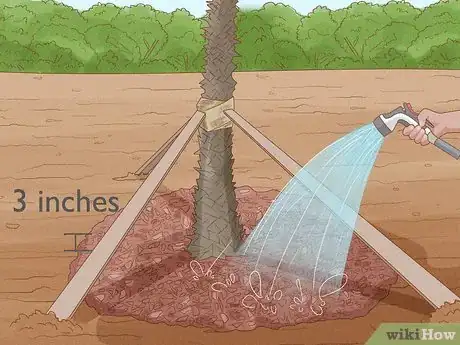
- Drive stakes on three sides, equidistant apart around the tree's circumference, and fasten lumber support braces (2X4 treated lumber will work) to blocks of wood secured to the trunk with tie wire, placed over the burlap.
-
2Water the tree thoroughly. You may want to create a small earthen dam around the root ball to keep the water from shedding away from the tree's roots while you water, particularly if the tree is on a hillside or in soil that doesn't absorb water easily. Mulching the base of the tree will also help to keep the soil moist. Use about 3 inches (7.6 cm) of non-compacting mulch.
-
3Hold off on fertilizing the palm for six to eight weeks after planting. Remember, transplanting your palm tree already poses a shock. Unfortunately, adding fertilizer poses another shock. To minimize the shock your tree might experience and maximize its chances of thriving, don't fertilize until six to eight weeks after planting.
- When you do decide to fertilize, remember to use a slow-acting fertilizer, and hold off placing the fertilizer directly near the trunk. Place the fertilizer one or two feet around the trunk of the tree to avoid over-fertilizing.
- You should also consider improving your palm’s soil with mycorrhizal fungi. Palms evolved to have a symbiotic relationship with these fungi and thrive when they are present in the soil, as the fungi colonize the tree’s root system and help it take in nutrients and water. You can purchase mycorrhizal treatments online or from plant stores.[5]
-
4Keep the tree watered as often as necessary until it is established, if the soil is gravel and sand it will need more watering. The establishment period will depend on the type of tree, its size, and whether it was a container plant or a wrapped root ball specimen. Generally, the roots should be watered thoroughly, but not flooded. Watering daily for the first few weeks, weekly for the following few months, then tapering off the watering is a normally suggested schedule.
Expert Q&A
Did you know you can get expert answers for this article?
Unlock expert answers by supporting wikiHow
-
QuestionWhat is the best time of year to plant a palm tree?
 Maggie MoranMaggie Moran is a Professional Gardener in Pennsylvania.
Home & Garden Specialist
-
QuestionHow much do palm trees grow in a year?
 Maggie MoranMaggie Moran is a Professional Gardener in Pennsylvania.
Home & Garden Specialist
-
QuestionHow deep are the roots of a palm tree?
 Maggie MoranMaggie Moran is a Professional Gardener in Pennsylvania.
Home & Garden Specialist
Warnings
- Use great care not to damage the bark of the tree, since any damage will offer insects an opportunity to attack it.⧼thumbs_response⧽
- Use great care when digging, especially if using power equipment, since unknown underground utilities may be encountered.⧼thumbs_response⧽
- Use great care lifting, if done manually, since palm trees have a high center of gravity with their relatively small root balls.⧼thumbs_response⧽
- Palm trees can be very temperamental. Don't be discouraged if your first attempt fails.⧼thumbs_response⧽
- Before you plant your palm tree, make sure that you are putting it exactly where you want it, or indeed, be sure that you want a palm tree at all. Once established, palm trees are nearly impossible to get rid of, as even a fragment of the tree's roots will sprout up into a new tree, even when the main body of the tree is removed.⧼thumbs_response⧽
Things You'll Need
- Material for bracing the tree
- Digging equipment (either shovels, etc., or power equipment)
- Soil amending materials such as vermiculite, topsoil mixtures, organic compost, and fertilizers
References
About This Article
To plant a palm tree, dig your hole at least 6 inches wider and deeper than the tree’s root ball. Then, put 6 inches of sand in the bottom of the hole. Next, expose the root ball’s root system and ease the tree down, making sure the root ball is slightly lower than the level of the adjacent ground. Fill the hole, watering as you go, and build a soil barrier around the newly planted tree to help it retain water. For more advice from our Horticulturist reviewer, including tips on how to keep the tree watered, keep reading!
