wikiHow is a “wiki,” similar to Wikipedia, which means that many of our articles are co-written by multiple authors. To create this article, 21 people, some anonymous, worked to edit and improve it over time.
There are 7 references cited in this article, which can be found at the bottom of the page.
wikiHow marks an article as reader-approved once it receives enough positive feedback. In this case, several readers have written to tell us that this article was helpful to them, earning it our reader-approved status.
This article has been viewed 349,566 times.
Learn more...
With the right precautions and materials, piercing your tongue will only take a couple of minutes of bravery and you'll be freaking out your parents in no time. It's absolutely essential that you take the necessary cleanliness and safety precautions, taking the time to acquire professional piercing equipment, doing the job properly, and caring for the piercing afterwards. It's always preferable to get your piercing done by a licensed professional,[1] but if you must, you must. See Step 1 for more information.
Steps
Preparing for Piercing
-
1Get the necessary tools and equipment for the job. Commercial piercing kits are available with everything you'll need to pierce your tongue. A 14 gauge barbell is recommended for the tongue. To do the job properly, you'll need:
- 1 sterilized 14-gauge piercing needle or cannula (a hollow needle using in piercing)
- 1 new 7/8-inch,14-gauge steel tongue barbell-style piercing
- surgical forceps
- sterile latex surgical gloves
- You should never attempt to pierce your tongue with anything other than a sterile piercing needle or cannula, and should never stud the piercing with anything but a new barbell-style piercing.
- Good quality piercing kits are sometimes cheaper than having your tongue pierced at the shop, but not necessarily. Usually it's not worth it in terms of value and effort. If you've got a shop you trust, you can have your tongue pierced by a professional, in and out in probably less than 20 minutes.
-
2Open and sterilize the equipment with alcohol. Make sure that you clean everything that you are going to be using with rubbing alcohol. The stud, the forceps, and especially the needle need to be cleaning thoroughly and then sterilized.[2]
- It should go without saying, though it bears repeating: Never reuse piercing needles[3] and only use needles specifically used for piercing if you're going to try to pierce your own tongue.
Advertisement -
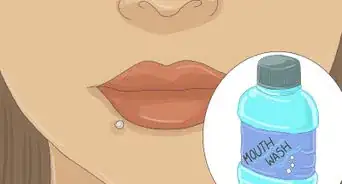
3Clean out your mouth thoroughly. Before you try to pierce anything, it's important to brush your teeth thoroughly and rinse your mouth out with a gentle anti-bacterial non-alcoholic mouthwash.
-
4Clean your hands. Wash your hands with soap and water, then sterilize them with hand sanitizer and put on some clean, disposable latex gloves.
-
5Anticipate the pain. While some people with their tongue pierced say that the tongue piercing is one of the least painful piercings you can get, and that it hurts even less than biting your tongue, it still involved jabbing a needle all the way through part of your body. It's no walk in the park. Anticipate the pain of the needle so you don't get halfway through and stop.


Piercing Your Tongue
-
1Locate the large veins on the bottom of your tongue.[4] Two significant veins run alongside the bottom of your tongue, either of which--if pierced--will bleed significantly and might cause a dangerous situation in which you'll need to visit the hospital and receive vascular repair. It's an expensive and potentially life-threatening possibility.
- Examine the underside of your tongue for the veins, and consider marking the safe spot between the veins with a small marker.
-
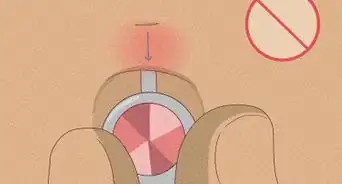
2Place the forceps clamp where you want the piercing to go.[5] The ideal piercing is centered back on the tongue far enough to be out of the way of the primary tastebuds, well clear of any veins that might be in danger of getting stuck.
- It's important to check and double check for the possibility of sticking yourself somewhere that will bleed significantly and risk vascular damage. If, when you pierce your tongue, it continues bleeding significantly, visit the hospital immediately.
-
3Pierce your tongue. Push the needle in straight and firm, using enough steady pressure to get it completely through the tongue. Do not remove the needle from your tongue until you've inserted the bar.[6]
- If you're using a solid piercing needle, most piercers like to go from the top of the tongue to the bottom of the tongue.
- If you're using a cannulated needle, most piercers like to go from the bottom of the tongue to the top of the tongue.
-
4Put the piercing bar in. Before you pull the needle all the way through and remove it, pull it gently to the side and insert the bar into the hole. Holding it in place, remove the piercing needle.[7]
-
5Attach the balls to the bar. Screw the balls on the barbell piercing, making sure it the piercing is comfortable and the balls securing it are tight.[8]
-
6Clean your mouth. Wipe up any blood that is on your tongue and rinse your mouth with mouthwash. The mouthwash may sting quite a bit, and it's very important to use non-alcoholic mouthwash that's very gentle. Most piercing shops sell a particular brand of mouthwash recommended for piercing care, usually Tech 2000 or Biotene.


Caring for Your Tongue Piercing
-
1Use ice and Ibuprofen to manage the swelling. Typically, the tongue will swell some after being pierced.[9] For some people, it's quite unnoticeable, for some it can be quite alarming. To manage the pain over the next few days, as well as any swelling you might experience, befriend a non-steroidal anti-inflammatory like Ibuprofen and suck on ice chips to help numb your tongue and keep the swelling down.
- Many people with tongue piercings find it helpful to suck on ice cubes immediately afterwards. This can help the swelling from starting, and numb the initial pain.
-
2Leave the piercing in. You don't need to remove the piercing and clean it. The piercing will heal best when left alone. Focus on keeping your mouth clean, not messing with the piercing itself. As tempting as it may be, don't try to remove it to inspect the healing process, and mess with it as little as possible. Let your mouth heal itself.
-
3Wash out your mouth twice a day with mouthwash and twice with salt water. Use a gentle mouthwash and rinse out your mouth regularly to lower your risk of infection. Alternate salt-water rinses with mouthwash.[10]
- Saliva has strong antibacterial properties that work to keep your mouth clean, but your mouth is still subject to lots of incoming risk of infection. Take care to clean it out and don't risk a painful infection.
-
4Avoid eating solid foods for 24-48 hours. You'll be able to manage the pain and avoid the risk of infection much more easily if you stick to juice and other foods you can sip for the first two days, at least. Listen to your body, but it's usually best if you avoid chewing and get used to the bar in your mouth for a while before trying to eat solid food.
-
5Avoid alcohol and smoking for at least two weeks. As your tongue starts to heal, avoid alcohol and smoke, which can agitate the wound and keep it from healing like it should. To be on the safe side, avoid them.[11]
-
6Try learning to speak normally with the bar in. One unexpectedly difficult issue that many newly-pierced people experience is that it's somewhat difficult to speak without a slight lisp, or feeling as if you've got a hard candy in your mouth at all times.
- The best way to speak properly: ignore it. Try your best to stop "holding" the bar as if it were a piece of candy, and just leave it alone as best you can. You'll instinctively try to keep the stud in your mouth, which you don't need to do. It's not going anywhere.
-
7Put in a smaller stud when the piercing heals. Total recovery can take up to a month, depending on the job and the person. When it starts to feel comfortable, it's good to switch to a smaller and more comfortable tongue stud than the one you used to get the piercing started. Change the bar to a smaller bar in about two weeks when the swelling has gone down.


Community Q&A
-
QuestionCan I re-pierce in the same hole or should I make a new one because of scar tissue?
 Community AnswerYou can repierce it. The only thing is it might a be a little harder to get the needle through and might have possible healing issues.
 -
QuestionWhat's the easiest piercing to hide from my parents? I'd like to get a piercing without their permission.
 Community AnswerBelly button, you can get it pierced and then just wear long t-shirts. After 6-12 months you can put in a retainer and wear crop tops!
 -
QuestionIs this easy to hide from family members?Community AnswerKind of. Try looking away when you're talking and avoid laughing. Also, if you use a neutral ball it is not very visible.
Warnings
- It is always preferable to get piercings done professionally if at all possible. Doing this by yourself at home runs the risk of hitting a vein, which can cause very serious bleeding.⧼thumbs_response⧽
Things You'll Need
- Needle
- Large metal tongue bar
- Clamp
- Gloves
- Hand sanitizer
- Paper towels
- ice cubes


References
- ↑ https://www.byrdie.com/diy-piercing-brilliant-or-brainless-3187317
- ↑ https://www.byrdie.com/diy-piercing-brilliant-or-brainless-3187317
- ↑ https://www.phsd.ca/health-topics-programs/body-art-salons/tattoos-piercings-making-safe-choice
- ↑ https://www.anatomynext.com/lingual-vein/
- ↑ https://www.youtube.com/watch?v=_T8svYgPsLE&has_verified=1
- ↑ https://www.youtube.com/watch?v=_T8svYgPsLE&has_verified=1
- ↑ https://www.youtube.com/watch?v=_T8svYgPsLE&has_verified=1
- ↑ https://www.youtube.com/watch?v=_T8svYgPsLE&has_verified=1
- ↑ https://info.painfulpleasures.com/help-center/piercing-information/tongue-piercing-faqs