This article was co-authored by wikiHow Staff. Our trained team of editors and researchers validate articles for accuracy and comprehensiveness. wikiHow's Content Management Team carefully monitors the work from our editorial staff to ensure that each article is backed by trusted research and meets our high quality standards.
This article has been viewed 75,007 times.
Learn more...
You can capture memories and moments in your own artistic way by mounting your photos. Dry mounting is a great way to preserve a photo for years whereas wet mounting is a good option for beginners looking for a quick mounting option. Wet mounting is usually very permanent and can cause a photo to yellow or decay over time, so it is not recommended as a long-term preservation method. However, it's a good to skill to have if you want a quick and easy way to display photos at a celebration or event.
Steps
Dry Mounting Photographs
-
1Choose the mounting board color and size. You can choose a size that leaves a border around the photo, or you can mount the photo on a board that is exactly the same size as the photo with no edges showing. You also have the option to use a mat which will place a border overtop of the photograph.[1]
- If you choose a mounting board with a border, carefully choose what color you want to show taking into account whether or not it matches the photograph.
- There are many options of board mounts to choose from, including but not limited to, Fotoflat, Foamex, Foamcore, Gatorboard and Colormount.
-
2Cut and measure your print. Use a ruler to measure the dimensions of your print. Remember that if you want to leave a border, your photo needs to be slightly smaller than the mounting board. Cut your photo to size accordingly.Advertisement
-
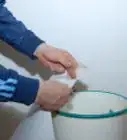
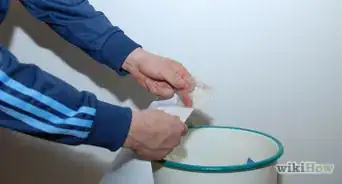
3Cut dry mount tissue. Dry mount tissue is a special adhesive paper designed to attach photos to mounting boards. Cut the tissue slightly smaller than the photo, about 1/8 inch (3 mm) smaller than the print on all sides, so the edges aren't visible beneath it.[2]
- Using an acid-free dry mount tissue is recommended as an acid-based tissue might cause visible damage to your mounted photos in the years to come.
-
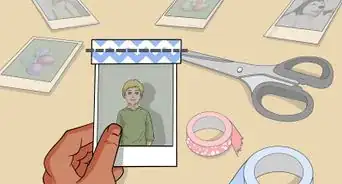
4Tack the tissue to the back of the photo. Using small pieces of clear tape, attach the dry mount tissue to the back of your photograph at each corner. This will hold it in place while you start adhering the tissue at the center.
-
5Warm an iron up to a low heat level. Too hot of an iron will damage your photo. You can also invest in a dry mounting press, although they tend to be more expensive.[3]
-
6Set the photo on the mount board. Clean the backside of your photograph leaving no traces of dust so it will stick to your board without fuss. Be sure the tissue is attached, and center the print on the mounting board.[4]
-
7Place a sheet of blotter paper on top of the photo. This is an important step as blotter paper will absorb excess moisture from the iron and will keep your photo from getting damp. The blotter paper should be the same size as the print and it goes right over your photo when you're ironing.
-
8Adhere the photo to the board. Press the iron down firmly in the center of the photo. Hold your iron or dry mount press there for about 5 minutes so the heat warms up the photo, dry mount tissue and mounting board. Pull the corners of the photo up carefully after the middle is firmly attached to the mounting board and remove the tape before adhering the edges to the board.
-
9Slide the iron from the center to each edge. Practicing this step first with an old print may help you get used to the process to ensure no mistakes are made. Make sure your iron stays in contact with the blotter paper to avoid getting bubbles in the mounted photo. Press the iron firmly down on the edges of the photo under even pressure for 5 minutes at each location.[5]
-
10Trim the edges of the board. Place your mounted photo on top of a cutting board, and use a box cutter or X-Acto knife to trim the edges of your mount board. Lay your ruler over an edge of the photo while cutting so you cut in a straight line. Smooth the edges of your photo with a nail file when you're finished trimming.[6]


Wet Mounting Photographs
-
1Choose your mounting board and adhesive. Adhesive options include roll-on, brush-on or even spray-on glues that are specifically designed for mounting photos. For spray-on glues, it's a good idea to use a respirator mask to avoid inhalation of fumes.[7]
- You can mount the photo on a typical mount board, or use cloth if you're mounting something like a map and plan on rolling it up.
-
2Cover your work area. When wet mounting a photo or print, you'll want to cover your entire work area with a tablecloth, newspapers or a piece of plywood so you don't damage the furniture underneath. You wouldn't want your adhesive sticking to your table or desk and peeling the surface off.[8]
-
3Line up the photograph. Position the photo on the mounting board where you want it to be using a ruler to make sure the bordering edges are the same size, and make small pencil marks just inside each corner on the front of the mounting board. The marks will be used as guides when you turn your photo over after applying the mounting adhesive.
- If you don't want a border on your mount board, then you won't have to worry about the bordering edges being even.
-
4Add the adhesive. Lay your photo upside down on a flat surface. Spray, rub or brush the glue on the photo in an even coat making sure to cover the corners and edges. Spread the adhesive evenly on the entire backside of the photograph ensuring that there are no lumps or dry spots.[9]
-
5Attach the photo to the mounting board. Flip the photo over onto the mounting board using the guide marks where you first measured to line it up evenly. Make sure it is centered on the mounting board before pressing down.
-
6Gently smooth any bubbles or wrinkles. Work your way from the center of the photo to the edges — first to one end, then the other and so on. Then gently lift the corners to get rid of any bubbles, and press from the center to each corner. You can use certain tools such as a rolling pin, round bottle or brayer to smooth the surface and to guarantee an even-textured finish.[10]
- Because glue can seep out from underneath the print, place strips of paper over the edges and corners of the photo so the tool you're using doesn't get glue on it.
-
7Wipe away any glue. In the likely occurrence that adhesive seeps from the edges of the photo, wipe it away with a damp cloth. Wring out the towel so you don't soak your finished product. Cover your mounted print with a heavy flat object (like a book) to keep it in place while it dries, and read the directions on the adhesive you used for the recommended dry time.[11]

Community Q&A
-
QuestionHow can I mount a black and white photo without it smearing? The ink smears when it is touched.
 Elissa SchwartzCommunity AnswerLet the ink dry for 24 hours. Never get the photo wet and use high-quality ink. You can also use a spray to coat the photo like Krylon UV Archival Varnish or Krylon Preserve it Aerosol Spray. Let it dry for 2 hours before you handle it.
Things You'll Need
- Iron
- Mounting board
- Dry mount tissue (acid-free is recommended)
- Mat cutters or X-Acto knife
- Scissors
- Ruler
- Clear tape
- Blotter paper
- Mounting adhesive
- Cardboard or something to cover the work surface

References
- ↑ http://www.reframingphotography.com/content/mounting-matting-and-framing
- ↑ http://www.reframingphotography.com/content/mounting-matting-and-framing
- ↑ http://www.photographytips.com/page.cfm/231
- ↑ http://howto.academyart.edu/submitting-artwork/mounting--matting-and-framing/dry-mounting
- ↑ http://www.photographytips.com/page.cfm/231
- ↑ http://howto.academyart.edu/submitting-artwork/mounting—matting-and-framing/dry-mounting
- ↑ http://collections.infocollections.org/ukedu/en/d/Jm0020e/5.3.html
- ↑ http://collections.infocollections.org/ukedu/en/d/Jm0020e/5.3.html
- ↑ http://collections.infocollections.org/ukedu/en/d/Jm0020e/5.3.html
About This Article