This article was co-authored by wikiHow staff writer, Amy Bobinger. Amy Bobinger has been a writer and editor at wikiHow since 2017. She especially enjoys writing articles that help people overcome interpersonal hurdles but frequently covers a variety of subjects, including health and wellness, spirituality, gardening, and more. Amy graduated with a B.A. in English Lit from Mississippi College in 2011 and now lives in her hometown with her husband and two young sons.
There are 25 references cited in this article, which can be found at the bottom of the page.
The wikiHow Video Team also followed the article's instructions and verified that they work.
This article has been viewed 17,935 times.
Learn more...
Making your own pillow covers is a fun way to change up your decor. Even better, these no-sew pillow covers don't require a sewing machine, and they're easy enough for anyone! If you have fabric adhesive on hand, you can create a custom cover for any pillow. If you want to change the look of your pillows often, try wrapping the pillow in fabric and securing it with a simple knot. For a more decorative option, link together strips of fabric to create a no-sew pillow cover with a braided edge.
Steps
Making a Cover Using Fabric Adhesive
-
1Cut a piece of fabric about 3 in (7.6 cm) larger than the pillow. Place your pillow in the center of the fabric you want to use as your cover. Then, use a ruler to measure about 1.5 in (3.8 cm) away from the edge of the pillow all the way around. Mark this measurement with a fabric marker or fabric chalk, then cut the fabric into a square or rectangle.[1]
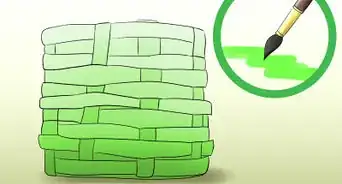
- You can use any type of fabric you like for this, although some silky or chunky fabrics might not bond well to the adhesive. Thicker materials like burlap, velvet, stiff cotton, or brocade might make your pillow look more elegant, or you can use chambray or cotton for a more casual look. Since you'll be adhering the fabric to create a hem, you don't have to worry about the material fraying.
- Since you'll be adding 1.5 in (3.8 cm) to each edge, the total width and length will be 3 in (7.6 cm) longer than the pillow.
- For very thick pillows, you may need to measure the fabric 2 in (5.1 cm) outside the edge of the pillow. Just make sure that the fabric will reach the center seam of the pillow with an extra 1 in (2.5 cm) for a seam allowance.
-
2Cut a second piece of fabric to the exact same size. Once you've cut the first side of your pillow cover, lay that piece of fabric on a second piece and trace around it with your fabric marker. Then, cut that piece of fabric, as well.[2]
- When you're designing your fabric cover, you may want to have the front and back be the same pattern. However, if you'd like a reversible pillow cover, you can use a different, coordinating color or pattern for the second piece.
Try this variation to make a no-sew envelope pillow cover: Instead of cutting a second piece of fabric, cut 2 more pieces that are the same width as the first piece, but only 3/4 as long. For instance, if your original piece is 20 in × 20 in (51 cm × 51 cm), you'd cut 2 more pieces that measure 15 in × 20 in (38 cm × 51 cm). Glue these to the back side of your larger piece on 3 sides, leaving the overlapping sides free so you can slip the pillow into place when you're finished.[3]
Advertisement -
3Place your 2 fabric pieces with the right sides together. Take your fabric pieces and stack them 1 on top of the other. Make sure the right sides, or printed sides, are facing each other—the bottom piece of fabric should be lying with the printed side up, and the top piece should have the printed side facing down.[4]
- To make your finished design look neater, you may want to press the pieces with an iron first.
-
4Place fabric adhesive between the pieces of material along 1 side. If you're using fabric glue, brush it onto the bottom piece of fabric along 1 side, going from the outside to about 1 in (2.5 cm) inside the edge. If you're using adhesive that comes on a roll, like double-sided fabric tape, peel the backing off one side and press it onto the bottom piece of material along the edge, then peel off the top piece of backing.[5]
- When you're finished, press the top piece of material firmly onto the adhesive to secure it.
- If you're using an iron-on adhesive, press it into place, then slowly run your iron along the wrong side of the top piece of material to bond the adhesive to the fabric.
-
5Repeat for 2 more sides, leaving 1 side open. Once you've adhered the first side of the fabric, keep applying your adhesive until you have 3 sides completely attached. As you do so, continue working about 1 in (2.5 cm) from the edge of the material so you'll have an even seam all the way around.[6]
- Leave the last side free for now so you can insert your pillow before you finish closing the cover.
- If the label advises that the adhesive needs time to cure, wait at least the recommended time before you continue. However, it's okay to attach the 3 sides all at once, rather than allowing the adhesive to cure between each application.
-
6Turn the fabric right-side-out and insert your pillow. After you've attached 3 sides of your pillow cover, turn it so it's right-side out. Use your fingers to push the corners out so they look neat, then slip the pillow in through the unattached side.[7]
- If you need to, you can use a pencil to push the corners out.
-
7Close the last side of the cover with your fabric adhesive. Fold the edges of the open side in to create a neat edge. Then, apply your fabric adhesive between the final 2 layers and press the folded edges together. Allow the glue to dry fully, then enjoy your new pillow cover![8]
- Folding in the final edge will help hide any raw edges and should prevent the fabric from fraying.
- If it's difficult to apply the fabric adhesive to the final side, you can use hot glue, instead.[9]


Wrapping the Pillow in Fabric
-
1Cut a square of fabric about 3 times larger than your pillow. Take the fabric you want to use to cover your pillow and cut a piece that's about 3 times longer and 3 times wider than the pillow you're covering. Your measurements don't have to be exact, but you do need to have plenty of excess fabric in order to knot it.[10]
- For this no-sew pillow cover, fleece, cotton, or another thinner material will work best. Thick or stiff fabrics like canvas, velvet, or burlap may not hold a knot as well. Since the edges will be exposed, choose a fabric that won't fray.
VTo cover a rectangular pillow: Cut the fabric so it's 2 1/2 times the width and 3 times the length of the pillow. Lay fabric with the long sides on the top and bottom and the shorter edges along the sides. Put the pillow in the middle of the fabric and fold the top and bottom so they overlap in the center. Then, fold in the corners of the left and right sides like you're wrapping a present, and tie the ends in a knot in the center of the pillow.[11]
-
2Place the fabric in a diamond shape with the pillow in the center. Once you've cut the fabric, lay it so one corner is directly in front of you and one is at the top of your work station, with the other 2 corners extending out to the sides. Then, place your pillow right in the middle of the diamond shape.[12]
- Make sure the fabric is right-side-down for this step.
-
3Fold the bottom corner of fabric up over the pillow. Take the bottom corner, or the one that's closest to you, and pull it all the way up and over your pillow. Tuck any excess under the top edge of the pillow.[13]
- Be sure to pull the fabric so it's snug.
-
4Fold the top corner down and tuck the end under the pillow. Lift the top edge of the pillow and pull the top of the fabric down until the point is about halfway under the pillow. Then, use your hands to press down the fold at the top of the fabric to crease it.[14]
- You will now have 2 layers of fabric beneath the top edge of the pillow.
- This fold should not go over the top of the pillow the way the previous fold did. Instead, tuck the material under the pillow.
-
5Bring the top edge down to the center of the pillow. Look for the flat edge along the top side of your pillow cover. Take this edge and wrap it down over the pillow so it hits right in the center.
- If the material doesn't reach all the way to the center of the pillow, you may need to adjust the fold you made in the previous step.[15]
-
6Fold in the left and right corners neatly. First, fold over the top edge of the fabric on 1 side of the pillow cover, tucking in the corners like you would if you were wrapping a present. The fold should go all the way from the pillow to the end of the point. Repeat this on the bottom of that side, then do the same for the top and bottom of the opposite side of the cover.[16]
- When you're finished, you should still see a triangle shape, but it will be sharper than it was before, and the corners should look tidier. [17]
Tip: To help the folds hold their shape, try pressing them with an iron!
-
7Knot the left and right sides together in the center of the pillow. Bring the left and right sides tightly together over the top of the pillow. Then, tie them together with a square knot to secure your no-sew pillow cover![18]
- You can leave free ends out if you like the way they look, or you can tuck them under the knot.


Making a Braided No-Sew Pillow Cover
-
1Cut 2 pieces of fabric 4 in (10 cm) larger than the pillow. Measure the dimensions of your pillow and add 4 in (10 cm) to the length and the width of those dimensions. Then, measure and cut your fabric to size.[19]
- For instance, if you want to make a 10 in × 16 in (25 cm × 41 cm) pillow, you'd cut your fabric to be 14 in × 20 in (36 cm × 51 cm).
- Fleece is a great material for this because it will hold the knots well, although you can also use fabrics like suede or wool. Avoid stiff materials or any material that will fray.
-
2Stack the 2 pieces of material together, right sides out. When you look at your fabric, you'll likely see that one side is printed and the other side isn't, or that the design isn't as vibrant. The printed side, also known as the right side, of each piece of fabric should be facing outward.[20]
- This means that the printed side of the bottom piece of fabric should be facing downward, and the printed side of the top piece should be facing up.
-
3Trim a 2 in (5.1 cm) square out of each corner of the fabric. With the fabric pieces still stacked together, measure and cut 2 in (5.1 cm) along either side of each corner. When you're finished, you should have a square cut into each corner.[21]
- It's easier to cut the pieces together to ensure they match up.
-
4Cut 1 in × 2 in (2.5 cm × 5.1 cm) strips along all 4 edges. Measure in 1 in (2.5 cm) from 1 of the corners, then make a 2 in (5.1 cm) long cut. Continue making 2 in (5.1 cm) cuts spaced every 1 in (2.5 cm) along the material, all the way around.[22]
- Be sure to cut through both layers of material as you do this.
-
5Fold each set of strips in half and cut a 1⁄2 in (1.3 cm) slit in the center. Take the first strip you cut and fold both layers in half. Then, carefully snip about 1⁄4 in (0.64 cm) along that fold. Continue doing this all the way around the pillow cover.[23]
- When you unfold the strips, you should have a cut that's 1⁄2 in (1.3 cm), right in the center of the pair of strips.
Try this easy variation: For an even easier approach to a no-sew pillow cover, tie together the top and bottom pieces from each set of strips. Do this all the way around 3 sides of the fabric, then insert your pillow fill before knotting the remaining strips. The finished pillow cover will have a fringed look.
-
6Push 1 set of strips through the hole in an adjacent set. Starting at 1 corner, take 2 sets of strips in your hand. Use your finger to hold open the hole on the set of strips closest to the corner. Then, push the second set of strips through that hole and pull it tight.[24]
- Make sure you insert both the top and bottom layers of each strip. When you're finished, check that you can see hole in the second strip.
-
7Continue attaching the strips like this around 3 sides. Take the third strip in the row and push it through the hole in the second strip, pulling it tight. Then, keep going all the way around the next 2 sides, being sure to work in the same direction as you go.[25]
- For instance, if you start working from left to right, you'd continue doing that all the way around.
- The ends should start to take on a braided look after just a few strips.[26]
- When you get to a corner, you don't have to do anything different—just slip the first strip from the new side through the last strip of the old side.
- For a neater look, tuck the ends inside the pillow cover as you go.
-
8Insert the pillow through the open side. Before you finish braiding the last side of the pillow cover, slide your pillow in through the opening. Push the corners of the pillow down into the corners of the cover and adjust it as needed, since it will be more difficult to adjust the pillow after the cover is closed.[27]
-
9Finish braiding the last side, then tie the final 2 pieces in a knot. Continue pushing each strip through the hole in the previous piece all the way along the fourth side of the pillow cover. When you get to the last 2 pieces, slide the last strip through the hole, then tie the ends in a double knot and tuck in the ends.[28]
- If any of the ends come free over time, just push them back through an opening between the knots.


Things You'll Need
Using Fabric Adhesive
- Fabric
- Scissors
- Fabric marker or chalk
- Tape measure
- Fabric adhesive
- Iron (optional)
Wrapping the Pillow
- Lightweight, low-fray fabric
- Scissors
- Tape measure (optional)
- Iron (optional)
Making a Braided Pillow
- Fleece or a similar low-fray fabric
- Tape measure
- Scissors


References
- ↑ https://youtu.be/0WeR5ZtzSQ8?t=77
- ↑ https://www.mom4real.com/make-no-sew-pillows/
- ↑ http://www.livelovediy.com/2013/04/how-to-make-pillow-with-glue.html
- ↑ https://www.mom4real.com/make-no-sew-pillows/
- ↑ https://youtu.be/0WeR5ZtzSQ8?t=57
- ↑ https://www.mom4real.com/make-no-sew-pillows/
- ↑ https://www.mom4real.com/make-no-sew-pillows/
- ↑ https://youtu.be/0WeR5ZtzSQ8?t=350
- ↑ https://www.mom4real.com/make-no-sew-pillows/
- ↑ https://youtu.be/FEIkRXxEYjY?t=10
- ↑ https://organizeyourstuffnow.com/the-easiest-pillow-cover-ever
- ↑ https://youtu.be/p6hdcFrfa_g?t=29
- ↑ https://youtu.be/FEIkRXxEYjY?t=56
- ↑ https://youtu.be/FEIkRXxEYjY?t=64
- ↑ https://youtu.be/FEIkRXxEYjY?t=67
- ↑ https://youtu.be/p6hdcFrfa_g?t=71
- ↑ https://youtu.be/FEIkRXxEYjY?t=87
- ↑ https://youtu.be/p6hdcFrfa_g?t=103
- ↑ https://youtu.be/A6HjUAQeMqk?t=46
- ↑ https://youtu.be/lmgK6_HuMFw?t=34
- ↑ https://youtu.be/xnq3wuajSYU?t=39
- ↑ https://youtu.be/A6HjUAQeMqk?t=59
- ↑ https://youtu.be/xnq3wuajSYU?t=112
- ↑ https://youtu.be/xnq3wuajSYU?t=155
- ↑ https://youtu.be/A6HjUAQeMqk?t=90
- ↑ https://youtu.be/xnq3wuajSYU?t=203
- ↑ https://youtu.be/A6HjUAQeMqk?t=93
- ↑ https://youtu.be/xnq3wuajSYU?t=291
About This Article