wikiHow is a “wiki,” similar to Wikipedia, which means that many of our articles are co-written by multiple authors. To create this article, 79 people, some anonymous, worked to edit and improve it over time.
This article has been viewed 866,177 times.
Learn more...
A homemade book can make a great gift for a birthday, wedding or anniversary. Why? Because it can be on any topic. It's also a great way to make something very ordinary unique and personal. With basic supplies and some time, you'll expand the mind of your child or light up the face of a new bride.
Steps
Glue and Fabric Bind
-
1Choose material for the cover and cut out two identical pieces. For your first book, cardboard is easy to work with. Once you get the hang of it, you can move to wood or game boards.[1]
- The cover needs to be 1/4 inch (0.6 cm) wider and ½ inch (1.25 cm) longer than the inside pages. If you are using printer paper, it should be 8 ¾" x 11 ½" (22.2 x 31 cm).
-
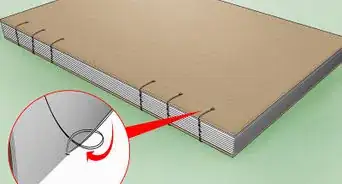
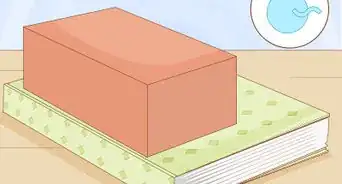
2Fold six sheets of paper in half. Then, sew them together at the crease in a figure-8 pattern. Make sure you start and end at the same point and the knot faces inside. This will create a spine.[2]
- 1/4" (0.6 cm) is an adequate width.
Advertisement -
3Stack several of these six-sheet stacks on top of each other. Make sure they are properly aligned. Press them down between some heavy books and measure the width of the spine.
- Once they are flattened, sew the stacks together using the same formation.
-
4Cut a strip of fabric. It should be as long as the pages and ¾" (2 cm) wider than the spine.
-
5Coat one side of the fabric with glue. Use plenty, but not so much that it drips. Stick the fabric to the spine of the pages. Pull it tight. Run a ruler along it to smooth out any bubbles.
- Place the book between sheets of wax paper and underneath a heavy book or two. Wait for the glue to dry. Allow it 20 minutes or so.
-
6Glue the cardboard pieces to the first and last pages. Before you do this, make sure the glue from the fabric is dry. Also, be sure the pieces of cardboard are aligned with each other and also with the spine.
-
7Cut one more piece of fabric. They should be as long as the cardboard pieces and ¾ of an inch (2 cm) wider than the piece of fabric holding the pages together. Glue these to the spine on top of the cardboard and press them into the first piece of fabric.
- Again, place the book between pieces of wax paper and underneath the heavy books. Wait to dry.
-
8After it has dried, cut out a piece of decorative paper. It should be 2 inches (5 cm) wider than both the covers and the spine combined, and two inches longer than the cover.
-
9Make a crease on the decorative paper 1 inch (2.5 cm) from the top 1 inch from the bottom. Make four slits in the paper to allow for the spine (which cannot be folded over upon), removing any excess.
- Cut the paper so the spine is covered but so there is no paper directly above or below it. You should now have four flaps — two above the book and two below.
- Fold these flaps down and glue them to the inside cover.
-
10Cut out two sheets of paper. They should be 1/4 inch (0.6 cm) narrower than the cover and ½ inch (1.25 cm) shorter. Glue it to the inside cover so that it covers what the cover paper doesn't, and so that it sits flush to the spine.
- After all of it is dry, decorate it however you want!
Japanese Book-Bind
-
1Gather your materials. Everything for this project can be bought at craft supply stores and nothing is more than a few dollars. Clean off the kitchen table and grab the following:
- Blank paper (30-100 sheets, depending on your book's thickness)
- 2 sheets of cardboard
- 2 sheets of pretty paper (2 types)
- Ribbon - a few feet long, 6 mm (1/4") wide
- Hole-punch
- Glue stick
- Scissors
- Ruler
- Bull clips
-
2Lay out your blank paper. Depending on what type of book this is, you'll want thinner or thicker paper; you'll also need to consider how many sheets. For a photo album, around 30. For a journal, 50 or more.[3]
-
3Grab the scissors. Cut out two sheets of cardboard that match the measurements of your blank paper. No dimension is too small or too big. Though if it's so big it's hard to carry, you've probably gone too far.
- Draw two vertical lines on one of the cardboard pieces. 1" (2.5 cm) from the left edge, draw the first line from top to bottom. The second line should be just under 1 ½" (3.5 cm) from the left edge and going parallel to the first one. Do this on the other piece of cardboard as well.
- These lines are very close to each other. This is to separate the bind from the body of the book, creating a hinge.
- Draw two vertical lines on one of the cardboard pieces. 1" (2.5 cm) from the left edge, draw the first line from top to bottom. The second line should be just under 1 ½" (3.5 cm) from the left edge and going parallel to the first one. Do this on the other piece of cardboard as well.
-
4Cut along the lines you just drew. That is to say, remove the ½" (1.25 cm) between the two lines. Discard the excess cardboard. You now have two pieces of cardboard, one being 1" wide.
- A craft knife may be easier than scissors. If you have one, use it.
-
5Make your outside covers. Get two pieces of fancy, decorated paper for your front and back covers and cut to size. Each piece should be 1 ½" (3.8 cm) longer and 1 ½" wider than the inside pages. If your blank paper is 8" by 10" (20 by 25 cm), cut your decorative paper to 9 ½" by 11 ½" (24 by 29 cm) size.
- Place one of your fancy pieces of paper face-down. You should be staring at a blank canvas. With a pencil, draw a ¾" (2 cm) border in all the way around the sheet.
-
6Glue the cardboard onto the pretty paper. Line it up with the border you drew in the previous step (that's why you just did that). Make sure that you cover the entire page with glue, not just the edges. A mess won't accumulate if you use a glue stick.
- This will be the back cover. The ½" (1.25 cm) gap in the cardboard that you cut out previously will be the "hinge" that makes the book open and open easily.
- Apply the glue to the paper if you're using wrapping paper (or other thin, pretty paper). This prevents wrinkling and swelling and gives the paper time to get used to the moisture in the glue before application on the cardboard.
- Repeat for the front cover. Make sure the pattern is facing the right direction!
- This will be the back cover. The ½" (1.25 cm) gap in the cardboard that you cut out previously will be the "hinge" that makes the book open and open easily.
-
7Fold in the sides. With the cardboard centered on the paper, fold in the corners over as far as they'll go. Glue them in place, creating little triangles of decorative paper that are resting on the corners of your cardboard.
- Once the corners are folded, start on the sides. Folding the corners first creates a geometrical, stream-lined fold. Sort of looks like gift-wrapping.
- Do this for both sides and glue everything in place. There should still be a ½" gap between the two pieces of cardboard.
-
8Start on the inside covers. Cut out two sheets of decorative paper that are ½" (1.25 cm) smaller than the blank paper. If your blank paper is 8" by 10" (20 by 24 cm), cut out the paper for the inside-covers to be 7 ½" by 9 ½" (19 by 23 cm).
-
9Hole punch two holes into the binding. Depending on what and how many materials you use, this could be very easy or very difficult. They should be about 1 ½" (3.8 cm) from either edge.
- If you don't have a hole punch (and preferably a single hole punch), you can use a drill. But before you drill a hole into the table, place it onto something you're comfortable drilling into, like a phone book. If you do use a drill, place the covers inside out so that the rough edges are on the inside.
- Use bull clips to hold everything together.
-
10Thread a ribbon through the holes using the Japanese bookbinding method. The ribbon should be six times longer than the book is tall. If your book is 6 inches (15 cm) tall, your ribbon should be 36 inches (90 cm) long. Once you've completed this, you're finished![4]
- Place it down through the top hole. Leave a length on the right for a bow.
- Place the same end down through the same hole again.
- Thread the same end down through the bottom hole.
- Thread the same end down through the bottom hole again.
- Wrap it underneath and down through the bottom hole once more.
- Pull the same end through the top hole. (A criss-cross pattern forms along the spine.)
- Wrap it over the top of the book and tie with the other end in a knot. It should sit on top of the hole.
- Tie in a bow.
Community Q&A
-
QuestionHow much space between each page do I need to glue a picture?
 Community AnswerYou don't need to glue any pictures if you don't want to. If you do, just do so on every page to the right-hand side.
 -
QuestionHow can I make a picture space?
 Community AnswerIf you want a drawn picture, draw it on paper, then glue it on the cover. if you want any other picture, glue it where you want it on the cover.
 -
QuestionWhat else could be used without using cardboard as the cover?
 Community AnswerYou could use wood or a board from a game or plastic or anything else you're able to cut to shape.
Warnings
- Don't glue the pages together. It's much harder to remove glue than to add more, so be cautious.⧼thumbs_response⧽
Things You'll Need
Glue and Fabric Bind
- Cardboard (or some other thick board)
- Scissors
- Ruler
- Needle and thread
- Two kinds of decorative paper
- Printer paper
- Elmer's glue or similar craft glue
- Fabric (old sheets work best)
- Wax paper
- Embellishments
Japanese Book-Bind
- Blank paper (30-100 sheets)
- 2 sheets of cardboard
- 2 sheets of pretty paper, differing types
- Ribbon - a few feet long, 6 mm (1/4") wide
- Hole-punch
- Glue stick
- Scissors
- Ruler
- Bull clips
References
- ↑ https://www.homemade-gifts-made-easy.com/how-to-make-a-book.html
- ↑ http://www.readwritethink.org/files/resources/printouts/HowToBindBook.pdf
- ↑ https://www.ibookbinding.com/bookbinding-styles/japanese-binding/top-10-japanese-stab-binding-tutorials-on-the-internet/
- ↑ https://www.westdean.org.uk/study/school-of-conservation/blog/books-and-library-materials/intro-to-binding-japanese-stab-binding-tutorial-flexible-cover-with-three-hole-stitching
About This Article
To make a homemade book with glue and fabric, start by choosing a material for your cover. If it’s your first time making a book, cardboard is a good option. Cut 2 identical front and back cover pieces so that they’re 1/4 inch (0.6 cm) wider and ½ inch (1.25 cm) longer than the inside pages. For example, if you’re using standard printer paper, get a piece of cardboard that’s 8 ¾ inches by 11 ½ inches (22.2 x 31 cm) and cut it in half. Next, take 6 pieces of paper and fold them in half widthwise. Thread a needle with a thick piece of thread or embroidery floss, then poke the needle through the middle of the crease from the front. Pull it back through the back of the crease about halfway between the middle of the paper and the edge, then bring it back through the original hole in the middle. Repeat the stitch on the other side of the middle of the crease to make a pair of stitches shaped like a figure 8. Tie the end of the thread to the loose end poking through the central hole on the front face of the pages. Make as many of these stitched groups of pages as you like, then stack them on top of each other. Set something heavy down on the stack, such as a large book, to flatten the pages. While you’re at it, measure the height of the stack of pages to get a sense of how wide the spine of your book needs to be. Once the pages are flat, sew them together using a similar pattern to the one you used to stitch the separate stacks of pages together. Then, cut out a strip of fabric as long as the pages and ¾ of an inch (2 cm) wider than the spine of your book. Coat one side of the strip with enough glue to dampen it thoroughly, but not so much that it drips and runs. Run the strip along the spine of the book lengthwise and wrap the excess width around the pages on either side. Make sure the fabric is pulled tight, and run a ruler along it to smooth out any bubbles or bumps. Place the pages between 2 pieces of wax paper and press them under a heavy object, such as a big book. Wait about 20 minutes for the glue to dry. Next, glue the cover pieces to the first and last pages of the book, making sure they are properly aligned with each other and the spine of the book. Cut out a second piece of fabric. Make this one as long as the cover pieces and ¾ of an inch (2 cm) wider than the first strip of fabric you cut. Glue the new piece of fabric to the spine and wrap the excess on either side around the edges of the cover pieces. Again, place the book between 2 pieces of wax paper and weigh it down with something heavy while the glue dries. In the meantime, cut out a large piece of decorative paper. It should be 2 inches (5 cm) wider than both covers and the spine combined, and 2 inches (5 cm) longer than the cover. Cut notches out of the top and bottom of the paper where it will fit over the spine, since you won’t be able to fold the paper over the ends of the spine. Open the book and set it on top of the sheet of decorative paper, and fold over about 1 inch (2.5 cm) of the top, bottom, and sides of the paper so that it fits perfectly around the covers. This will be easier if you cut slits at the corners of the paper where you need to make the folds. Glue the flaps down to the inside covers of the book so the paper stays in place. To finish your book, cut 2 more pieces of decorative paper about 1/4 inch (0.6 cm) narrower than the cover and ½ inch (1.25 cm) shorter. Glue them to the inside covers of the book so that they’re flush with the spine. Once all the glue is dry, have fun decorating your book however you like. To learn how to decorate your homemade book, scroll down!
