wikiHow is a “wiki,” similar to Wikipedia, which means that many of our articles are co-written by multiple authors. To create this article, 36 people, some anonymous, worked to edit and improve it over time.
The wikiHow Video Team also followed the article's instructions and verified that they work.
This article has been viewed 344,006 times.
Learn more...
Finding a passable sketchbook at an art store is fairly simple and commonplace, but nothing fuels that creative energy like constructing your own sketchbook. You can add your own personal touches to the book, and really make it one of a kind. Your homemade sketchbook will not only function as a unique piece of artwork in and of itself, but it can save you from spending a lot of money on generic, store-bought sketchbooks.
Steps
Prepping the Sketchbook Paper
-
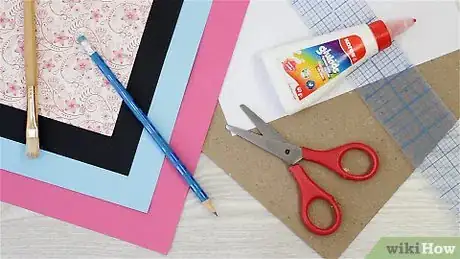
1Gather your materials. Collect all the materials you will need to construct and design your sketchbook:
- 20-30 sheets of drawing paper – Size A4 works well or even 9”x12” or 11”x14”.
- Patterned paper – This paper is for decorating the outside cover of your sketchbook. Depending on how you want to decorate you can use 3 different patterns for the cover of the sketchbook, the spine, and the interior of the sketchbook covers (endpaper).
- Cardboard – To make the covers of the sketchbook. Consider using thick paperboard rather than corrugated cardboard; it’ rather feeble.[1]
- Glue – White school glue works just fine for painting the materials.
- Needle and thread – Using a thicker needle is advised, as well as thicker thread, such as string, yarn, or hemp.[2]
- Ruler
- An awl or pushpin
- Pencil
- Small paintbrush or sponge brush
-
2Create your sketchbook signatures. Create 3-4 piles of paper with six sheets of paper in each pile. Fold each pile of paper lengthwise, in half, so that you make a little booklet with multiple pages. One little booklet is a “signature” of your sketchbook. The signatures make up the pages of your sketchbook, and make binding your sketchbook a lot easier.
- Depending on how big you want your sketchbook to be, you can adjust the number of signatures you use. However, the more signatures you use, the harder it’ll be to bind your sketchbook and the bulkier your sketchbook will be.
Advertisement -
3Mark your signatures for binding. Stack the signatures on top of one another, and line up the top, bottom, and folded edges. Use a pencil to draw four, evenly spaced vertical lines across the spines of the signatures.
- It is very important that the marked lines are all even on the signatures. This will ensure that the sketchbook pages line up uniformly once bound.
- The lines nearest the top and bottom of the signatures should be at least an inch away from the edges.[3]
-
4Poke your binding holes. Unfold each signature so it lies flat, with the outer spine facing up. Use either an awl or a pushpin tack to push a hole through the lined markings on each signature spine.
- Be sure to keep the pages of each signature aligned so your binding holes are all evenly placed.
- Once the sharp object is pushed through all sheets of paper, consider wriggling the poking object around a bit, to gently widen the holes. This will make it easier to fit the thread through.[4]
-
5Cut your binding string. Gauge how much binding string you need to use by measuring the length of the signature spines. Then take that measurement from the top end of the spine to the bottom, and multiply it by how many signatures your sketchbook will have. For example, if the spine is 10” long, and the sketchbook will have 4 signatures, cut your binding string at least 40” long.
- Always err on the side of caution. Cut more string than you need (about 45” of string), rather than cutting too little string, and running out as you thread.
-
6Thread the needle. Feed the string through the eye of the needle, and tie the ends of the string together, so it is double threaded.[5]
- Your knot should leave about an inch of extra string from the end of the knot. Let the needle fall to the middle of the string.
Sewing the Signatures Together
-
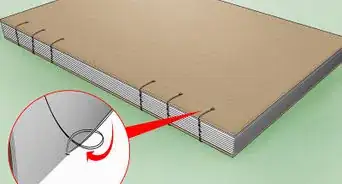
1Sew the first signature. Take one signature and thread the needle through the bottom hole, going from the outside of the signature, through to the inside of the signature. Pull the thread all the way through, so the knot of the string is up against the spine of the signature. From the inside of the signature, thread the needle through the second hole, moving out. Pull the string taut. Then, thread the needle through the third hole, moving from the outside of the signature, back in. Finally, thread the needle through the last top hole, moving from the inside of the signature, out.
- To know if the binding looks correct, the string between the two middle holes should run along the outside of the spine.
-
2Sew the second signature. Stack the second signature on top of the first, having both spines line up evenly.[6] Since the needle ending at the top of the spine for the first signature, you will start threading the second signature at the top hole. Thread the string through the second signature’s top hole, moving outward, in. Finish threading the needle through the second signature’s binding holes in the same fashion as you threaded the first signature, swapping directions. The needle should finish at the bottom of the second signature, going from the inside, outward.
-
3Attach the two signatures together. With the needle and thread coming from the bottom of the second signature, loop the needle around the knotted end of the first signature. Pull the needle around, over the knotted string to make a loop, and feed the needle through the hole to make a new knot.[7] This newly formed knot will secure the second signature to the first signature.
- Be sure to loop the thread of the threaded needle in the space between the knot and the first signature.
- If the securing knot is made on the free end of the knotted string, the signatures will not be secured to one another, and the securing knot will slip off the end of the string.
-
4Bind the rest of the signatures. Sew the rest of the signatures in the same manner you used for the previous signatures. If you are only using three signatures, when you finish threading the third signature, there won’t be a knot to tie the third signature onto. In this case, make a knot with the needle and thread around the string holding the first and second signature together. If you are using an even number of signatures, you will finish threading on the bottom, and be able to make a securing, final knot around the original signature knot.
- Once you have sewn all of your signatures, make your final securing knot and cut off the rest of the string. Again, be sure to leave a small amount of space on the string you cut.
-
5Trim the pages. The edges of the signature pages may be a bit uneven once they are all stitched together. If they are, and you want them evened out, use a ruler to measure 1/8” from the edge, mark the straight edge, and then cut off 1/8” from the pages’ edges.
- Consider measuring the width of the signature pages after you trim them, so you know the exact dimensions of your pages.
Making the Outer Sketchbook
-
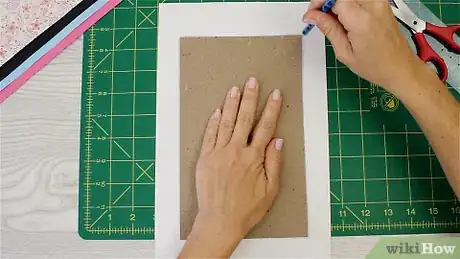
1Measure out the front and back covers. The covers for the sketchbook are going to be the same width as your signature pages but will be ¼” taller on the top edge. To find the measurements of the covers, trace your bound signatures (folded) onto the board you’re using to make your covers. Fully trace the signature pages twice, one tracing to make the front cover, and one to make the back cover. Once you have two tracings of the signature pages, measure ¼” above the top edge of the signature pages tracing. Make two marks; one mark ¼” above the spine side, and one mark ¼” above the free edge side. Connect the ¼ inch markings horizontally, so you have a straight line ¼” taller on the top edge of the original signature pages tracing.
- When the tracings are finished and expanded by ¼” at the top, use scissors to cut out the two cardboard covers.
-
2Cut out the sketchbook spine. The spine of the sketchbook will be the same height as the covers, but the width will depend on the height of the bound signature pages. Use a ruler to find the height of the bound signature pages, and use that measurement as the width of the sketchbook spine. Once you have your measurements, cut the spine out of the cardboard.
-
3Cut out the cover paper. Trace your cover cardboard onto the paper you want to use for your cover paper. Once you have two complete tracings, use a ruler to measure 1½” from the top edge of the two tracings. Make two marks on each tracing; one mark 1½” above the spine side, and one mark 1½” above the free edge side.
- The finished products should be two pieces of cover paper that are equal in width to the sketchbook covers, and 1½” taller than the cover boards.
-
4Measure the cover paper. Use a ruler to measure and draw a ¾” line from three edges of the cover paper. The cover board for the sketchbook should fit within the ¾” lines.
- The only side of the cover paper that shouldn’t be measured is the side that will be on the spine of the sketchbook.
-
5Cut the cover paper. With the two intersecting lines that measure the top and vertical ¾” measurements on the cover paper, draw a 45-degree angle line just above the intersecting lines. Then, cut along the 45-degree line. Fold the cover paper over to the inside face of the cover board to see if the cover paper fits correctly.
- The amount of left space between the intersecting lines and the 45-degree angled line should be very little, about 1/32”.
-
6Trace out the spine cover. Place the cut out sketchbook spine on the paper with which you’ve chosen to decorate it. Trace the spine on the paper, and then trace vertical lines extending 1½” out from both sides of the spine, and ¾” horizontal lines from the top and bottom of the spine.
- The end result should look like a big rectangle, with a centered skinny rectangle that’s the same size as the spine of your sketchbook.
-
7Cut the endpaper. Cut the two endpaper sheets to be equivalent in height to your signature pages, but twice the widthwise. Then fold the two sheets in half.
- Be sure that the patterned side of the endpaper is facing inward when folded in half.
Gluing the Sketchbook Together
-
1Glue the cover papers. Lay the cover papers on a flat surface. Use the glue and a paintbrush or paint sponge to coat the cover papers with a thin layer of glue. Completely cover the inside sections of the papers with glue, where the hard cardboard pieces will be. Place the cardboard pieces onto the papers, and press out any air bubbles that form once the cardboard pieces are on the paper. Coat the cover papers edges (that are sticking out) with glue, and fold them in to the insides of the covers.[8]
- To help the covers dry smooth and evenly, lay heavy books on top to keep the covers from curling or bending as they dry.
- If the glue is really thick, you can thin it out a little bit by mixing it with some water in a small dish.
-
2Glue the spine. Lay the spine paper on a flat surface, and cover the middle section (where the spine will go) with a layer of glue. Place the spine inside the drawn-out parameters.
-
3Attach the covers to the spine paper. Once the spine has had some time to dry, apply a thin layer of glue to one side of the spine paper, next to the spine. Place one cover on the spine paper, leaving about 1/8” to ¼” of space between the spine and the sketchbook cover. Do the same thing on the other side of the spine, attaching the other cover to the spine paper. When both covers are glued to the spine paper, add a small amount of glue to the top and bottom edges of the spine paper, and fold them in to the inside of the sketchbook. Add some heavy books to the glued pieces of the sketchbook so they can dry uniformly.
- Remember, the outside covers of the sketchbook should be facing down on your flat surface.
- Be sure to press the spine paper into the spaces between the spine and the covers.
-
4Glue the endpapers to the sketchbook covers. Cover the back of one of the sheets of endpaper with a thin layer of glue. Make sure the entire back surface is covered. Then place the endpaper on the inside of one of the covers.[9] Align the edge of the paper to be at the edge of the spine-side cover. Glue the other endpaper to the inside of the other cover, aligning the edge of the endpaper near the spine-side of the cover.
- There should be a small amount of space between the edges of the endpapers, and the open edges of the sketchbook.
-
5Glue the endpapers to the sketchbook signatures. On one of the endpapers, coat approximately ½” of the spine-side edge of the endpaper with glue. Fold the cover over (essentially closing the sketchbook), to align the glued portion of the endpaper with the last page of signature paper. Then flip the book over and glue the other edge of the endpaper to the nearest page of signature paper.
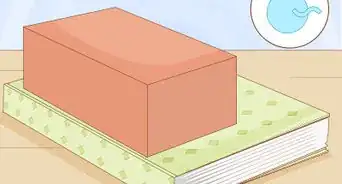
- Once all the gluing is finished, lay a few heavy books on top of the sketchbook so everything can dry without warping or curling.
Community Q&A
-
QuestionCan I use chart paper for a sketchbook?
 Community AnswerYes, you can use whichever paper you would like for a sketchbook.
 -
QuestionWhen I do my sketchbook, can I staple it?
 Community AnswerStapling the edges of the papers while they are folded closed makes it so the sketchbook cannot lie open flat. This makes drawing inside more difficult. It isn't recommended, but if it is your only alternative, you may give it a try.
 -
QuestionCan I decorate the cover?
 Community AnswerCertainly! Be creative and make it your own! It is a book for art, after all.
Warnings
- Be careful not to crumble or wrinkle the signature paper as you sew it. You don’t want it to ruin your final outcome.⧼thumbs_response⧽
- Avoid poking yourself with pins or cutting yourself with the scissors.⧼thumbs_response⧽
References
- ↑ http://www.stencilrevolution.com/tutorials/how-to-make-a-sketchbook/
- ↑ http://www.instructables.com/id/How-to-Create-a-Hand-bound-Sketchbook/?ALLSTEPS
- ↑ http://www.instructables.com/id/How-to-Create-a-Hand-bound-Sketchbook/?ALLSTEPS
- ↑ http://www.stencilrevolution.com/tutorials/how-to-make-a-sketchbook/
- ↑ https://www.youtube.com/watch?v=S2FRKbQI2kY
- ↑ http://danidraws.com/blog/2007/09/19/make-your-own-sketchbook/
- ↑ http://www.instructables.com/id/How-to-Create-a-Hand-bound-Sketchbook/?ALLSTEPS
- ↑ http://www.instructables.com/id/How-to-Create-a-Hand-bound-Sketchbook/?ALLSTEPS
- ↑ http://www.instructables.com/id/How-to-Create-a-Hand-bound-Sketchbook/?ALLSTEPS
About This Article
To make a sketchbook, start by making 3-4 piles of 6 sheets of paper for your signatures, which are little booklets. Then, fold them in half lengthwise, punch holes along the fold, and sew them together. Once the signatures are bound, use one to trace out 2 rectangles on a piece of cardboard, one for the front cover and one for the back. Then, cut them out and glue paper onto them in a design of your choice. Finally, cut out the book's spine from paper, glue it to the cover, and glue the signatures inside. For detailed instructions on how to put your sketchbook together, read on!
