This article was co-authored by wikiHow staff writer, Eric McClure. Eric McClure is an editing fellow at wikiHow where he has been editing, researching, and creating content since 2019. A former educator and poet, his work has appeared in Carcinogenic Poetry, Shot Glass Journal, Prairie Margins, and The Rusty Nail. His digital chapbook, The Internet, was also published in TL;DR Magazine. He was the winner of the Paul Carroll award for outstanding achievement in creative writing in 2014, and he was a featured reader at the Poetry Foundation’s Open Door Reading Series in 2015. Eric holds a BA in English from the University of Illinois at Chicago, and an MEd in secondary education from DePaul University.
The wikiHow Video Team also followed the article's instructions and verified that they work.
This article has been viewed 80,234 times.
Learn more...
Bam Bam is a lovable and iconic character from The Flintstones. Since Bam Bam is often depicted alongside his next-door neighbor, Pebbles, this costume is a great option if you’re dressing up with your partner or you’re getting two children ready for Halloween. You can also dress your entire family up as the famous prehistoric characters to put some matching outfits together. While you can certainly sew everything you need for the costume, Bam Bam’s outfit is a great option if you’re looking for an easy no-sew costume since you can use orange shorts for the half-tunic and an orange baseball hat for the cap.
Steps
Crafting the Half-Tunic
-
1Get some bright orange shorts if you want to keep things simple. If you don’t feel like sewing, grab a set of orange shorts. Bam Bam’s shorts are traditionally a bright orange, but you can use another muted color if you prefer. The costume will still read as Bam Bam if you use a tan or brown. Try to use a pair of shorts with no patterns or logos on them.[1]
- Any type of shorts will work for this. A comfortable pair of cotton shorts are ideal, though. The smooth fabric will closely resemble a store-bought Bam Bam costume.
-
2Sew the half-tunic yourself using orange felt for a custom outfit. Measure your waistline and cut a sheet of orange felt to be 1 in (2.5 cm) longer than the waistline. Set the height of the tunic to run from the waist to the knees. Then, use a sewing machine to sew the fabric together into a skirt out of your orange fabric.
- Cut a few holes into the waistline and thread a string or piece of twine through the waist to make a belt. Wear shorts underneath your half-tunic just in case the string breaks.
Advertisement -
3Cut a series of triangles out of the bottom to get that prehistoric look. Grab some fabric shears and stretch out the bottom of the half-tunic or shorts. Cut a sequence of 2–3 in (5.1–7.6 cm) triangles out of the bottom edge of the fabric. You can make each triangle a different size, or cut out a cardboard template and trace around it to make an even set of triangles. This will give the shorts or half-tunic that weathered, prehistoric look.[2]
-
4Craft a sequence of black triangles out of paper or felt. Get a sheet of black felt and some fabric shears. Cut out a sequence of black triangles in a variety of sizes. Make the biggest triangles roughly 4–5 inches (10–13 cm) in size and make the smallest triangles 1–2 inches (2.5–5.1 cm). These triangles are for Bam Bam’s half-tunic, so start by cutting a handful out. You can always cut more as you need them.[3]
Tip: Since you’re cutting them out for your half-tunic, you might as well cut out some smaller triangles now for the hat if you’re making one. These triangles are roughly half the size of the triangles for the half-tunic.
-
5Glue the triangles in a random order all over half-tunic. Set your triangles down so that they sit randomly over the half-tunic. Once you find an arrangement you like, place a thick bead of hot glue on the back of your first triangle and press it into the fabric. Repeat this process for the rest of your triangles. Leave at least 2–3 inches (5.1–7.6 cm) between each triangle to keep a good percentage of the orange showing through on the half-tunic.[4]
- You can sew the triangles into place if you really want to, but hot glue is pretty good at bonding small pieces of fabric.
- Don’t forget to do the back of the half-tunic as well!
-
6Add a loop of brown or black fabric to make the shoulder strap. Measure the distance between your bottom right hip on the front and the back of that same hip as it leads around your left shoulder. Cut out a length of brown or black fabric that matches this length and fold the width over until it’s roughly 4–6 inches (10–15 cm) wide. Then, pin or sew this piece into the half-tunic on the front of your right hip and the right side of your waist on the back.[5]
- For a different look, you can wrap the shoulder strap fabric up by twisting it to make it thinner and pin it in place this way. If you do this, pin the twisted fabric together on top of your shoulder with a safety pin to keep it from unraveling.
-
7Cut a bone out of cardboard and glue white felt or paper onto it. Draw a basic bone on a piece of cardboard. The size is entirely up to you, although 6 inches (15 cm) wide and 3 inches (7.6 cm) thick is a good average size. Cut the bone out with a utility knife or heavy duty scissors and glue white felt or white paper to the front of the bone.[6]
- The easiest way to draw a bone is to draw two parallel lines and put two overlapping and symmetrical circles on each end. You can always pull up a drawing of Bam Bam online and use it as a reference if you’d like.
- If you’re good with a sewing machine, feel free to cut out 2 bones out of fabric and stitch them together. When you get halfway around the bone, stuff half of it with cotton fluff. Continue stitching and stuffing until you have a plush bone.
-
8Trim the excess felt or paper off and glue the bone to the front hip. Use scissors or a utility knife and a cutting board to cut the excess paper off of your bone. Then, apply a thick bead of hot glue to the back of the bone and press it against the front of the half-tunic to cover the location where your shoulder strap meets your waistline.[7]
- Bam Bam is traditionally shirtless, but you can throw on a white T-shirt or tank top underneath if you’re heading out for a party or Halloween.
- Use brown sandals or sneakers for the shoes. Bam Bam is usually barefoot, but this is obviously a bad choice if you’re going out for trick-or-treating or a costume party.
Making the Hat
-
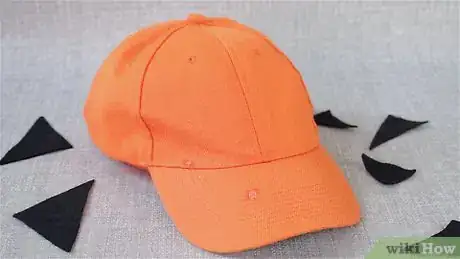
1Grab a bright orange baseball hat for an easy option. If you don’t want to make the hat yourself, get a hat that matches the color of the half-tunic. Any baseball hat should work, but a hat with a soft crown (like a 5-panel hat, or fishing hat) will work best. Don’t worry if the hat has any logos on them—you can always cover these images up with black triangles.[8]
-
2Cut and fold a small orange cap yourself if you feel like getting crafty. Bam Bam is traditionally depicted with a tiny, round brimmed cap that kind of resembles a newsboy hat. This is pretty hard to sew, but you can glue a small sheet of orange foam paper to make the hat if you’d like. Wrap a single sheet of foam paper into a cone-like shape and pin it together in the back to make a little cap. Trim the sharp edges in the front to give the cap a round look.[9]
- You do not need to make the hat if you don’t want to. The half-tunic and the bat should be more than enough for most people to realize that you’re Bam Bam.
- If you used a different color for the half-tunic, use that same color for the hat. Bam Bam’s hat and half-tunic always match.
-
3Cut a sequence of smaller triangles out of black felt or paper. If you already did this when you were making the half-tunic, skip this step. Otherwise, cut out a sequence of small triangles using black felt and fabric shears. Make the biggest triangles 2–3 inches (5.1–7.6 cm) and the smallest triangles 1–2 inches (2.5–5.1 cm).[10]
- The triangles that go on Bam Bam’s hat follow the same general shape and pattern as the half-tunic, but they’re usually half of the size.
-
4Glue or sew the triangles on to the hat. Attach the triangles to the hat the same way you attached them to the half-tunic. Either put some hot glue on the back and press them into the fabric, or sew them directly into the hat. Spread the triangles out randomly and leave at least 2 inches (5.1 cm) between each shape to give the triangles some variety.[11]
- Don’t forget to cover up any logos or writing on the hat.
Tip: You can pin a white cotton ball to the top of the hat if you’d like. Bam Bam’s hat usually has a little tuft of white cotton on the top, but many people won’t notice this so it really doesn’t matter if you choose to skip it.
Creating Your Bat
-
1Grab any cylindrical object to make the bat. Any round object that is at least 24 inches (61 cm) long and roughly 1–2 inches (2.5–5.1 cm) thick will work for this. A long vacuum attachment, small broom handle, branch, or toy bat are all great options depending on the size and material you want to use.
Variation: You can use a plastic bat on its own if it’s brown. Bam Bam’s bat is traditionally thicker than a regular bat, but it’s not a big deal if your bat is a little thinner. A brown whiffle ball bat is perfect for this.
-
2Wrap tissue paper around the object and tape it down. Get some brown tissue paper and wrap it around the bat in layers to build the thickness up. Tape each piece down with any type of tape to hold it in place. Continue wrapping tissue paper around the bat to build it up so that the top of the bat is thicker than the bottom of the bat. Taper the tissue paper in the middle to build it up like Bam Bam’s bat.
- You’re going to cover the tissue paper, so don’t worry about the tape showing.
-
3Tape brown felt or paper bags around the object to add texture. Once you’re happy with the shape and thickness of the bat, grab some brown paper bags or brown felt depending on the texture you prefer. Wrap the paper or felt around the bat so that the fabric or paper is taut. Cut the felt or paper and use hot glue or clear tape to connect the layers and hold them against the bat. You can also use safety pins if you prefer.
- Felt is better if you want a softer looking bat. Paper is ideal if you want some texture in the bat that will vaguely resemble wood.
-
4Draw a few black ovals around the bat to give it a wood grain. If you want to add some wood grain, grab a black permanent marker or fabric marker. Add some small ovals to the bat and draw around them in a sequence of concentric ovals. You can add smaller details if you’d like, such as chips or dots that resemble the texture in wood. Once you’re happy with the bat, you’re done!
Things You’ll Need
Crafting the Half-Tunic
- Sewing machine
- Measuring tape
- Orange felt
- Orange shorts
- Black felt
- White felt
- Brown or black fabric
- Fabric shears
- Hot glue or stitching thread
- Scissors or utility knife
- Safety pins
- Cardboard
- Marker
Making the Hat
- Foam paper
- Hat
- Black felt
- Fabric shears
- Hot glue or stitching thread
Creating Your Bat
- Cylindrical object
- Tissue paper
- Tape
- Felt or brown paper
- Safety pins, hot glue, or clear tape
- Permanent marker or fabric pen
References
- ↑ http://thegypsysouldiaries.com/diy-bam-bam-costume/
- ↑ https://youtu.be/gbnOI3IOS0I?t=15
- ↑ https://youtu.be/gbnOI3IOS0I?t=51
- ↑ https://youtu.be/gbnOI3IOS0I?t=51
- ↑ https://tinykelsie.com/2014/10/22/simple-cheap-family-costumes/
- ↑ https://youtu.be/gbnOI3IOS0I?t=71
- ↑ https://youtu.be/gbnOI3IOS0I?t=81
- ↑ https://tinykelsie.com/2014/10/22/simple-cheap-family-costumes/
- ↑ http://thegypsysouldiaries.com/diy-bam-bam-costume/


