This article was co-authored by Mia Danilowicz. Mia Danilowicz is a Master Tailor who works onset and on the red carpet in Los Angeles, California. With over a decade of experience, Mia specializes in bridal and gown couturier fittings, garment reconstruction, and custom design. Mia has worked at the Oscars, Grammys, SAG Awards, and Golden Globes. Her clients include a long list of entertainment and fashion industry headliners, major fashion magazines, luxury consumer brands, and popular media. Mia was trained at the Fashion Institute of Design and Merchandising and received her AA in Fashion Design and BS in Business Management.
This article has been viewed 74,286 times.
Hakama pants are the customary attire worn by samurais. Traditional hakama pants contain seven pleats meant to symbolize the seven virtues of bushido– "the way of the warrior" which is the foundation of the samurai way. If you are a non-practicing samurai, these pants can be great for both hot and cold weather. For cold weather, they are large enough to pack many layers underneath without bulging and, for hot weather, these pants are loose and airy, allowing an extraordinary amount of airflow to the legs.
Steps
Preparing the material
-
1Choose your preferred material. Traditional male hakama pants are made from a stiff silk material, but a more modern style can be made from a medium weight cotton fabric (about the weight of bed sheeting).
-
2Launder the fabric to remove any dirt or sizing. Iron smooth if the laundering process produces a wrinkled material.Advertisement
-
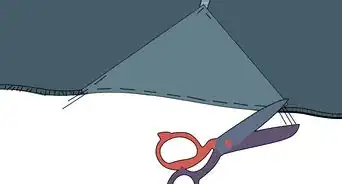
3Lay the material flat and cut off any hemmed or finished edges.


Making the ties
-
1Cut three strips of fabric approximately 4 inches wide from the longest edge of your material. These strips will become the straps that secure the samurai pants.
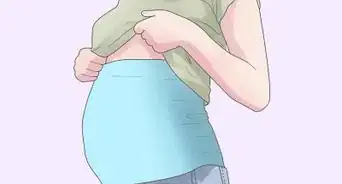
- Each fabric strip should be long enough to go around the intended wearer's waist with 8-10" (20-25 cm) to spare.
-
2Make one long strip. Sew two of the strips together along the short edges, leaving the third strip at its original length— half the length of the long strip.
-
3Form two tubes - one long, one short. Fold each strip in half lengthwise and pin, then sew a seam along the unfinished edges to create two tubes. Turn both tubes inside out so the seam is on the inside with the unfinished edges no longer visible, then set the tubes aside.


Cutting the pant legs
-
1Cut the remaining fabric in half. Fold the remaining fabric in half lengthwise and carefully cut along the fold. These two pieces will form the legs of your samurai pants.
-
2Fold the leg pieces in half lengthwise. Then, set one on top of the other so the folded edges are facing you and the unfinished edges away from you.
-
3Cut an area for the crotch. Cut a half "U" on the folded side of both leg pieces, starting approximately 1/3 of the way down the pants. Start perpendicular to the fold and curve smoothly to form the bottom of the "U". When you come parallel to the fold, run along the parallel line up to the top fabric edge.
- The inner or middle part of the "U" should be facing you.
- Make sure to cut both leg pieces equally.
-
4Unfold the leg pieces and even the crotch area of each. When you unfold them, each should have a full "U" through the middle of the top third of each of the pant pieces. Lay the two unfolded pant pieces on top of each other. The "U" shapes should match. If not, make the necessary adjustments.


Forming the pants
-
1Fasten the crotch area.
- Place the leg pieces on top of each other with the "U" in the middle.
- Pin and sew the pieces together along the "U" shape to fasten the crotch area.
- For security, you probably want to use a double seam here.
-
2Unfold the fabric. The newly sewn crotch should be in the middle with the sewn edge up and the pant legs on either side of the seam.
-
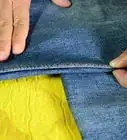
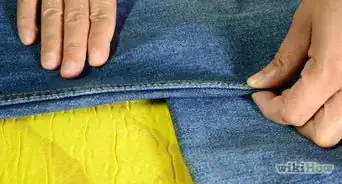
3Sew along the outside edges of each leg. Pinning first, begin approximately 6-8" (15-20 cm) from the top of the pant and continue all the way to the bottom.
-
4Hem the top of the pants. Use closely spaced stitches and a double line of stitching.
-
5Turn the fabric right-side out. The sewn portions will now be on the inside of the pants.


Making the pleats
Note that this design offers six pleats rather than the traditional seven pleats of an authentic samurai outfit.
-
1Form the front pleats. Fold and pin four evenly spaced pleats on the front top of the hakama pants with all folds facing the middle of the pants - i.e., the two folds on each side will face each other.
-
2Secure the front pleats. Sew a straight line across only the top front of the samurai pants, approximately 2-3" (5-7.5 cm) from the top. Reinforce the pants by sewing a second line to make them more sturdy.
-
3Form the back pleats. Fold two pleats on the backside of the pants with both folds facing the middle of the pants, then pin the pleats in place.
-
4Secure the back pleats. Sew two straight lines along the top backside of the pants, just as you did in the front. They should be approximately 2-3" (5-7.5 cm) from the top— the same as in the front.


Attaching the ties
-
1Iron the tubes. Iron both the tubes so that the seams run fairly straight down the middle of one side of each tube so that they become strips.
-
2Finish one end of each tie strip by tucking the last inch (2.5cm) of fabric into the tube and sewing across the end, 1/2" (1 cm) from the edge of the tube. This can be done with a sewing machine or by hand.
-
3Position the longer tube. Take the longer tube and place it along the front of the hakama pants, aligning the finished end of the strip with the crotch seam. This strip will be the tie that wraps around your back and continues on around to the front where you tie the pants.
-
4Secure the longer strip. Pin the tube/strip along the top edge of the pants with the seam down, then sew along the bottom edge of the strip. Start at the front, then continue along the backside of the hakama pants. For extra durability, sew the top length of the strip to the pants as well.
- Note: The seam of the tube should be hidden on the underside, against the pant fabric.
- Terminate the stitching with a rectangle (long edge across the width of the tie). You can stitch an "X" within the rectangle to build in long term durability at this strain point.
-
5Place and secure the shorter tube. Take the shorter tube and lay it against the backside of the hakama pants, again positioning the finished end of the tube on the crotch seam. This strip will only wrap around to the front as a tie. Sew it in place along the top and bottom edge, stopping on the side or continuing a bit onto the front. Again, terminate the stitching with an "X"ed rectangle.
-
6Trim the excess fabric from the tie strips.
- Remove all pins from the hakama pants and try them on.
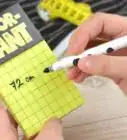
- Cut the tie strips so that each extends beyond the belly button about 9-11" (23-28 cm).
-
7Finish the ends of the tie strips by tucking the last inch (2.5 cm) of fabric into the tube and sewing across the end, 1/2" (1 cm) from the edge of the tube. Again, this can be done by hand or with a sewing machine.


Finishing the pants
-
1Adjust the length. Try the pants on in order to fit them to your specific leg length, making sure to secure them where they will be worn.
- Secure the the pants by tying the tie strips in front, making sure the fit is comfortable.
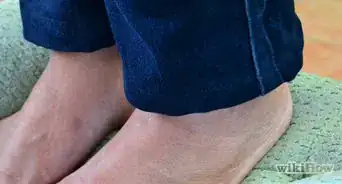
- The ideal pant length is with the bottom hem at the malleolus, or big part of the ankle bone.
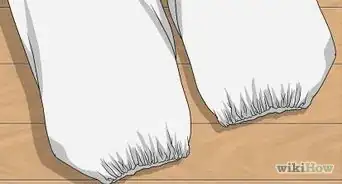
- Cut excess fabric from the bottom cuffs of each leg and hem them to finish your samurai hakama pant look.
-
2Go out in your sporty new hakama pants and wow them!


Things You'll Need
- 3 yards (2.75 m) of fabric or 1 twin size flat bed sheet
- Scissors (or fabric cutting wheel)
- Thread
- Sewing machine
- Pins

References
About This Article