This article was co-authored by wikiHow staff writer, Jessica Gibson. Jessica Gibson is a Writer and Editor who's been with wikiHow since 2014. After completing a year of art studies at the Emily Carr University in Vancouver, she graduated from Columbia College with a BA in History. Jessica also completed an MA in History from The University of Oregon in 2013.
There are 20 references cited in this article, which can be found at the bottom of the page.
The wikiHow Video Team also followed the article's instructions and verified that they work.
This article has been viewed 20,319 times.
Learn more...
Homemade baby clothes make precious heirlooms and because they're so small, you can knit them quickly! Knit 2 flat pieces of fabric in a stockinette stitch pattern and then seam them together at the sides to form the pants. Since you'll make the waist with a double rib stitch, which is slightly elastic, there's no need to mess with buttons or drawstrings. This makes this project great for new to intermediate knitters.
Steps
Casting On
-
1Select a soft worsted weight yarn for the baby pants. Choose a 125-gram (4.5 oz or 285 yd/260 m) skein of worsted weight (#4) yarn in any color. You might see worsted weight labeled as afghan, aran, or medium-weight yarn. Although you can use yarn made from any material, choose yarn that's soft enough for the baby and that will wash well.[1]
- Keep the label from the skein of yarn so you can remember the washing instructions once you finish making the pants.
-
2Make a slip knot with worsted weight yarn. To form a slip knot, pull the yarn and twist the end into a loop so the tail end is on top. Use 1 hand to hold the tail and slide your other index finger and thumb through the loop. Pinch the working yarn and bring it through the loop.[2]Advertisement
-
3Slide the slip knot onto size US 7 (4.5 mm) knitting needles. Slip the loop of yarn onto a straight needle. Then, pull the yarn tail so the loop tightens around the needle. Stop pulling just when the knot is secure so you can easily insert your working needle into the stitch.[3]
- If you do accidentally pull too tightly and you can't insert the needle into the stitch, gently tug on the loop while you hold the actual knot. This loosens the stitch so you can put the needle through it.
-
4Cast on 36 stitches. Although there are several ways to cast on, one of the easiest ways for beginners is to knit a stitch. Instead of placing the stitch you just made on your right needle, insert the tip of your left needle into the loop and slide it back onto the left needle so you have 2 stitches on it. Keep knitting stitches and placing them back on the left needle until you have a total of 36 stitches on it.[4]
- You'll also need an extra set of size US 7 (4.5 mm) knitting needles so you can work each pant leg.
Tip: This pattern makes pants for a newborn to 3-month old baby. To make pants for a baby that's between 3-months and 6-months old, cast on 56 stitches.

Making a Ribbed Waist
-
1Work 13 rows of a basic 2 x 2 rib pattern to create the waist. For the rib, purl (p) 2 stitches and knit (k) 2 stitches across the whole row. When you reach the end of the first row, turn the work and p2, k2 across the next row. Make a total of 13 rows in the rib stitch.[5]
-
2Make 6 rows of the stockinette stitch pattern. For the first row of stockinette stitch, knit every stitch. To make the next row, purl every stitch. Work the following 4 rows by knitting the odd rows and purling the even rows.[6]
- You'll knit rows 1, 3, 5 and purl rows 2 and 4.
-
3Work an increasing row for row 7. Once you've made 6 stockinette stitch rows, knit 1 stitch and make 1 left stitch (m1L). Then, k3, m1L across the row until there are just 2 stitches left. Knit the last 2 stitches to finish the increasing row.[7]
- You'll have 48 stitches on your needles once you finish this row.
Did You Know? To m1L, bring the tip of your left needle under the horizontal stitch between your needles. Working from front to back, lift the stitch up while you insert the right needle into the back of the stitch. Knit this stitch.
-
4Knit 22 more rows in the stockinette stitch pattern. Purl the row after your increasing row to make row 8 of the stockinette stitch pattern. Continue to alternate purling and knitting rows for another 21 rows.[8]
- Remember to knit the odd rows and purl the even rows.

Knitting the Legs
-
1Purl 24 stitches and pass the remaining 24 stitches to a spare needle. To work the row where the legs split off, purl 24 stitches. Then, slide each of the remaining 24 stitches onto a spare US size 7 (4.5 mm) knitting needle. You'll keep working the stitches that you just purled in order to make the right leg. Don't work the stitches on the spare needle just yet.[9]
- You can use a spare standard needle or circular needle, depending on what you prefer.
-
2Place a stitch marker on the first stitch of the left leg and turn your work. Attach a stitch marker to the first stitch that you placed on the spare needle. This will help you remember that this is the beginning of the left leg. Turn your work over so you can knit the stitches on your working needles.[10]
- If you don't have a stitch marker, attach a safety pin or small hair accessory to the stitch.
-
3Work the stockinette stitch for 44 rows. Knit across every stitch in the row after you've split them. Then, continue to work the stockinette pattern down the entire right leg. Remember to knit the odd rows and purl the even rows.[11]
- You'll be working 24 stitches across each row instead of the 48 that you did for previous rows.
-
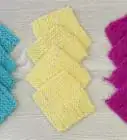
4Make 6 rows in the seed stitch pattern. To give the pant's a little texture near the bottom of the leg, do 6 rows of seed stitch. K1, p1 across the entire first row of the seed stitch pattern. Then, p1, k1 across the second row of seed stitch. Work 4 more rows by alternating the stitches like this:[12]
- Odd rows: *k1, p1*
- Even rows: *p1, k1*
-
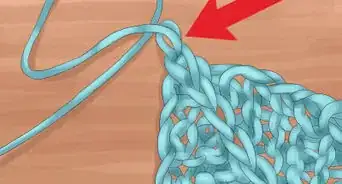
5Bind off the right leg stitches. Now that you've made the right leg, bind off each stitch on your working knitting needles. You can bind them off knitwise or purlwise, but you don't have to bind the stitches off using the seed stitch pattern. Then, tie off the last stitch and leave a yarn tail that's about 6 inches (15 cm) long.[13]
Tip: Just remember which style you used to bind off the stitches so you can use the same method for the other leg.
-
6Work the left leg using the stockinette and seed stitch patterns. Go back to the stitch marker and purl each of the stitches in the row. Repeat the pattern that you used for the right leg. Stockinette stitch 44 rows and then make 6 rows in the seed stitch pattern. Once you finish with that, bind off the stitches of the left leg and tie a knot to secure the last stitch.[14]
- If you placed the left leg stitches on a circular needle, slide them back onto your standard knitting needles before you begin working them.
- Leave a tail that's about 15 inches (38 cm) long so you can use it to join the leg pieces.
-
7Create an identical fabric piece to the one you just made. Once you've completed 1 whole fabric piece that has 2 legs, repeat the steps to make an identical piece. You'll sew the sides together to form the pants since you didn't sew them in the round.[15]
- Use the same yarn and needles when working the second piece so it works out to be the same size.


Assembling the Pants
-
1Lay the pants pieces side by side and thread a tapestry needle. Arrange both pieces of fabric so the right sides face up and 2 of the legs touch. Then, thread a tapestry needle with 1 of the long yarn tails that's at the bottom of the pant leg.[16]
- If you prefer, use a darning needle instead of a tapestry needle.
-
2Use the mattress stitch to sew together the sides of the pants. To mattress stitch, insert the needle into the opposite stitch on the fabric. Pull to connect the pieces. Then, insert the needle between the horizontal bar of the stitches and work from side to side. Pull again when you reach the end of the pieces to tighten the stitches. Weave in the tail once you reach the top of the pants.[17]
- The mattress stitch is a great stitch for seaming the stockinette stitch pattern since it creates an almost invisible seam.
-
3Fold the pants and mattress stitch the other side of the legs. Fold the pants so the seamed side is on the right and the top piece of fabric is right-side up. Thread your needle again and sew together the other side of the pants. Work from the bottom of the pant legs up to the waist. Then, weave in the yarn tail.[18]
-
4Sew together the inner legs to finish the pants. Now that the pants are joined on the outer sides, use the mattress stitch to sew the inner legs together. This forms the crotch of the pants as well. Weave in the ends to finish the pants.[19]
Tip: Follow the yarn's care instructions for washing and drying the pants, especially if you used yarn that contains wool.


Things You'll Need
- 2 sets of US size 7 (4.5 mm) knitting needles
- 1 skein (125 g/4.5 oz or 285 yd/260 m) of worsted weight (#4) yarn
- Tapestry needle
- Stitch marker
- Measuring tape
- Scissors


References
- ↑ https://www.craftyarncouncil.com/standards/yarn-weight-system
- ↑ https://youtu.be/oj21JDDSrgM?t=53
- ↑ https://youtu.be/b2sQ777rFXM?t=40
- ↑ https://youtu.be/b2sQ777rFXM?t=42
- ↑ https://www.fredamossdesigns.com/rib-2x2
- ↑ https://youtu.be/b2sQ777rFXM?t=108
- ↑ https://youtu.be/b2sQ777rFXM?t=134
- ↑ https://youtu.be/b2sQ777rFXM?t=326
- ↑ https://youtu.be/b2sQ777rFXM?t=361
- ↑ https://youtu.be/b2sQ777rFXM?t=379
- ↑ https://youtu.be/b2sQ777rFXM?t=442
- ↑ https://youtu.be/b2sQ777rFXM?t=494
- ↑ https://youtu.be/b2sQ777rFXM?t=519
- ↑ https://youtu.be/b2sQ777rFXM?t=599
- ↑ https://youtu.be/b2sQ777rFXM?t=623
- ↑ https://youtu.be/6tMJPqFBKOE?t=76
- ↑ https://youtu.be/6tMJPqFBKOE?t=638
- ↑ https://youtu.be/6tMJPqFBKOE?t=307
- ↑ https://www.youtube.com/watch?v=6tMJPqFBKOE
- ↑ https://knitfarious.com/how-to-read-knitting-stitch-patterns-knitters-guide/
About This Article