This article was co-authored by Jonas Jackel and by wikiHow staff writer, Christopher M. Osborne, PhD. Jonas Jackel is the Owner of Huckleberry Bicycles, a bicycle retail store based in San Francisco, California. Jonas has over 20 years of experience managing bicycle retail stores and has operated Huckleberry Bicycles since 2011. Huckleberry Bicycles specializes in servicing, repairing, and custom building road, cross, gravel, touring, folding, and e-bikes. Jonas was also previously sat on the Board of Directors for Bike East Bay, a bicycle-advocacy non-profit organization based in Oakland, California.
There are 8 references cited in this article, which can be found at the bottom of the page.
This article has been viewed 14,078 times.
A derailleur hanger (also called a mech hanger or rear mech hanger) is a “sacrificial” part that’s designed to protect more expensive parts of your bicycle. A hanger is easy to ignore until it breaks—then it becomes very important to find the right match! Since there’s no universal hanger standard, it’s important to carefully compare your old and new hangers before buying, whether online or at a bike shop.
Steps
Online Searching
-
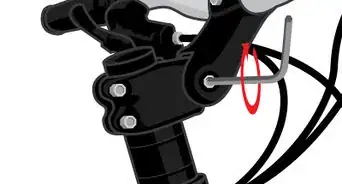
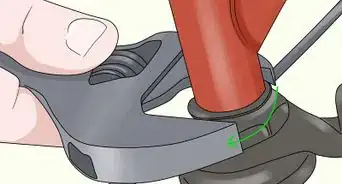
1Remove your current hanger, if you’re able, for comparison.[1] To remove the hanger currently on your bike, start by taking off the rear wheel—on newer bikes you can usually do this without any tools. Use a hex wrench (also called an Allen wrench) to remove the bolt connecting the derailleur to the hanger, and then to remove the bolt connecting the hanger to the bike frame.[2]
- Not sure which part is your derailleur hanger? It’s the small, thin, slightly L-shaped metal piece that connects to your derailleur—the small transmission system that moves the chain to different cogs when you shift gears. Do an online image search for “derailleur hanger” or “rear mech hanger.”
- If you can’t remove the current hanger for some reason, don’t worry—you still have options! Either take a high-quality photo of the installed hanger or bring your whole bike to a bike shop.
-
2Choose a bike parts retailer website and use its parts search interface. Most general bike parts websites carry derailleur hangers, and there are also sites that focus specifically on these small but critical bike components. Most of these sites rely on search boxes to help you find the right hanger—for instance, entering your bike’s make, model, and year will give you matching hanger results. If you don’t have all this info (such as the year, for example), enter as much as you can to narrow the results.[3]
- Do a web search for “replacement derailleur hanger” or “replacement rear mech hanger” to get results from numerous online hanger retailers. Popular retailers include derailleurhanger.com, derailleurhangerstore.co.uk, wheelsmfg.com, and elanusparts.com, to name but a few.
- There’s no clear “best” online retailer for derailleur hangers. Check out several options and compare their search interfaces, inventory results, prices, shipping rates and times, customer reviews, and so on.
Advertisement -
3Upload a high-quality hanger photo, if needed, to the parts website. Many derailleur hanger retailer sites offer an image upload option for hard-to-find hanger replacements. You’ll probably have to provide your email address and any basic details about your bike that you can offer. Make sure the image lighting and clarity are good so that the hanger is clearly visible.
- You’ll get the best results if you remove the hanger first. If that’s not possible, aim to get as complete a shot of the whole hanger as you can.[4]
- Give the retailer 24 hours to get back to you before trying one of their competitors. Or, try several retailers at once and see which one provides you with the best results.


In-Store Shopping
-
1Go to a cycle shop that sells your brand of bike whenever possible. If you have a Schwinn bicycle, for instance, a bike shop that sells Schwinn bicycles is your best brick-and-mortar bet for finding a matching hanger. If there are multiple bike shops in your area, call around to see which ones carry your brand of bike.[5]
- If you can’t find a shop that sells your bike brand, there’s still a good chance that you can find a matching hanger at a good-quality bike shop in your area. If you don’t have any bike shops in your area, call nearby sporting goods stores and general retailers that sell bikes and ask if they carry derailleur hangers.
-
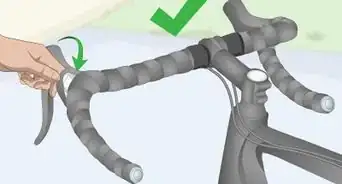
2Bring along the old hanger—or a photo of it—if you plan to do a self-install. Removing a hanger is usually quite easy: remove the bolt connecting the bike’s derailleur to the derailleur hanger with a hex (Allen) wrench, then do the same with the bolt that connects the hanger to the bike frame. If you can't bring in the removed hanger, take a high-quality photo of the old hanger to bring to the shop.[6]
- If you’re taking a photo, make sure there's good lighting and focus so the details of the hanger are clearly visible.
-
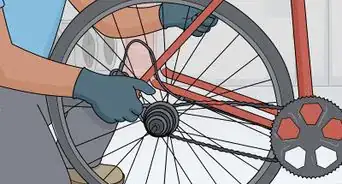
3Bring in your whole bike if the shop offers a professional install. Truth be told, derailleur hangers are fairly easy to install, making it a manageable project for the average DIY biker. That said, fine-tuning the install to get the maximum performance from your derailleur takes some extra effort and experience. If the bike shop offers installation, seriously consider letting a shop associate do the job for you.[7]
- Ask if you can watch the install happen and get some pointers along the way. Replacing a derailleur hanger is a great skill to learn if you ride your bike regularly.
- Go ahead and get a bike tune-up while you’re at it—doing so improves your bike’s performance and supports your local bike shop![8]


Buying and Installing
-
1Make sure the new hanger visually matches the old one before buying. Once you’ve found an apparent hanger match, confirm it actually is a match by comparing it to your current hanger. Make a side-by-side comparison by holding up the old and new hangers (or pictures of them) to check for a true match. If the shape, hole locations, and other fine details all check out, you can feel confident about making the purchase.[9]
- Just to be sure, though, make sure the retailer has a good return policy!
- While prices vary, the average hanger costs around $30 USD.
-
2Buy 2 new hangers when you find the perfect match. This is a good derailleur hanger rule of thumb—if you can find a matching hanger, buy 2! Hangers are sacrificial parts that are meant to bend and break fairly easily, so it’s a smart investment to buy a replacement for your replacement. At about $30 USD a piece, it also won’t break the bank to buy a pair of replacements.[10]
- By having a backup for your backup, you’ll save yourself the trouble of searching all over again for a matching hanger in the future.
-
3Get a “universal” hanger as well, but treat it as an “emergency” hanger. You’ll sometimes see hangers marketed as “universal,” but don’t take this to mean that they’re suited to long-term use on any type of bike. They’re more accurately called “emergency” hangers and should be treated more like a car’s spare tire. In other words, buy one and keep it handy while biking, but only use it as a quick fix to get back home.[11]
- Even if you carry a matching replacement hanger with you, it’s not a bad idea to also carry an emergency hanger. Hangers are small and lightweight, after all, and the emergency hanger may prove especially useful if you ever bike with others.
- As an added bonus, some emergency hangers also double—intentionally—as bottle openers!
-
4Practice replacing the hanger under ideal conditions at home. If you have a minor crash during your commute home after dark in a rainstorm, do you really want that to be your first time replacing a broken hanger? Instead, do a practice run of removing and replacing a hanger while in your garage. It’ll only take a few minutes and—even though perfectly fine-tuning the install takes practice—it’s a fairly easy repair job to do competently.[12]
- The installation process varies somewhat based on your bicycle and the type of hanger it uses. Generally speaking, though, replacement involves popping off the rear tire, using a hex (Allen) wrench to disconnect the derailleur and then the old hanger, and then reversing the process to attach the new hanger.[13]
- The best way to learn how to do the job right is to watch someone with lots of experience do it, then get some hands-on experience yourself under their supervision. If that’s not possible, watch several how-to videos online and follow along.[14]
-
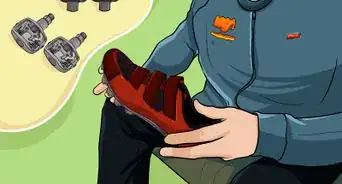
5Buy a matching spare hanger next time you buy a new bike. Ideally, all new multi-gear bicycles would come with a spare derailleur hanger, but that’s rarely if ever the case. Take it upon yourself to buy a matching replacement each time you get a new bike. That way, you’ll have a perfectly-matched backup ready to go when your current hanger inevitably gets damaged.[15]
- If you buy your bicycle at a good bike shop, they should have matching replacement hangers in stock. Alternatively, see if a shop associate can help you track down a match or contact the manufacturer for one.


Expert Q&A
-
QuestionHow do you adjust a bike derailleur?
 Jonas JackelJonas Jackel is the Owner of Huckleberry Bicycles, a bicycle retail store based in San Francisco, California. Jonas has over 20 years of experience managing bicycle retail stores and has operated Huckleberry Bicycles since 2011. Huckleberry Bicycles specializes in servicing, repairing, and custom building road, cross, gravel, touring, folding, and e-bikes. Jonas was also previously sat on the Board of Directors for Bike East Bay, a bicycle-advocacy non-profit organization based in Oakland, California.
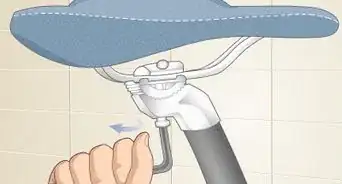
Owner, Huckleberry BicyclesIf it's out of adjustment, there are a couple of different things that you have to do to properly adjust the derailleur on your bike. When adjusting the rear derailleur, you need to have the tension in that cable be set up correctly to shift from one gear to the next. You can use a couple of limit screws to control how far up or down the derailleur will go. Once you have the limits set correctly, you’ll just adjust the cable tension until you know the shifter is going to move the derailleur the appropriate distance to get the change from one cog to the next.


References
- ↑ Jonas Jackel. Owner, Huckleberry Bicycles. Expert Interview. 18 February 2020.
- ↑ https://www.diymountainbike.com/mountain-bike-derailleur-hanger/
- ↑ Jonas Jackel. Owner, Huckleberry Bicycles. Expert Interview. 18 February 2020.
- ↑ https://electricbikeaction.com/how-to-align-your-derailleur-hanger/
- ↑ https://ridemonkey.bikemag.com/threads/little-help-on-finding-the-right-derailleur-hanger-dropout.239956/
- ↑ https://www.diymountainbike.com/mountain-bike-derailleur-hanger/
- ↑ https://ridemonkey.bikemag.com/threads/little-help-on-finding-the-right-derailleur-hanger-dropout.239956/
- ↑ Jonas Jackel. Owner, Huckleberry Bicycles. Expert Interview. 18 February 2020.
- ↑ https://wheelsmfg.com/blog/how-to-find-the-right-derailleur-hanger.html
- ↑ https://cyclingmagazine.ca/sections/training-guide/maintenance/shifting-off-it-may-be-your-derailleur-hanger/
- ↑ https://www.mtbr.com/threads/emergency-hanger.716877/
- ↑ https://cyclingmagazine.ca/sections/training-guide/maintenance/shifting-off-it-may-be-your-derailleur-hanger/
- ↑ https://www.diymountainbike.com/mountain-bike-derailleur-hanger/
- ↑ https://youtu.be/0QJTgmNpiVs?t=75
- ↑ https://cyclingmagazine.ca/sections/training-guide/maintenance/shifting-off-it-may-be-your-derailleur-hanger/
About This Article