This article was co-authored by Alison Buchanan and by wikiHow staff writer, Jennifer Mueller, JD. Alison Buchanan is a Power Vinyasa Yoga Teacher based in Seattle, Washington. She completed over 300 hours of training with yoga instructor, Baron Baptiste, and is a certified Baptiste Teacher. She is a teacher with The Art of Yoga Project, a non-profit organization that brings the mindfulness of yoga to teenage girls in the California Justice System.
This article has been viewed 95,877 times.
The cat pose (Marjaryasana) in yoga stretches and strengthens your spine to help improve your posture and balance. Cat pose often is combined with cow pose (Bitilasana) to lengthen and open up your spine. Cat and cow poses are a good way to warm up your back for further spinal stretches. Talk to your doctor before doing these poses if you have a chronic back condition or have had a recent back injury.
Steps
Perfecting Cat Pose
-
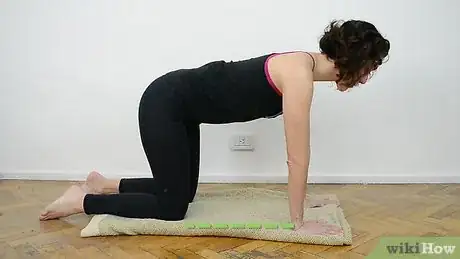
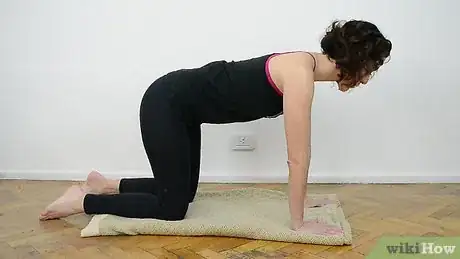
1Start on your hands and knees. The starting position for cat pose is also called "tabletop pose." Get on all fours with your wrists directly below your shoulders and your knees directly below your hips. Lay down a yoga mat to lessen the stress on your knees and wrists.[1]
- Your back should be flat and neutral. Extend your neck out as well, lowering your gaze a bit, so that you can draw a straight, flat line from your head to your tailbone.
-
2Spread your fingers. To lessen the stress on your joints, spread your fingers wide and cup your palms slightly. Your middle finger should be facing forward, the rest of your fingers splayed. Press all five fingertips into the mat.[2]
- If you have problems with your wrists or have had a recent wrist injury, you may want to come down to your elbows. Keep your elbows directly below your shoulders and rest on your forearms instead of your hands.
Advertisement -
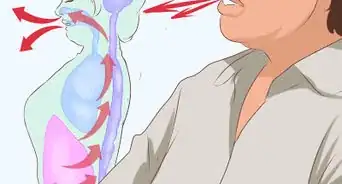
3Connect with your breathing. Your breath is a major part of yoga practice. While in tabletop position, take a moment to turn your mental focus to your breath. Inhale deeply through the nose, filling your lungs. Pause, then exhale slowly and deeply out your mouth.[3]
-
4Round your back. On an exhale, round your spine up towards the ceiling, keeping your tailbone tucked under. Round your shoulders back so that your shoulder blades fall in line alongside your spine.[4]
- This position gives the cat pose its name. With your back rounded on all fours, you should look somewhat like an angry cat.
-
5Tuck your chin towards your chest. Lengthen your neck to complete cat pose, but don't try to force your chin to touch your chest. Imagine your spine is one long, even curve from your tailbone to your head.[5]
- Breathe deeply into the curve, gently contracting your glutes. Pull your abdominal muscles back and in towards your spine as you inhale. As you exhale, think of curving and lifting your spine towards the ceiling. Hold the stretch for 5 to 10 breath cycles.
-
6Sit back to release. If you're only doing cat pose and not moving into another pose immediately, first lower and flatten your spine to return to tabletop position. Then lower your hips on an exhale to sit back on your heels.[6]
Adding Cow Pose
-
1Come to tabletop position. Both the cow pose and the cat pose are done on all fours, which makes them good poses to do together. Make sure your wrists are directly under your shoulders and your knees directly under your hips.[7]
- Take a moment in tabletop position to connect with your breath. Inhale deeply through your nose and exhale deeply out your mouth. Take a pause between each breath.
-
2Arch your back. On an inhale, come into cow pose by dropping your belly towards the floor and lifting your pelvis and chest towards the ceiling. Make sure to keep your shoulders open and your tailbone tucked in.[8]
- Lift your gaze so that you are looking forward, but take care not to crunch your neck – keep it long, reaching through the crown of your head toward the ceiling.
-
3Return to tabletop. If you are doing cow pose by itself, hold the stretch for 5 to 10 deep breath cycles. On each exhale, think of lowering your belly and deepening the arch in your back. On every inhale, lift your sitting bones and open your chest.[9]
- On an exhale, lift your belly to come back to tabletop position. You can continue to another pose or lower back onto your heels to end the pose, as you did with the cat pose.
-
4Create a flow between cat and cow. Cat and cow can be performed together as a vinyasa flow. In yoga, "vinyasa" means to synchronize your movement with your breath as you flow between two poses.
- For the cat-cow vinyasa, start in tabletop. On an inhale, arch your back to come into cow pose. As you exhale, drop your chest and hips and round your back upward into cat pose. Return to cow pose on the inhale.
- Repeat these movements 10 to 20 times with a breath for each movement. Keep your breathing slow and deep, and don't rush through the movements.
Trying Other Spinal Stretches
-
1Lift into downward facing dog. Downward facing dog typically is one of the first yoga poses you'll learn. This pose also stretches your spine and back muscles, particularly the back extensors. You use these muscles when you stand or lift things.[10]
- Get on all fours in tabletop position, just as you were with cat and cow. You might want to move your hands forward slightly. On an exhale, lift your hips up toward the ceiling. Roll over onto your toes and straighten your arms to come into an inverted "V" shape.
- Hold the pose for 5 to 10 deep breath cycles, pulling through your heels to lengthen your legs as you lift up from your wrists, creating a balance point at your hips. Then lower back down into tabletop position.
-
2Drop into extended cobra. Just as cat and cow poses stretch the spine in opposing ways, extended cobra is the opposite of downward facing dog, giving your spine a good counter-stretch.[11]
- From downward facing dog, lower your hips towards the floor as you lift and open your chest. Make sure your shoulders are rolled back. Your shoulder blades should fall straight down alongside your spine.
- Hold the pose for 5 to 10 deep breath cycles. With every inhale, focus on opening and expanding your chest to hold more air. As you exhale, sink your hips into the floor and arch your back.
- You also can create a vinyasa with this pose and downward facing dog, moving between the two poses fluidly with a breath for each movement.
-
3Flex your spine with a seated twist. The seated twist increases flexibility down your entire spine and massages your abdominal organs to improve your digestion. As the name implies, you'll start this pose from a seated position.[12]
- Extend your legs in front of you, placing your hands at your sides. Sit up straight, shoulders back, and adjust your weight so that you are sitting firmly on your sitting bones, not on your tailbone. You may want to place a rolled towel behind you to support your lower back.
- Bend your right knee, placing the foot on the outside of your outstretched left leg. As you inhale, reach your left arm straight forward. Then exhale and reach your left arm across your body, bending your elbow around your knee. Place your right hand on the floor behind you.
- Look towards the right, drawing your chin towards your shoulder. Hold the twist for 5 to 10 breath cycles, trying to twist further with each exhale. Don't crank or force the twist. Then release and repeat the movement on the other side.
-
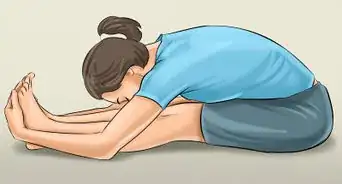
4Relax with a deep forward bend. The deep forward bend is a classic yoga pose to stretch your entire back, including your muscles and your spine. It also increases circulation to your back muscles and spine.[13]
- Start in a seated position with your legs extended in front of you. Make sure your weight is evenly balanced on your sitting bones.
- On an exhale, fold forward over your legs from your hips, extending your arms overhead and then out in front of you. Try to keep your back as long and flat as possible.
- Relax your neck and fold as far forward as you can without pain or discomfort. If you can, you can rest your forehead on your shins. Hold the pose for 5 to 10 breath cycles, then return to an upright seated position.
-
5Rest in child's pose. Many yoga practitioners end their sessions with child's pose, an easy and calming pose that also stretches your entire back. Typically it's best to move into child's pose from tabletop position.[14]
- Keep your knees apart, but bring your feet together so that your big toes are just touching. On an exhale, lower your hips until you are sitting on your heels, extending your arms forward so that you fold over your thighs.
- You can hold child's pose as long as you are comfortable, breathing slowly and deeply.
What Are Common Mistakes to Avoid When Doing Cat & Cow?
References
- ↑ https://www.yogajournal.com/poses/cat-pose
- ↑ https://www.yogajournal.com/poses/cat-pose
- ↑ https://www.yogajournal.com/poses/cat-pose
- ↑ https://www.yogajournal.com/poses/cat-pose
- ↑ https://www.yogajournal.com/poses/cat-pose
- ↑ https://www.yogajournal.com/poses/cat-pose
- ↑ https://www.yogajournal.com/poses/cow-pose
- ↑ https://www.yogajournal.com/poses/cow-pose
- ↑ https://www.yogajournal.com/poses/cow-pose
- ↑ http://www.thespinehealthinstitute.com/news-room/health-blog/3-yoga-poses-that-help-stretch-stressed-out-back-muscles
- ↑ https://beyogi.com/yoga-poses-spine-flexibility/
- ↑ http://www.chopra.com/articles/6-yoga-poses-to-help-relieve-neck-pain
- ↑ https://beyogi.com/yoga-poses-spine-flexibility/
- ↑ http://www.chopra.com/articles/6-yoga-poses-to-help-relieve-neck-pain





-Step-16.webp)
