This article was co-authored by Ndeye Anta Niang. Ndeye Anta Niang is a Hair Stylist, Master Braider, and Founder of AntaBraids, a traveling braiding service based in New York City. Ndeye has over 20 years of experience in African hair including braiding box braids, Senegalese twists, crochet braids, faux dread locs, goddess locs, kinky twists, and lakhass braids. Ndeye was the first female of her tribe in Africa to move to America and is now sharing her knowledge of African braids passed on from generation to generation.
There are 7 references cited in this article, which can be found at the bottom of the page.
This article has been viewed 32,729 times.
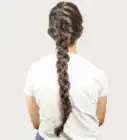
Box braids are a great, stylish way to protect your hair. If you are tired of keeping your braids down, consider pulling them back into a French braid instead. Once you have mastered the technique, you can try 2 French braids, a Dutch braid, or even a braided crown!
Steps
Creating a Basic French Braid
-
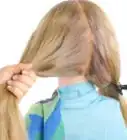
1Gather 6 to 9 braids from your hairline and split them into thirds. Take about 6 to 9 braids from your front hairline. They do not all have to be 1 row; you can do 2 to 3 rows of braids. Split the section into 3 smaller, equal-sized sections.[1]
- Make each section contain the same number of braids. About 2 to 3 braids would be ideal.[2]
- Take the braids from the middle of your forehead, spanning from temple-to-temple.
-
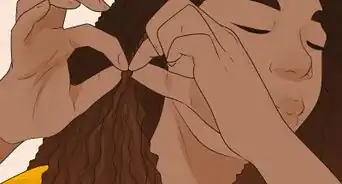
2Do a regular braid for 2 crossovers. Take the left section and cross it over the middle 1 so that it is now the new middle section. Next, take the right section, and cross it over the new middle section.[3]
- Pull your sections tight enough so that the braid is smooth, but don't pull them so tight that they feel uncomfortable.
- Once you’ve finished your French braid you can make your style more comfortable by loosening any overly tight box braids. Pull tight box braids gently at your hairline to create more slack and loosen them in the final style.
Advertisement -
3Add some braids to the left section, then cross it over the middle section. Take a few braids from the left side of your hairline and add them to the left section. Cross the now-thicker left section over the middle section.[4]
- How many braids you add is up to you. The more you add, the thicker your French braid will be. About 2 to 3 braids would be ideal, however.
-
4Repeat the process for the right side. Gather a few braids from the right side of your hairline and add them to the right section. Cross the right section over the new middle section.[5]
- Add the same number of braids as you did for the left side. For example, if you added 2 braids to the left section, add 2 braids to the right section.
-
5Continue to braid in this fashion until you reach your nape. Keep adding braids to the left and right sections before crossing them over the middle 1. When you reach your nape and have no more hair to add into your braid, stop.[6]
-
6Finish off with a regular braid, then secure it with a hair tie. How far down you braid is up to you. You can braid halfway down, three-quarters of the way down, or even all the way down. Once you have finished your braid, secure it with a hair tie.[7]
- Alternatively, skip the regular braid, and tie your braids into a low ponytail instead.
-
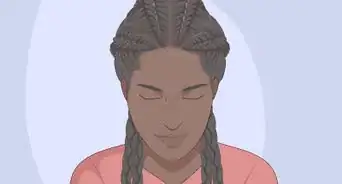
7Smooth down your edges. Take a moment to look at your edges. If the hairs seem unruly, apply some edge control cream, and smooth them down with a soft-bristled toothbrush.[8]
- If your box braids are freshly done and not frizzy, you can likely skip this step. If your box braids are a few weeks old, this will make your edges look neater.
- Alternatively, you can use argan oil and hair gel.
- Box braids themselves are a protective style and can be left in for weeks. The French braid, however, is a temporary style and can be taken out at the end of the day. If you wrap your hair in a silk scarf before sleeping, you may be able to make it last for up to 2 days.


Trying Different Variations
-
1Part your hair down the center, then create a French braid on each side. Choose a side to start with, then secure the other side with a hair tie. After you finish French braiding the first side, remove the hair tie, then French braid that side too.
- Start braiding with the section closest to your hairline.
- Try to keep the braids positioned between your part and hairline. For a different twist, try parting your hair on the side.
- You can do this style with Dutch braids too!
-
2Cross the strands under the middle 1 for a Dutch braid. Follow the instructions for a basic French braid. Instead of crossing the left and right sections over the middle 1, however, cross them under. This includes the bits where you are doing a regular braid too.[9]
- For a thicker braid, increase the number of braids that you add into the left and right sections. For example, add 3 strands for the first crossover, then 4, then 5.
-
3Create a braided headband for a romantic look. Section off the hair that's in front of your ears and tie the rest back. Start Dutch braiding at your left ear, work your way across the top of your head and down to your right ear. Finish off with a regular braid, then tie it off with a hair tie. Undo the rest of your hair that you sectioned off earlier.[10]
- The front section should cross over the top of your head, like a headband. It should only contain the hair between your hairline and ears.
-
4Upgrade a braided headband into a half-up style. Create the braided headband first. Next, gather a few braids from behind your left ear and pull them behind your head. Take your braid, and add them to the gathered braids to create a half-up ponytail. Secure everything with a hair tie.[11]
- Don't gather all of the braids above your ears like doing a standard half-up ponytail, or you will create too much volume.
-
5Dutch braid around your hairline to create a braided halo or crown. Create a deep side part. Starting from the thicker side of the part, begin to do a Dutch braid around your head. When you reach the part, finish off with a regular braid and secure it with a hair tie. Wrap the braid around the side of the braided crown, then secure it with large bobby pins.[12]
- Choose bobby pins that match the color of your box braids for a seamless look. You will likely need several to secure your crown.
- Alternatively, use mini claw clips to secure the regular braid to the Dutch braid.


Expert Q&A
Did you know you can get expert answers for this article?
Unlock expert answers by supporting wikiHow
-
QuestionWhat is a Dutch braid?
 Ndeye Anta NiangNdeye Anta Niang is a Hair Stylist, Master Braider, and Founder of AntaBraids, a traveling braiding service based in New York City. Ndeye has over 20 years of experience in African hair including braiding box braids, Senegalese twists, crochet braids, faux dread locs, goddess locs, kinky twists, and lakhass braids. Ndeye was the first female of her tribe in Africa to move to America and is now sharing her knowledge of African braids passed on from generation to generation.
Hair Stylist & Master BraiderA Dutch braid is basically just an inverted version of a regular French braid!
Support wikiHow by unlocking this expert answer.
-
QuestionHow do you do double French braids?Ndeye Anta NiangNdeye Anta Niang is a Hair Stylist, Master Braider, and Founder of AntaBraids, a traveling braiding service based in New York City. Ndeye has over 20 years of experience in African hair including braiding box braids, Senegalese twists, crochet braids, faux dread locs, goddess locs, kinky twists, and lakhass braids. Ndeye was the first female of her tribe in Africa to move to America and is now sharing her knowledge of African braids passed on from generation to generation.
Hair Stylist & Master BraiderTo do double French braids, you'd start by parting your hair down the middle from front to back. Then, you would do a French braid on each side.Support wikiHow by unlocking this expert answer.
-
QuestionWhat if it looks all poofy at the top?
 Miranda VeriveCommunity AnswerTake down the braid, then redo, pulling it tighter. This should make it less poofy. Also, hairspray it.
Things You'll Need
- Hair tie
- Edge control cream
- Soft-bristled toothbrush
- Bobby pins
References
- ↑ http://www.curlynikki.com/2014/08/how-to-french-braid-natural-hair.html
- ↑ https://www.youtube.com/watch?v=d_x04GKoSjQ&feature=youtu.be&t=40s
- ↑ http://www.curlynikki.com/2014/08/how-to-french-braid-natural-hair.html
- ↑ http://www.curlynikki.com/2014/08/how-to-french-braid-natural-hair.html
- ↑ http://www.curlynikki.com/2014/08/how-to-french-braid-natural-hair.html
- ↑ http://www.curlynikki.com/2014/08/how-to-french-braid-natural-hair.html
- ↑ http://www.curlynikki.com/2014/08/how-to-french-braid-natural-hair.html
- ↑ https://www.youtube.com/watch?v=d_x04GKoSjQ&feature=youtu.be&t=2m25s
- ↑ https://www.youtube.com/watch?v=d_x04GKoSjQ
About This Article