This article was co-authored by Josh Goldenberg. Josh Goldenberg is a Residential Remodeling Expert and the Co-Founder of 5blox, based in the Greater Los Angeles area. With more than seven years of experience, Josh and his team specialize in luxurious and sustainable home renovations. 5blox is fully licensed and bonded.
There are 10 references cited in this article, which can be found at the bottom of the page.
This article has been viewed 35,863 times.
Molding is a broad term that applies to different materials used in trim carpentry. The two most commonly used types of molding are crown molding and base molding. Crown molding is used to finish the corners where walls meet the ceiling, and base molding is applied where the walls of a room meet the floor. While you’ll cut base molding to be installed standing vertically, crown molding should be cut and installed at an angle. For most molding cuts, you’ll be cutting 2 beams at 45 degrees to fit together on either an inside or an outside corner. While you can technically use any type of saw to cut molding, a miter saw will do the job most effectively.
Steps
Measuring and Marking the Molding
-
1Use a tape measure to find out the exact length of the walls. It’s important that you measure as specifically as possible—to the nearest 1/16 of an inch—so that the cut molding will fit perfectly. If you need to round your measurement, round up. Measure all 4 walls if you’re redoing a room or repairing a bad molding job.
- If the wall you’re measuring is longer than your tape measure, just measure from 1 side of the wall as far as your tape measure will go. For example, say it’s 100 inches (250 cm). Mark the spot with a pencil. Then, measure from the other side of the wall to the pencil mark. Add the 2 measurements together to find the full length of molding you’ll need.[1]
- If you haven’t installed molding before, work on measuring and cutting 1 piece at a time.
-
2Visit a local hardware store and find a molding you like. There are hundreds of different types and styles of molding that all serve more or less the same purpose. You can purchase long sections of molding at any hardware store or home-supply store. Be sure to purchase sections of molding that are long enough to span the entire length of the wall(s) you’re cutting molding for. In fact, buy about 10% extra in case you measured wrong or make a bad cut.[2]
- Hardware stores will let you return leftover, unused molding.
- Most molding boards are about 3 inches (7.6 cm) wide and 1⁄2 inch (1.3 cm) thick.
Advertisement -
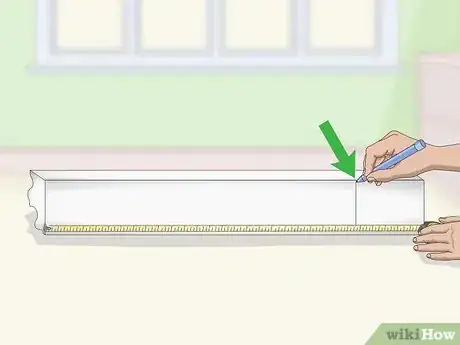
3Mark the length of the wall on the molding boards. Once you’ve purchased the molding, you’ll need to mark the length of the wall on the boards.[3] This will show you where to cut the molding so it’ll fit your wall. Hold the piece of molding against your length of your wall and mark the molding with a pencil.
- If you’re making an outside cut, you’ll mark the length on the top of the board. If you’re making an inside cut, you’ll mark the length on the bottom of the board.[4]
- For example, say you’ll be applying molding to 2 walls that are 105 inches (270 cm) and 85 inches (220 cm), respectively. You’ll need to measure out and mark those distances on 2 separate molding boards.
Cutting Base Molding with a Miter Saw
-
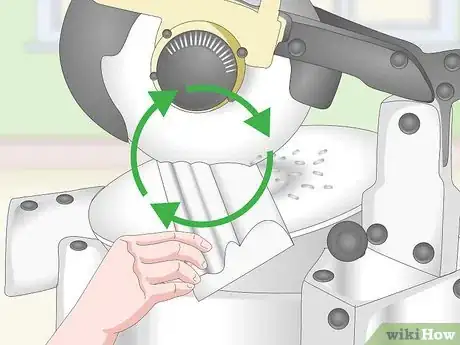
1Set your miter saw to cut at 45 degrees. To set the angle, raise the saw blade up and squeeze the handle at the front of the arm coming out of the saw’s base. Turn the base until the indicator points to 45 degrees.[5] A miter saw comprises a large spinning saw blade that you’ll lower into an adjustable base. Since molding boards need to fit tightly together in a corner (or over the outward-facing corner of a wall), both angles should be exactly 45 degrees.[6]
- Some types of miter saw may require you to loosen a knob before you can adjust the base’s angle.
- Make sure to use a trim-cutting saw that’s between 80-100 tooth for a more precise and smooth cut.
-
2Place the front of the molding against the saw’s base for an outside cut. Outside cuts are used for corners that jut out into a room.[7] Setting the front edge of molding against the saw’s base will ensure that the front of the board is cut longer than the back.
- So, the bottom of the board needs to be shorter for an outside cut.
-
3Set the back of the molding against the saw’s base for an inside cut. Inside cuts are used for recessed corners. By placing the back of the molding against the saw, you’ll leave the back edge longer and cut the front edge short.[8]
- So, the front part of the molding needs to be shorter for an inside cut.
-
4Turn on the saw and lower the blade to cut through the board. You can activate the saw by pulling the trigger. This will typically be located on the inside grip of the handle. Squeeze the trigger and, as the blade spins, lower it slowly. Press the blade through the board and catch the cut molding before it falls to the floor.[9]
- Keep your other hand on the molding board to hold it steady as you cut. Make sure that your hand is at least 6 inches (15 cm) away from the blade at all times.
- The board’s cut edges will be rough and potentially splintered. Sand both of the sawed edges with a piece of 100-grit sandpaper to smooth out any rough spots.[10]
-
5Cut a second board the same as you did the first. So, if you’re molding an inside corner, set the bottom of the board against the saw’s base. If you’re molding an outside corner, set the front of the board against the saw’s base. Cut the second board just as you did the first one, being careful to keep your fingers out of the way of the saw blade.[11]
- Once the 2 boards are cut, you’ll be ready to hang the molding.
-
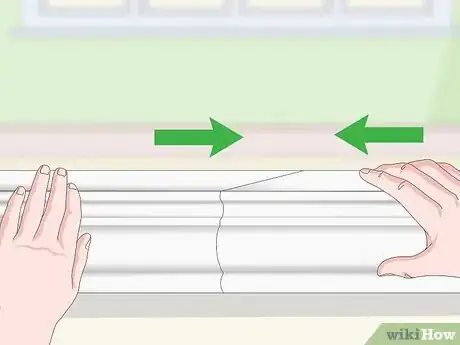
6Splice together 2 molding boards if 1 won’t span the wall. If you’re applying base molding to a wall that’s longer than your molding boards, you’ll need to splice together 2 separate boards as seamlessly as possible. Do this by cutting 2 boards at 45 degrees. 1 board should be cut as if you were making an outside corner (front side longer) and 1 as if you’re making an inside corner (back side longer). This way, the boards will fit seamlessly together when you align them on the wall.[12]
- Then, use a hammer to drive 1.5 in (3.8 cm) finishing nails into the splice cut to hold the boards together.
Using a Miter Saw to Cut Crown Molding
-
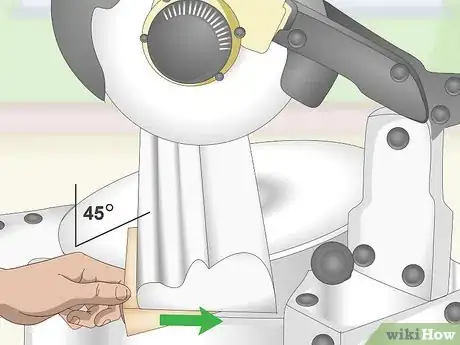
1Slip a jig under the molding board so it rests at 45° against the base. Crown molding is installed at a 45-degree angle between the ceiling and the wall. Hold the molding against the base of your saw so that the upper edge lies flat against the back of the saw. Then, slip a small piece of board or scrap wood against the lower edge of molding to hold it in place.[13]
- You can use any type of scrap board as the jig. Or, if you prefer not to make your own, you can purchase a jig from a hardware store.
-
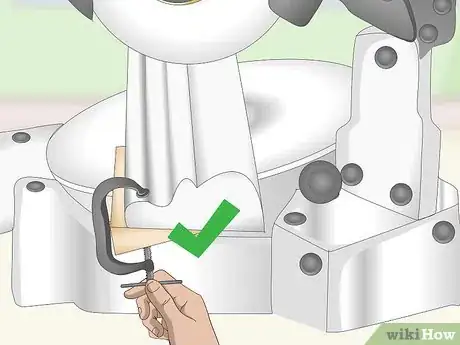
2Clamp the jig in place with a C clamp. The clamp will keep the jig in position and ensure that your crown molding will be at an exact 45-degree angle for cutting. If you’re cutting multiple pieces of crown molding, leave the jig clamped in place for each cut.[14]
-
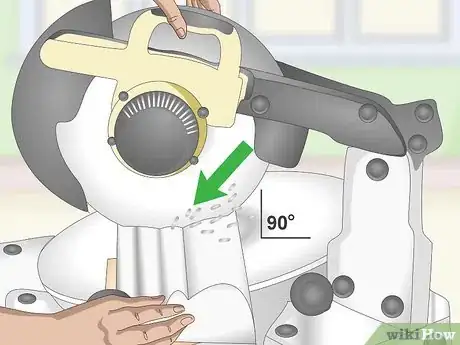
3Cut 1 crown molding board at a 90° angle. The first piece of crown molding you cut will span the length of a wall and butt into both corners at a 90° angle. Make sure that your miter saw is set to 90° and will cut straight ahead, then make the cuts.[15]
- Be careful not to bump the jig out of place when you’re moving the crown molding board around.
-
4Cut inside corners by cutting a molding board at a 45° angle. Set a second molding board in position against the saw and the jib. If you’re going to position this board on the right side of the already-cut molding, set the saw 45° to the left. If you’re positioning this board to the left side of the already-cut molding, set the saw 45° to the right. Once the board is in position, make the cut.[16]
- When you position the 2 crown molding boards on the wall, the first board you cut will butt square into the corner. The second molding board will slip into place against the first, leaving no gap between the boards.
- Use a coping saw to trace the profile of the molding onto the edge of one piece after making your miter cut. This will help make your corners easier to install.
-
5Make outside corners by cutting 2 crown molding boards at 45°. For an outside corner, you’ll only need 45-degree angle cuts. Rotate the saw to the left 45-degree mark and cut 1 board. Make sure the board is held tightly in place against the jib.[17]
- Then, rotate the saw to the right 45-degree mark and cut your second board.
- Use a corner block to eliminate miter cuts and make the molding easier to install.
Things You’ll Need
Measuring and Marking the Molding
- Tape measure
- Molding boards
- Pencil
Cutting Base Molding with a Miter Saw
- Molding Boards
- Miter saw
- 100 grit sandpaper
- 1.5 in (3.8 cm) finishing nails
- Hammer
Using a Miter Saw to Cut Crown Molding
- Molding Boards
- Miter saw
- C-clamp
- Jig
- Pencil
- Coping saw (optional)
Warnings
- Exercise caution when using a miter saw, as it could seriously hurt your hand or arm. Wear protective eyewear when operating the saw and make sure that your fingers are clear of the blade before you begin cutting.⧼thumbs_response⧽
References
- ↑ https://www.youtube.com/watch?v=LHUH7knryFc&feature=youtu.be&t=49s
- ↑ https://www.architecturaldigest.com/story/how-to-install-crown-molding
- ↑ Josh Goldenberg. Residential Remodeling Expert. Expert Interview. 25 January 2022.
- ↑ https://www.youtube.com/watch?v=LHUH7knryFc&feature=youtu.be&t=3m2s
- ↑ https://www.youtube.com/watch?v=jf52qMZibd0&feature=youtu.be&t=31s
- ↑ https://www.familyhandyman.com/carpentry/trim-carpentry/perfect-trim-on-doors-windows-and-base-moldings/view-all/
- ↑ https://www.thisoldhouse.com/how-to/how-to-install-easy-crown-molding
- ↑ https://www.thisoldhouse.com/how-to/how-to-install-easy-crown-molding
- ↑ https://www.todayshomeowner.com/video/how-to-cut-and-install-crown-molding/
- ↑ https://www.thisoldhouse.com/how-to/how-to-cut-crown-molding
- ↑ https://www.thisoldhouse.com/how-to/how-to-install-easy-crown-molding
- ↑ https://www.architecturaldigest.com/story/how-to-install-crown-molding
- ↑ https://www.architecturaldigest.com/story/how-to-install-crown-molding
- ↑ https://www.architecturaldigest.com/story/how-to-install-crown-molding
- ↑ https://www.architecturaldigest.com/story/how-to-install-crown-molding
- ↑ https://www.architecturaldigest.com/story/how-to-install-crown-molding
- ↑ https://www.thisoldhouse.com/how-to/how-to-cut-crown-molding
- ↑ https://www.youtube.com/watch?v=LHUH7knryFc&feature=youtu.be&t=2m36s


