This article was co-authored by wikiHow staff writer, Hunter Rising. Hunter Rising is a wikiHow Staff Writer based in Los Angeles. He has more than three years of experience writing for and working with wikiHow. Hunter holds a BFA in Entertainment Design from the University of Wisconsin - Stout and a Minor in English Writing.
There are 16 references cited in this article, which can be found at the bottom of the page.
The wikiHow Video Team also followed the article's instructions and verified that they work.
This article has been viewed 101,506 times.
Learn more...
Chicken thighs are cuts of dark meat that stay tender and juicy when you cook them. While you can cook a chicken thigh with the bone in, removing it allows you to cut the chicken much easier. Begin slicing around the thigh bone so you can pull it out from the meat. After you remove the bone, continue cutting away the inedible parts and portioning the meat. Once you cut the chicken, cook it thoroughly so it reaches 165 °F (74 °C) to avoid getting food poisoning!
Steps
Deboning the Thigh
-
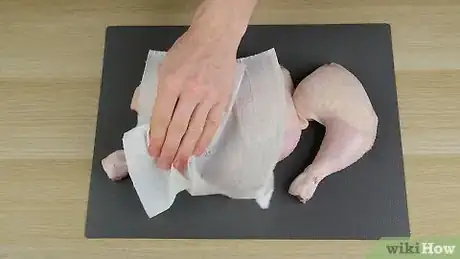
1Pat the raw chicken thigh dry with paper towels. Drain any of the juices from the chicken’s packaging into your garbage can or down the sink drain. Cover the thigh with a paper towel and apply light and even pressure to wick up the excess liquid. Continue drying the chicken until it doesn’t feel slippery.[1]
- Drying the thigh will help keep it from sliding around while you’re trying to cut it.
- If the raw chicken feels sticky, has a potent odor, or looks a dull grey color, throw it away since it has gone bad.[2]
-
2Cut the joint between the drumstick and thigh with a filet knife if it’s still attached. Use a filet knife with a long, narrow blade so you can easily cut along the bones without damaging the meat. Set the chicken on a cutting board with the skin facing up, and bend the drumstick back from the thigh until you can see a white line of fat in line with the joint. Slice right along the fat line with your knife to easily separate the thigh and drumstick.[3]
- Chicken thighs that are sold as “quarters” have the drumsticks still attached.
- If you hit bone when you cut into the meat, move your knife over and try again until it glides cleanly through the joint.
- Be sure to use a sharp knife since you’re more likely to hurt yourself with a dull blade.
Advertisement -
3Slice along the left side of the thigh bone with your knife. Flip the chicken thigh over so the skin faces down, and locate the knobby end of the bone poking out from the thickest part of the meat. Place the tip of your knife against the left side of the bone and make slow, short cuts down its length to separate the meat. Try to keep the blade as close to the bone as you can so you don’t accidentally leave behind scraps of meat.[4]
- Don’t apply too much pressure while you’re cutting, or else the blade may slip off of the bone and cut you.
- You don’t have to remove the bone if you want to bake bone-in chicken thighs.
-
4Push the meat over so you can cut along the right side of the bone. Set the knife down and pull apart the cut with your hands so you can see the right side of the bone. Pat the meat so it stays in place before placing the tip of your knife along the uncut side of the bone. Use short, slow strokes with the blade angled toward the bone so you remove the most meat. Slice until you reach the other end of the bone.[5]
- As you slice through the meat, continue pushing it away from the bone to help pull it tight so you can make the cleanest cuts.
-
5Pull the bone up and out of the thigh as you slice it off of the meat. Lift the knobby end of the bone off your cutting board with your nondominant hand. Place the blade of your knife at the end of the bone along the uncut side of the bone. Raise the bone up to pull the meat tight, and scrape the blade against the length to finish cutting off of the meat. When you reach the end of the bone, cut any places where it’s still attached to the meat to remove it.[6]
- Never cut toward your fingers since you could easily hurt yourself if the blade slips.
- Save the bones if you want to make a chicken stock.
Tip: Practice deboning multiple thighs at the same time so you can get more practice. Wrap any thighs you don’t want to cook in aluminum foil and store them in your freezer for up to 9 months.[7]
Trimming and Slicing the Meat
-
1Cut off any excess fat or cartilage with your knife. Keep the chicken thigh with the skin side face down so you can easily see the meat. Look for any large pieces of white fat or yellow cartilage left on the meat that you don’t want to eat. Pull the fat or cartilage tight with your nondominant hand so you can slice as close to the meat as you can with your knife. Throw away any of the scraps when you’re finished.
- It’s okay to leave some of the fat on the thigh since it will cook down and keep the chicken juicy.
-
2Peel off the skin with your fingers if you don’t want it. Flip the chicken thigh over so the skin side faces up. Grab an edge of the skin with your dominant hand and hold the meat against the cutting board with your other hand. Pull the skin straight up and away from the meat so it separates easily. If the skin doesn’t come off, pull it as tight as you can and cut along the meat with the tip of your knife.
- Chicken skin gets crispy once it’s cooked, so you may leave it on the thigh if you want. Trim off any excess that hangs off the meat with your knife.
-
3Butterfly the thickest part of the thigh if it’s thinner on one side. Flip the meat over so the side that had the skin faces down, and flatten it out so you can see how thick it is. If one side of the meat is thicker than the other, cut the thick side at a 45-degree angle so the blade goes halfway through the meat. After making your cut, pull the sides apart and spread the meat out again to see if it has a consistent thickness. Otherwise, slice deeper into the meat until it does.[8]
- You don’t have to butterfly the chicken thighs if you don’t want to, but it will help the meat cook evenly.
Variation: Lay the thigh flat on a piece of plastic wrap and cover it with another piece. Pound the chicken with the flat side of a meat hammer until it’s the same thickness throughout.[9]
-
4Portion the thigh into strips or cubes if you want smaller pieces. Keep the meat flat on your cutting board so it’s easier to divide into equal portions. Hold the chicken in place with your nondominant hand as you make slow, smooth cuts through the meat with your knife. If you want to cut them into strips, try to make them about 2 inches (5.1 cm) wide and 4 inches (10 cm) long. If you want to cut the meat into smaller pieces, try making 1 in × 1 in (2.5 cm × 2.5 cm) cubes.[10]
- You can also cook the chicken thigh whole if you don’t want to cut it.
- Be sure to clean or disinfect any surfaces that had raw chicken on them so you don’t spread bacteria.
Cooking Chicken Thighs
-
1Bake chicken thighs in the oven if you want a simple meal. Move one of your oven racks to the center position and preheat the oven to 425 °F (218 °C). Season the chicken thigh with salt and pepper for flavor before putting it in a greased baking dish. Put the chicken in your oven for about 20 minutes before checking if it has an internal temperature of 165 °F (74 °C) with a meat thermometer. If not, put it back in the oven and check again in 5 minutes. Take the thigh out of the oven and let it rest for 10 minutes so it stays juicy.[11]
- Don’t eat chicken that has an internal temperature below 165 °F (74 °C) since you could risk getting food poisoning.
- How long it takes to bake chicken thighs depends on the thickness of the meat. Always check the temperature rather than relying on set times.
- Try marinating the chicken in a sauce before you bake it if you want it to have more flavor.
-
2Sear the chicken thigh in a hot pan to keep them juicy. Season the chicken with sprinkles of salt and pepper before you cook it. Set a pan with 2 teaspoons (9.9 ml) of olive oil over high heat on your stove until it starts to smoke. Lay the chicken thigh down in the middle of the pan and leave it alone to cook for 5 minutes so it gets crispy. Flip the chicken over and reduce it to a medium heat until it has an internal temperature of 165 °F (74 °C).[12]
- If left the skin on the thigh, put it in the pan skin-side down so it can get crispy.
- Try using different spices and seasonings if you want a different flavor. For example, try cayenne pepper or paprika to add some spice, or use oregano and basil if you want something more herbal.
-
3Grill the chicken thigh for a classic barbecue flavor. Start your grill and allow it to reach a medium-high heat. Brush the grates with olive oil before you put the chicken on it, or else the thigh may stick to the grates. Place the thigh on the grill and leave it alone for about 5 minutes. Flip the thigh over to the other side and allow it to cook for another 5 minutes before you check the temperature.[13]
- Use barbecue sauce as a marinade if you want to make juicy BBQ chicken thighs.
- Keep the grill covered while you’re cooking the chicken to help bring it to temperature faster.
-
4Fry chicken strips in oil if you want them crispy and easy to eat. After cutting the chicken thigh into 2 in × 4 in (5.1 cm × 10.2 cm) strips, marinate them in buttermilk for up to 24 hours to help keep them juicy. Shake the excess buttermilk off before coating them in flour seasoned with salt and pepper. Heat a pot of vegetable oil to 350 °F (177 °C) before dropping the 4–5 strips at a time. Let them cook for around 7 minutes, or until they have an internal temperature of 165 °F (74 °C).[14]
- Serve the chicken strips with dipping sauces, such as honey mustard, barbecue sauce, or ranch dressing, for additional flavor.
Tip: If you’re making multiple batches of chicken strips, keep ones you already cooked on a baking sheet in your oven at 250 °F (121 °C).
-
5Skewer cubes of chicken and vegetables if you want to make kebabs. Cut the chicken thighs into 1 in × 1 in (2.5 cm × 2.5 cm) pieces so they fit well on the kebabs. Push a wooden skewer through the middle of a piece of chicken thigh and slide them down. Alternate between pieces of chicken and similarly sized vegetables, such as pieces of onion, pepper, or mushroom. Place the kebabs on a grill at high heat and cook them for about 3 minutes before flipping it. Cook the other side for an additional 2–3 minutes or until the chicken is 165 °F (74 °C).[15]
- Brush a sauce or marinade on the chicken and vegetables while they’re cooking if you want to infuse flavors.
Warnings
- Don’t eat chicken unless you cook it to an internal temperature of 165 °F (74 °C), or else you risk getting food poisoning.[16]⧼thumbs_response⧽
- Clean any surface that comes into contact with raw chicken with soapy water or disinfectant so you don’t spread harmful bacteria.[17]⧼thumbs_response⧽
- Be careful not to cut your fingers while you’re using your knife. Always keep them away from the blade,⧼thumbs_response⧽
Things You’ll Need
Deboning the Thigh
- Filet knife
- Cutting board
- Paper towels
Trimming the Meat
- Filet knife
- Cutting board
References
- ↑ https://youtu.be/r0IEiU_-Fjo?t=55
- ↑ https://www.thekitchn.com/how-can-i-tell-when-chicken-s-gone-bad-256662
- ↑ https://www.youtube.com/watch?v=lad6CdC_roc
- ↑ https://youtu.be/r0IEiU_-Fjo?t=95
- ↑ https://youtu.be/r0IEiU_-Fjo?t=108
- ↑ https://www.allrecipes.com/article/deboning-a-chicken-thigh/
- ↑ https://www.foodsafety.gov/food-safety-charts/cold-food-storage-charts
- ↑ https://youtu.be/r0IEiU_-Fjo?t=185
- ↑ https://www.epicurious.com/expert-advice/how-to-make-chicken-thigh-cutlets-article
- ↑ https://www.epicurious.com/recipes/food/views/buttermilk-fried-chicken-fingers-51258410
- ↑ https://www.thekitchn.com/how-to-cook-boneless-skinless-chicken-thighs-in-the-oven-180140
- ↑ https://themodernproper.com/posts/pan-fried-boneless-skinless-crispy-chicken-thighs
- ↑ https://www.epicurious.com/recipes/food/views/grilled-chicken-thighs-238540
- ↑ https://www.epicurious.com/recipes/food/views/buttermilk-fried-chicken-fingers-51258410
- ↑ https://www.foodandwine.com/recipes/chicken-thigh-yakitori
- ↑ https://www.fsis.usda.gov/food-safety/safe-food-handling-and-preparation/food-safety-basics/safe-temperature-chart
- ↑ https://www.fsis.usda.gov/food-safety/safe-food-handling-and-preparation/food-safety-basics/safe-temperature-chart


