This article was co-authored by wikiHow Staff. Our trained team of editors and researchers validate articles for accuracy and comprehensiveness. wikiHow's Content Management Team carefully monitors the work from our editorial staff to ensure that each article is backed by trusted research and meets our high quality standards.
wikiHow marks an article as reader-approved once it receives enough positive feedback. This article received 19 testimonials and 92% of readers who voted found it helpful, earning it our reader-approved status.
This article has been viewed 1,108,807 times.
Learn more...
Curing olives is an ancient process that turns the naturally bitter fruit into a deliciously salty, tart snack. Choose a curing method that works best for the type of olive you have. Water curing, brining, dry curing and lye curing each yield distinctly different flavors and textures. Curing olives takes a long time, but doing it yourself allows you to make olives catered to your exact taste.
- Prep time (in water): 7-10 days
Steps
Curing Olives in Water
-
1Obtain fresh green olives. Water curing gently removes oleuropein, a component in olives that gives them a sharp, bitter taste. Green olives are actually just immature olives (just like green tomatoes are immature tomatoes) and they are naturally pretty mild, so using water alone is sufficient to cure them.
- Green olives left on the vine to fully ripen will turn purple or black. Once they're fully ripe, water alone won't remove the bitter taste; you'll need to choose a different curing method.
-
2Inspect the olives. Make sure that they are as unbruised as possible. Look for holes left by insects or birds. If the olives were treated with chemicals, rinse them off before you begin the brining process.Advertisement
-
3Break the olives. In order for the water to be able to reach the insides of the olives, you'll need to break or slit the olives to let the moisture in. You can do this with a wooden mallet or, more commonly, a rolling pin. Give the olives a light smack, keeping them as intact as possible. You want the flesh to tear, but don't completely mash it or rip it into several different pieces. You should also take care not to damage the pit.
- If you're concerned about the appearance of the olives, you can slit them with a knife instead. Take a sharp paring knife and make three slits in the olives to allow the water to penetrate.
-
4Place the olives in a plastic bin and cover with cold water. Use a food-grade plastic bin with a lid. Completely cover all of the olives with water, making sure none are poking out. You may need to weigh them down with something like a plate to keep them from floating above the surface of the water. Place the bin's cover loosely over the olives and put the container in a cool, dark place.
- Make sure you use a food-grade container that won't leach chemicals into the brine. A glass container also works well, but you'll need to make sure it isn't exposed to sunlight.
-
5Change out the water. At least once a day, change out the water with fresh, cold water. Make sure you don't forget, since otherwise bacteria could build up in the water and taint the olives. To change the water, just strain the olives through a colander, wash the pot, replace the olives and fill it back up with cold water.
-
6Continue the process for about a week. After one week of changing the water daily, taste an olive to see if the bitterness is at a level you like. If it is, the olives are ready; if you want the olives to be less bitter, wait a few more days (changing the water daily) before moving on.[1]
-
7Make a finish brine. This is the solution that the olives will be stored in. It's a mixture of pickling salt, water and vinegar that will both preserve the olives and give them a delicious pickled taste. To make the brine, mix the following (makes enough for 10 pounds of olives):
- 1 gallon (3.8 L) cool water
- 1 1/2 cups pickling salt
- 2 cups white wine vinegar
-
8Drain the olives and place them in a storage container. Use a large glass jar with a lid or another storage container of your choice. Wash and dry the storage container thoroughly before placing the olives inside. Leave one inch of space at the top of the container.
-
9Cover the olives with the brine. Pour it into the container to completely cover the olives. Place the lid on the container and store the olives in the refrigerator.
- You may add lemon peel, rosemary sprigs, roasted garlic, or black pepper to flavor the brine if you'd like.
- The olives will keep in their brine for up to a year in the refrigerator.[2]


Curing Olives in Brine
-
1Obtain fresh olives. Both green and black olives may be cured in brine, a mixture of salt and water that preserves the olives and gives them a salty taste. This method takes longer than water brining, but it's the best method to use for ripe olives. Manzanillo, mission, and kalamata olives are commonly cured in brine.
- Inspect the olives to make sure that they are as unbruised as possible. Look for holes left by insects or birds. If the olives were treated with chemicals, rinse them off before you begin the brining process.
- You may want to sort the olives by size. A batch of olives will cure more evenly if all the olives are a similar size.
-
2Cut the olives. In order for the brine to be able to reach the insides of the olives, you'll need to slit the olives to let the moisture in. Make a vertical cut down the olive using a sharp knife; make sure not to cut the pit.
-
3Place the olives into glass jars with lids. They need to be stored in containers that can be sealed against the air, and glass is best for this purpose. Pack the olives into jars, leaving an inch of space at the top.
-
4Cover the olives with a medium brine. Mix 3/4 cup of pickling salt with a gallon of cold water. Pour the brine into the jars so that it completely covers the olives. Seal the jars and store them in a cool, dark place, such as the pantry or cellar.
-
5Wait one week. During this time the olives will begin to brine. Leave the jars undisturbed to allow the salt and water to seep into the olives.
-
6Drain the olives. After one week, drain the olives and discard the medium brine, which will be full of bitter flavor. Keep the olives in the same glass containers.
-
7Cover the olives with a strong brine. Mix 1 1/2 cups of pickling salt with one gallon of water. Pour the strong brine over the olives to completely cover them. Seal the containers.
-
8Store the olives for two months. Keep them in a cool place out of sunlight. At the end of two months, taste an olive to determine whether the bitterness level suits your taste. If not, change the brine again and store the olives for another month or two. This process can be repeated until you're happy with the way the olives taste.


Dry Curing Olives
-
1Obtain fully ripe olives. Black, oily olives may be dry-cured using salt. Manzanillo, mission, and kalamata olives are commonly cured this way. Make sure the olives are completely ripe and dark in color. Inspect the olives to make sure that they are as unbruised as possible. Look for holes left by insects or birds.[3]
-
2Wash the olives. If the olives were treated with chemicals, rinse them off before you begin the brining process. Lay them out to dry completely.
-
3Weigh the olives. Use a kitchen scale to figure out exactly how much they weigh. You'll need a pound of pickling salt (1 1/2 cups) for every two pounds of olives.
-
4Prepare a curing crate. You may use a wooden fruit crate about six inches deep with two slats on each side. Line the entire crate with burlap, including the sides, and staple or nail it to the top. Prepare a second crate identical to this one.
- Alternately, you can line the crate with cheesecloth, old sheets or cloth napkins as long as there is enough fabric to keep the salt contained and to absorb any liquids which may drip from the crate.
-
5Mix the olives and salt. Mix 1 1/2 cups of pickling or Kosher salt for every two pounds of olives in a large bowl. Make sure to mix thoroughly, so that every olive gets covered in salt.
- Do not use iodized table salt; this will affect the flavor of the olives. You need pickling salt or Kosher salt.
- Don't skimp on the salt, since it prevents mold from growing.
-
6Pour the mixture into a fruit crate. Pour all of the olives and salt into one crate, then cover it with a layer of pickling salt. Cover the crate with cheesecloth to keep bugs out of the mixture.
-
7Place the crate in a covered outdoor area. You may want to lay out a tarp, since the juices from the olives will seep out and stain the surface. Rather than setting the crate directly on the ground, raise it up on blocks to promote air circulation.[4]
-
8Mix the olives after one week. Dump the contents of the crate into the second, clean crate. Shake the crate well to mix the olives, then carefully pour them back into the original box. This ensures every olive gets an even coating of salt and allows you to see any damaged or rotten olives. Remove these, they'll not be good to eat later.
- Any olives with white circular patches (probably a fungus) should be removed. The fungus often starts at the stem end of the olive.
- Check the olives to make sure that they are beginning to cure evenly. If an olive has shriveled areas and plump areas, you may want to dampen the olive prior to repacking in salt; this will encourage the plump area to start shriveling.
-
9Repeat once a week for a month. After this time, taste an olive to determine if you like the flavor. If the olive is still quite bitter, continue the dry-curing process for another couple of weeks. The olives should take about a month to six weeks to become cured depending on the size of the olive. When cured, they will be shriveled and soft.
-
10Strain the mixture. Either sift out the salt by pouring the olives over a screen, or pick the olives out of the salt and shake them out one by one.
-
11Dry the olives overnight. Spread them out on paper towels or cloth napkins to thoroughly dry.
-
12Store the olives.Mix the olives with a pound of salt for every ten pounds of olives to help preserve the olives in storage, then pour them into glass jars and seal them. Store them in the refrigerator for several months or more.
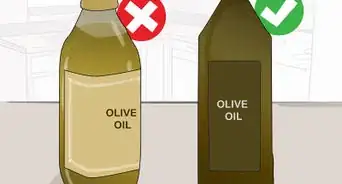
- You can also mix the olives with extra-virgin olive oil and spice to taste.


Lye Curing Olives
-
1Take precautions when working with lye. Lye can cause burns. Wear chemical-resistant gloves and safety glasses whenever you're working with lye, and don't use an olive vat made of plastic or anything made out of metal (even lids, since the lye dissolves metal).[5]
- Do not use the lye curing method if children might come anywhere near the olives or the solution.
- Complete the process in a well-ventilated room. Open the windows and turn on a fan to increase the airflow.
-
2Clean the olives. This method works best for large olives, such as Seville olives. It may be used for either green or ripe olives. Pick out the damaged or bruised olives and sort the olives by size, if desired.
-
3Place the olives in a lye-resistant container. Again, do not use a metal container; a large glass or ceramic. container is best.
-
4Make a lye solution. Pour one gallon of water into a lye-resistant container. To the water, add 2 ounces of lye. The solution will immediately heat up. Cool it to 65 to 70 °F (18 to 21 °C) before you add it to the olives.
- Always add lye to water; never add water to lye. It will cause an explosive reaction.
- Use exact measurements. Using too much lye will be detrimental to the olives; too little and they won't cure properly.
-
5Pour the lye over the olives. Cover the olives completely with the lye solution. Use a plate to weigh the olives down so they don't get exposed to air, which would cause them to darken in color. Cover the container with cheesecloth.
-
6Stir the mixture every two hours until the lye reaches the pits. For the first eight hours, just stir the mixture and recover it when you're finished. After eight hours, start checking the olives to see whether the lye has penetrated to the pits. While wearing chemical-resistant gloves, pick a few of the largest olives. If they are easy to cut to the pit, with soft, yellowish green flesh all the way through, the olives are ready. If the flesh is still pale at the center, submerge them and try again in a few hours.
- Make sure you never handle the olives with your bare hands. If you don't have chemical-resistant gloves, use a spoon to remove the olives and run them under cold water for several minutes before checking lye penetration.
-
7Switch out the lye solution if necessary. If the olives are very green, the lye may not penetrate to the pits after 12 hours. If this is the case, drain the olives and cover them with a fresh lye solution. After another 12 hours, do the same if the lye still hasn't penetrated to the pits.
-
8Soak the olives in water for two days. Change the water at least two times a day. This process washes the olives and gives the lye time to seep back out. Each time you change the water, it will look lighter color.
-
9Taste test an olive on the fourth day. If it's sweet and fatty, with no bitterness or soapy flavor, proceed to the next step. If it still tastes of lye, continue the soaking and rinsing process until the olives taste mild and the water rinses clear.
-
10Cure the olives in a light brine. Place the olives in a glass storage container. Mix 6 tablespoons pickling salt in a gallon of water and pour it over the olives to cover them. Let the olives cure for a week, at which point they're ready to eat. Store the olives in the refrigerator in their brine for up to a few weeks.


Community Q&A
-
QuestionHow are the olives stored or prepared for eating? What if they end up being too salty?
 Community AnswerAt least one day before consuming, rinse the olives out of the brine. If they are too salty, soak them in fresh water overnight, then marinate them in olive oil and whatever spices and herbs you prefer. For long term storage, put your olives in a glass jar, add herbs and spices, then add one third fresh brine (saturated solution), one third white vinegar and a third olive oil. Put on the lid and store somewhere dark and cool for at least a few months to develop a good flavour. The olives should last for years when preserved properly.
 -
QuestionWhat is the best way to store harvested olives until I have enough to cure a batch?Community AnswerStore them covered with fresh water, changing it daily if possible. This will also help leach the tannins from the olives.
-
QuestionI have purchased black olives produced and packed in Spain. Is there any risk related with health? The black olives have an ingredient containing ferrous gluconate as a color stabilizer.
 Damir SteberCommunity AnswerThat is a difficult question as it is probably impossible to know just how much of the substance is in your jar. Ferrous gluconate is a source of iron, often prescribed to treat iron deficiency anemia (not enough iron in the body to make oxygen-carrying hemoglobin). As such an adult can be prescribed up to 1 gram a day, and it's hard to believe they would be adding much more iron then that. As with all such things, try one! I'm sure many others have already. If you don't have a problem have a few more. Enjoy. There are many sights that will tell you of side effects and things to look for.
Warnings
- Do not taste the olives while they are soaking in lye, wait until the 3 day period with water is up before testing.⧼thumbs_response⧽
- Scum may form at the surface of the brine. It isn't harmful as long as the olives are fully submerged, but it should be removed when it forms.⧼thumbs_response⧽
Things You'll Need
- Chemical-resistant gloves
- Safety glasses
- Two wooden crates
- Untorn burlap, cheesecloth, sheets, or cloth napkins


References
About This Article

To cure olives in brine, place the olives into air tight glass jars with lids, leaving 1 inch of space at the top. Next, mix 3/4 cup of pickling salt with 1 gallon of water and pour the brine into the jars. Store the jars in a cool, dark place for 1 week, then drain the olives and discard the brine. Then, mix 1 1/2 cups of pickling salt with 1 gallon of water and pour the stronger brine into the jars. Store the olives for 2 months in a cool, dark place to finish curing them! To learn how to cure your olives in water, read on!