This article was co-authored by Lauren Kurtz. Lauren Kurtz is a Naturalist and Horticultural Specialist. Lauren has worked for Aurora, Colorado managing the Water-Wise Garden at Aurora Municipal Center for the Water Conservation Department. She earned a BA in Environmental and Sustainability Studies from Western Michigan University in 2014.
There are 13 references cited in this article, which can be found at the bottom of the page.
wikiHow marks an article as reader-approved once it receives enough positive feedback. In this case, 89% of readers who voted found the article helpful, earning it our reader-approved status.
This article has been viewed 163,599 times.
Orchids are beautiful tropical flowers that add an exotic flair to any indoor space. Due to the native conditions orchids grow in, however, you may need to take a few extra measures to ensure that your plant not only survives, but thrives. Your indoor orchid must receive plenty of indirect light, and the air around it must be kept sufficiently warm and humid at all times.
Steps
Getting Started
-
1Choose the right kind of orchid. There are lots of different types of orchids, which makes choosing one dependent on the type of environment you can offer them. Things like the temperature of your house, how much light you get, how much attention you can give will decide which orchid is best for you.[1]
- One of the easiest type of orchid to grow indoors is the moth orchid (Phalaenopsis orchids). These orchids last for months and grow best in medium-grain bark mix, warm temperatures, and low to medium light. They are good for first-timers, and are pretty forgiving of mistakes.
- If you tend to over-water your orchids then you'll want to go for the slipper orchids (such as Phaphiopedilum, or Phragmipedium).[2] On the other hand, if you tend to ignore your orchids Cattleya, Oncidium, or Dendrobium are the best choices.
- If you don't get much light in your house then Jewel orchids (Paphiopedilum) are the best choice.[3] For those with only a small windowsill mini-cattleyas (Pleurothallis) or miniature moth orchids are the best choice.
-
2Choose the right pot. The most basic and common pot is the terracotta pot (in clay or plastic). There are many different kinds to choose from. Some considerations: if you're a heavy waterer use a clay pot with a coarse potting mix; if you tend to let your orchids dry out use a plastic pot and a fine potting mix.[4]
- Clear plastic pots let light reach the roots and allow you to keep an eye on the orchid's root growth. These can be good if you don't have a whole lot of time.
- Pots with a net basket insert or with bi-level drainage make for great drainage and air circulation, which is good if you over-water.
- Wooden baskets tend to be constructed of a rot-resistant wood, like teak. If you do use a basket then you'll need to first line it with sheet moss and then put in your potting mix.
Advertisement -
3Use the appropriate potting mix. The roots of orchids need more airspace than dirt provides, so orchid mixes tend not to have potting soil. The mix tends to have things like fir bark, coconut husk, sphagnum moss, tree fern fibers and perlite, and is frequently a mixture of two or three of these materials.[5]
- A fine mix is best for smaller types of orchids and ones that have small roots and need to stay on the damp side, like slipper orchids, most oncidiums, miltonias. Make a fine mix from 4 parts fine-grade fir bark or coco husk chips or redwood bark, one part fine charcoal, one part horticultural-grade perlite or small-grade Aliflor. [6]
- The medium mix is good if you aren't sure which mix to use. It is particularly good for cattleyas, phalaenopsis, and most mature orchids. Make it out of four parts medium-grade fir bark or medium-grade coco husk chunks, one part medium charcoal, and one part horticultural-grade perlite or medium-grade Aliflor.
- If you don't want to make your own, you can find good orchid potting mixes at most home improvement and garden shops. There are plenty of mixes that serve a wide range of orchid types.
-
4Find the right light source. Orchids need lots of light and depending on the type of orchid,[7] they need filtered light or full on light. Pick a window facing south or west. This plant should get at least six hours of sunlight a day.
- Check your orchid to see if it needs more light or less light. That will determine whether you use sheer curtains or whether you use no curtains.
- Use fluorescent lights to supplement the natural light. Gardeners have found that just plain, normal fluorescent lights can do the trick very nicely. The light that comes in through your window may not be consistent enough, especially on cloudy days or if you place your orchid near a window that only lets minimal sunlight through. Investing in a couple of 20 watt fluorescent tubes or other similar lighting can simulate more ideal conditions.


Caring For Your Orchid
-
1Maintain the right temperature. Find out if your orchid is a "cool growing" orchid or a "warm growing" orchid. The two types prefer temperatures that fall into a slightly different range. Warm growing orchids include vanda, phalaenopsis, and oncidium breeds. Cool growing orchids include phragmipedium, miltonia, and cymbidium breeds.
- Drop the temperature approximately 15 °F (−9 °C) at night. Within nature, orchids grow in locations that experience a similar drop in nighttime temperature. As a result, manually dropping the temperature this dramatically in your home, at least in the room where your orchid grows, will encourage your the plant to flower and thrive.
- Keep warm growing orchids at a temperature between 75 to 85 °F (24 to 29 °C) during the day. At night, allow the temperature to drop somewhere between 65 and 75 degrees.
- Keep cool growing orchids at a temperature between 65 and 80 degrees Fahrenheit during the day. At night, allow the temperature to drop somewhere within the range of 50 to 65 degrees.
-
2Maintain good air circulation. This is especially important during warm weather. Open the windows on hot, muggy days or place a small fan nearby. Stale, stagnant air will stunt the orchid's growth.
-
3Water your orchid properly. Each type of orchid requires slightly different amounts of watering. In general it's best to water your orchid every 5 to 12 days, depending on time of year and temperature. If you're going through a heat spell you may need to water your orchid more frequently.
- The roots need to remain evenly moist throughout the entire year, but the plant will not need as much water during cooler months, when growth is naturally reduced, as it does during vibrant warm months.
- Orchids that need to be moist at all times are Paphiopedilum, Miltonia, Cymbidium, and Odontoglossum, to name a few.
- The orchids that need to be moist during active growth, but nearly dry between waterings are the ones like Cattleya, Oncidium, Brassia, Dendrobium.
- For some orchids you will need to allow them to dry out between waterings. These include Phalaenopsis, Vanda, Ascocenda.
- When in doubt, follow the instructions that came with your orchid, or look up the watering needs for your particular orchid online.
-
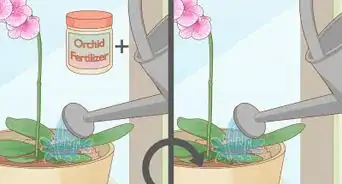
4Fertilize about once a month. This is only a general guideline, because it really depends on the orchid type. When the orchid is actively growing it can be best to actually fertilize it weekly or bi-weekly. However, you want to make sure that you're watering it without fertilizing at least once a month so that the water can flush excess fertilizer salts.[8]
- For the best results, use a fertilizer made specifically for orchids. You can also use any balanced potting fertilizer.
- Avoid fertilizing too frequently. If you do this you're going to overwhelm the plant and have an adverse effect on its growth, especially during its dormant periods.
- Some orchids don’t need fertilizer at all. In fact many orchids are perfectly happy to bloom year after year without any fertilizer at all.
-
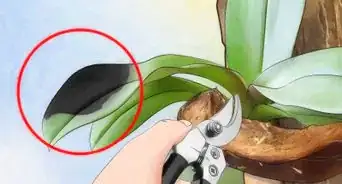
5Trim the stem to allow for new growth. When all the flowers have fallen off, trim the orchid's stem to just above the very lowest node (little triangular etch that is a potential new bloom). Cut diagonally.[9]
- This will encourage new growth. As long as you keep watering weekly you should be able to see new flowerings appear.
- Keep in mind that some orchids only bloom once a year.
-
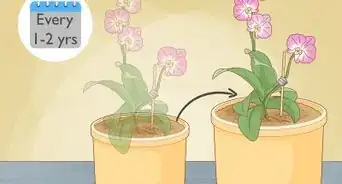
6Repot your orchid. A good way to determine whether or not your orchid needs to be re-potted is simply by checking its growth. If an otherwise healthy orchid does not bloom even if the levels of light, temperature, and humidity are all sufficient, you may need to re-pot it. Avoid repotting when it is in bloom.[10]
- Select a pot size based on the size of the root mass, so you won't necessarily be repotting into a bigger pot. Orchids like being a little tight in their pots and a too-large pot will make them not yield as much foliage or flowers. Choose a new pot, new potting mix and transfer the orchid over.
- Orchids that require annual repotting are: Dendrobium, Miltonia, Paphiopedilum and Phalaenopsis and their hybrids.
- Orchids that require every other year repotting are: Cattleya, Dendrobium, Oncidium, Odontoglossum and their hybrids.
- Orchids that require every third year repotting are: Vanda and its allies, and Cymbidium.


Troubleshooting
-
1Deal with an orchid that won’t bloom. There are a few different reasons why an orchid might not be blooming. The most common reason is that it doesn't have the right light level, so make sure that you check that first. You can look at the color of the leaves. Leaves should be medium-green. If they are a dark, lush green,the plant is likely not getting enough light. If that isn't it, there are a few more things to consider.[11]
- The orchid might simply be too young. Plants have to be mature enough to bloom and then only during their natural cycle.
- Your orchid might be overpotted. For best results with orchids, you'll need to make sure that they are tight in their pots. Pots that are too big for the root mass put the orchid in danger of not growing or blooming.
- Another problem could be that you're using the wrong fertilizer. There could be too much nitrogen, which suppresses blooming. You want a nitrogen phosphorus potassium (or NPK) value of 10:10:10 in your fertilizer.
-
2Care for an orchid with limp leaves. If you're dealing with limp leaves you will want to unpot the orchid and check the root system. If the roots are mushy then a significant root loss has occurred and there are several likely culprits.[12]
- Overwatering can do this. You can safely water an orchid about once a week, depending on the type and only as long as they are healthy and potted properly. Check the mix to see if it is drying out properly before you re-water.
- The pot is too large. This can also cause problems with your orchid's roots, because they are expending too much energy trying to maintain their root system rather than caring for leaves and new flowers.
- Potting mix has degraded. Potting mixes are only good for a certain amount of time before they need to be replaced. Make sure yours hasn't gone past its deadline.
-
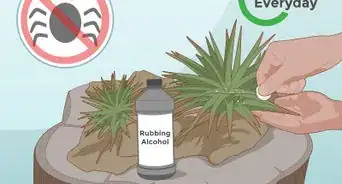
3Deal with pests. While pests are less likely in an indoors orchid, you can still get them in potting mixes and just out of nowhere. Make sure you know how to deal with these nuisances so you can keep your orchid alive and healthy.[13] [14]
- Aphids target bloom spikes and buds so if you see holes in these areas you might have aphids. Fortunately most insecticides will control these little nuisances.
- Snails and slugs can get into the potting mixes, so make sure you check the mixes that you're putting your orchid in. They tend to chew on the roots, or on leaves and stems. Again, insecticides can usually take care of this problem, or getting a new potting mix.
- If your young leaves are getting discolored, and white masses are appearing on your orchid, then you probably have mealybugs. Use insecticides or remedies that contain an oil of some sort because this coats and suffocates the bug. It's also a good idea to repot the plant once you've eradicated the menace.
- For a home-made insecticide you should mix 9/10 quart of warm water, 1/10 quart of rubbing alcohol, 1 tsp of lightweight oil (Neem Oil is an excellent choice), a few drops of gentle dishwashing detergent. Mix these in a spray bottle and shake vigorously (make sure the cap is on). Spray the orchids.


Expert Q&A
Did you know you can get expert answers for this article?
Unlock expert answers by supporting wikiHow
-
QuestionHow do I get rid of fungus from my orchid?
 Lauren KurtzLauren Kurtz is a Naturalist and Horticultural Specialist. Lauren has worked for Aurora, Colorado managing the Water-Wise Garden at Aurora Municipal Center for the Water Conservation Department. She earned a BA in Environmental and Sustainability Studies from Western Michigan University in 2014.
Professional GardenerReduce watering to see if that clears up the fungus. Use a fungicide if you are dealing with a particularly bad infestation.
Support wikiHow by unlocking this expert answer.
-
QuestionWhy is my orchid just loaded with roots but no blooms?
 Community AnswerIt sounds like it's in the growing season. If you have too many roots in the pot, the orchid is telling you to re-pot it. Either something is wrong with the roots or it's not getting enough water. If it's making new leaves as well, it's definitely in the growing season, and that's a good thing. It means it will have more resources to gain energy for flowers later, hence bigger or longer lasting flowers.
 -
QuestionWhy did the leaves on my orchids turn red?
 pratham mCommunity AnswerIt may be getting too much light. Place your orchid in indirect sunlight for best results.
Warnings
- Watch out for pests. Insects and other pests do not pose as great a risk to indoor orchids, but occasionally, orchids can get attacked by mealy bugs, scale, and aphids. If you spot these pests, wash them off the plant or treat the plant with insecticidal soap. Cleaning the leaves regularly also helps to keep insects and mites away to a certain extent.⧼thumbs_response⧽


References
- ↑ http://www.bhg.com/gardening/houseplants/care/how-to-grow-orchids-indoors/
- ↑ https://www.trianglegardener.com/lady-slipper-orchids-unique-blooms-to-enjoy-indoors/
- ↑ https://www.ourhouseplants.com/plants/jewel-orchid
- ↑ http://www.dummies.com/how-to/content/how-to-choose-an-orchid-pot.html
- ↑ http://www.dummies.com/how-to/content/deciding-on-a-potting-mix-for-orchids.html
- ↑ https://www.dummies.com/home-garden/gardening/flower-gardening/deciding-on-a-potting-mix-for-orchids/
- ↑ https://www.aos.org/orchids/additional-resources/light-the-key-to-successful-blooming.aspx
- ↑ http://www.bhg.com/gardening/houseplants/care/how-to-grow-orchids-indoors/
- ↑ http://www.theguardian.com/lifeandstyle/gardening-blog/2009/nov/03/orchid-care-beginners
- ↑ http://www.beautifulorchids.com/orchids/orchid_care_tips/repotting/repotting.html
- ↑ http://www.cloudsorchids.com/doctor/dflower.htm
- ↑ http://www.cloudsorchids.com/doctor/dlimp.htm
- ↑ http://www.beautifulorchids.com/orchids/orchid_care_tips/faq/frequently_asked_questions.html
- ↑ http://www.cloudsorchids.com/doctor/dpests.htm
About This Article

To care for an orchid indoors, place the plant in a window that faces south or west to ensure it gets at least 6 hours of sunlight a day. If you don’t have a window that will provide the right light, or if you just want to supplement the natural light, keep the orchid under a fluorescent light. Water your orchid every 5 to 12 days, depending on the time of year and temperature, as well as the type of orchid you’re growing. Also, add a fertilizer to the soil about once a month. Keep reading for tips from our Horticulture co-author on how to regulate the temperature for your orchid!