This article was co-authored by Maggie Moran. Maggie Moran is a Professional Gardener in Pennsylvania.
There are 8 references cited in this article, which can be found at the bottom of the page.
wikiHow marks an article as reader-approved once it receives enough positive feedback. This article has 25 testimonials from our readers, earning it our reader-approved status.
This article has been viewed 719,377 times.
Orchids are amongst the most beautiful flowers of the entire plant kingdom, combining exotic looks with a diverse set of characteristics. Orchids are exquisite plants, comprising over 30,000 different species and over 200,000 hybrid varieties--making orchids one of the two largest families of plants in the world. Capable of growing indoors and outdoors, orchids are no doubt unique and, unfortunately for some potential green-thumbs, difficult to grow successfully. Someone who hopes to grow orchids should prepare themselves for both the failures and triumphs that breeding this lovely plant variety bring.
Steps
Potting Your Orchid
-
1Select a species of orchid. Some orchids are easier to grow than others. Cattleya, Phalaenopsis and Paphiopedilum orchids are amongst the easiest to grow and are recommended for most beginner gardeners and orchid growers. There are, however, believed to be over 40,000 species of orchid species — that's two times the amount of existing bird species and four times the amount of existing mammalian species. There's almost literally an orchid for any type of person.
- Perhaps the most common genera of orchids found for sale include Phalaenopsis, Dendrobium and Oncidium. Phalaenopsis is known as the "moth orchid" and is extremely popular among beginning growers; the genus Dendrobium contains about 1,200 species of orchids and is the classic epiphyte of orchids; Oncidiums are characterized by column wings and a callus at the lip of the flower.
- Different genera of orchids have different ideal humidities, growing temperatures, watering schedules, and light requirements. Talk with your local nursery or visit the local chapter of your orchid society to find out what makes your genus of orchid grow best.
-
2Choose the right kind of soil for your orchids. Some first-time orchid growers make the mistake of assuming that orchids need to be potted in soil like other blooming flowers, choosing potting soil as a conduit. That would likely kill your orchid. Most orchid roots need far more air than potting soil would give them, but they still need something to anchor their roots, and so they benefit from a looser, more porous mix.[1]
- Many people use bark chips, sphagnum moss, coconut husks, charcoal, perlite, and even styrofoam pellets as potting mix, often in combination. Experiment with porous, breathable mixes that you have on hand, or ask an expert for his or her special recipe.
Advertisement -
3Try a potting mix, or combination of several different mediums. For simplicity's sake, you can make two basic kinds of potting mixes that will work for most kinds of orchids. Make sure to add water to your mix and strain it before using for best results.
- Make a fine potting mix, suitable for slipper orchids, most oncidiums, miltonias, and orchids with small roots that enjoy moisture more than most:
- 4 parts fine (grain) fir bark or fine (grain) coco husk
- 1 part fine (grain) charcoal
- 1 part perlite
- Make a medium potting mix, suitable for cattleyas, phalaenopsis, and other mature orchids. If you're unsure of which mix to use, try the medium-grade potting mix before the fine-grade mix:
- 4 parts medium (grain) fir bark or medium (grain) coco husk
- 1 part medium (grain) charcoal
- 1 part perlite
- Make a fine potting mix, suitable for slipper orchids, most oncidiums, miltonias, and orchids with small roots that enjoy moisture more than most:
-
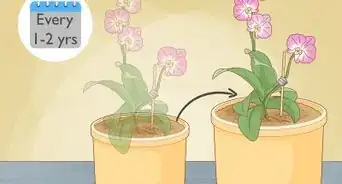
4Choose a snug pot for your orchid unless it is large. Many orchids are comfortable being root-bound. Choose a smaller pot to place your orchid in, making sure that there are plenty of holes in the pot itself for drainage. Make sure to avoid decorative pots as well because the glaze is harmful to orchids. Remember, the enemy of orchids is often over-watering. Some orchids, such as cymbidiums, will require longer pots to accommodate very long root systems. The following types of pots offer a break from the traditional clay pot (which is perfectly acceptable and preferred by most orchid growers):
- Net pots, which have wire mesh and allow for a breathable environment. These can be hung in advantageous locations for better sunlight.
- Clear plastic pots, which get better sunlight to the roots. These allow the grower to inspect the root systems without disturbing the orchid.
- Wooden pots, which are constructed of rot-resistant wood. Line any wooden pots with sheet moss before adding your potting mixture.
-
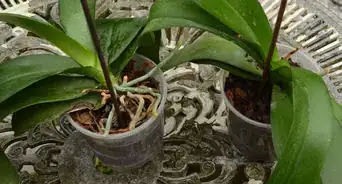
5Pot your orchid. Remove the orchid from its original pot, making sure to cut off any dead or rotting roots. Divide the root matter into several different sections, if needed, before placing the plant in its pot.[2] The most mature section of growth should be positioned towards the bottom of the pot and newer growth should be positioned near the sides of the pot. Lightly add the potting mix, barely covering the root system.
-
6


Nurturing Your Orchids
-
1Create the right temperature for your orchid. Most orchids originate from a tropical climate, meaning good air, plenty of light, and 12-hour days (365 days a year). The temperature (depending on the species of orchid) should range between 65 to 75 degrees Fahrenheit (18.3 to 23.8 degrees Celsius).
- Dropping the temperature of the orchid’s environment at night by about 10 degrees will promote new buds, especially during the fall and winter.[5]
-
2Make sure your orchids get enough sunlight, but not too much. Many orchids enjoy indirect sunlight: direct sunlight cases them to burn, while not enough creates a plant that doesn't flower. Place your orchid near a south or east facing window. A west facing window may provide too much sunlight and a north facing window may not provide enough.[6]
- Check your orchid's leaves if you want to diagnose whether it's getting too much light or not enough. Orchid leaves should be a light green with yellowish tones. If the leaves are dark green, it means that the orchid isn't getting enough light. If the leaves are yellow, brown, or reddish, it means they're getting too much.[7]
- Low-light orchids ( Paphiopedilum, Phalaenopsis, and Oncidium) do best if they get northerly or easterly light. Moderate to high-light orchids (Cattleya, Dendrobium, and Vanda) prefer getting westerly or southerly light.
- Orchids love being behind curtains or window blinds. This way, they get plenty of light, but the light that they do get is indirect.
-
3Water your orchid once per week. It's easier to kill an orchid by watering it too frequently than by not watering enough. Water your orchid about once per week and allow it to dry out between waterings.[8] During the summer months, longer days and more heat might necessitate a shorter watering period. Water your orchid for 15 seconds and then place it on a tray of pebbles to allow it to dry out.
-
4Care for the orchids diligently. Orchids require much more attention than your average plant or flower. The thicker your leaves are, the more likely your plant requires a larger dose of water. If your plant has bulky faux-bulbs, less water is better. Orchids are not resilient in most occasions, but are when it comes to their water intake. Again, they actually deal with a lack of water better than a superfluous amount of water.
-
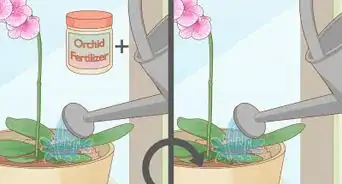
5Use an orchid-specific fertilizer and do not over-fertilize your orchids. Typically, expect to fertilize your orchid once per week with a weak (diluted to ¼ strength) 20-10-20 fertilizer mixture. Then, water the plant with plan water once per month to rinse out any accumulated fertilizer.[9] Fertilize too often and you'll chance burning the roots and hampering flowering; fertilize not often enough and you'll chance hampering the flowering process.. Keep the plant in indirect sunlight until the flower spike shows. Once the spike is around 5 inches (13 cm) tall, brace it with a tie-up.
-
6Keep the humidity level up. Because of orchids' natural affinity for humidity, keep the humidity of your growing room — wherever it may be — at about 50% to 75% at all times. You can achieve this level by running a humidifier near the orchid or by placing trays of pebbles with water one them near the orchid.[10]
-
7Understand that each orchid is different. Each strand of orchid has different caretaking needs and rules. No one orchid is the same; all require a different temperature, lighting situation and watering schedule. So when you choose an orchid plant to grow, you must be flexible when growing orchids.


Expert Q&A
Did you know you can get expert answers for this article?
Unlock expert answers by supporting wikiHow
-
QuestionHow do you care for an orchid plant?
 Maggie MoranMaggie Moran is a Professional Gardener in Pennsylvania.
Home & Garden SpecialistOrchids need enough water but should be given the chance to dry out between waterings. So, use your finger to poke the top inch of soil to test if it needs watering. If the orchid is indoors, it needs between 50 and 70% humidity.
Support wikiHow by unlocking this expert answer.
-
QuestionCan you use ice cubes to water orchids?Maggie MoranMaggie Moran is a Professional Gardener in Pennsylvania.
Home & Garden SpecialistYes, the ice-cube melts slowly, giving the orchid a slow source of hydration so it doesn't drown.Support wikiHow by unlocking this expert answer.
-
QuestionHow do you get an orchid to bloom again?Maggie MoranMaggie Moran is a Professional Gardener in Pennsylvania.
Home & Garden SpecialistOnce the orchid starts to go dormant, begin using a balanced fertilizer on it each month. Make sure the temperature of the orchid is between 55 and 65 degrees. Keep the plant in indirect sunlight until the flower spike shows. Once the spike is around 5" tall, brace it with a tie-up.Support wikiHow by unlocking this expert answer.


References
- ↑ http://www.aos.org/orchids/additional-resources/orchids-indoors.aspx
- ↑ http://www.beautifulorchids.com/orchids/orchid_care_tips/repotting/repotting.html
- ↑ http://www.missouribotanicalgarden.org/gardens-gardening/your-garden/help-for-the-home-gardener/advice-tips-resources/visual-guides/repotting-phalaenopsis-and-other-monopodial-orchid.aspx
- ↑ http://www.aos.org/orchids/orchid-care/when-should-i-repot.aspx
- ↑ http://www.aos.org/orchids/additional-resources/orchids-indoors.aspx
- ↑ http://www.aos.org/orchids/orchid-care/where-in-the-house-can-i-grow-my-orchid.aspx
- ↑ http://www.beautifulorchids.com/orchids/orchid_care_tips/light/light.html
- ↑ http://www.aos.org/orchids/additional-resources/orchids-indoors.aspx
- ↑ http://www.aos.org/orchids/additional-resources/orchids-indoors.aspx
About This Article

To grow orchids, choose a snug pot and use a porous potting medium like bark chips, sphagnum moss, or perlite. Put your orchids in a location that gets plenty of indirect light every day, such as a south or east facing window. Maintain a humidity level of 50-75% by running a humidifier or placing a tray filled with pebbles and water near the orchids. Water them once per week, allowing the potting medium to dry out between waterings, and repot them every 2 years to give them plenty of room to grow! To learn more from our Horticulturist co-author, like how to use fertilizer to help your orchid grow, keep reading!