This article was co-authored by wikiHow Staff. Our trained team of editors and researchers validate articles for accuracy and comprehensiveness. wikiHow's Content Management Team carefully monitors the work from our editorial staff to ensure that each article is backed by trusted research and meets our high quality standards.
This article has been viewed 207,928 times.
Learn more...
A storm shelter is a safe place that you can use to take refuge during a catastrophic storm event such as a tornado or a hurricane. Building an in-ground or above-ground storm shelter should be done by licensed professionals who follow the guidelines set by governmental organizations such as the Federal Emergency Management Administration (FEMA). But, you can build your own storm shelter on top of your concrete slab foundation that you can use to protect yourself during a storm. Start by choosing a location on top of the concrete slab of the structure and measuring how much space you’ll need. Then, build a sturdy frame to support the shelter. Finally, cover the walls with steel sheeting and plywood and install a door that is certified to withstand the pressure, wind, and impact of catastrophic storms.
Steps
Choosing a Location
-
1Look for a location on top of the building’s foundation. Your storm shelter will need to be anchored into a strong concrete slab foundation. Choose a location in your basement or on your ground floor near a structural wall so your shelter will be out of the way and has additional support.
- Choose a location above ground if you’re concerned about flood risking from severe storms such as hurricanes.
- Basement shelters are more effective protection against tornadoes than above-ground shelters.
- A bathroom, closet, or corner of the garage are also suitable locations for your storm shelter.
-
2Clear the area of any obstructions. Move any storage items, furniture, or decor from the area you’ve selected to place your shelter. You also need to remove any tiling, carpeting, or any other flooring if it’s covering the structure’s foundation.
- Move any items far enough that they won’t get in your way while you’re working.
- Make sure there’s a clear path to the storm shelter area and it can be accessed quickly.
Advertisement -
3Calculate 7 square feet (0.65 m2) for each person. FEMA recommendations state that there needs to be enough floor space for each person to occupy the shelter for the duration of the tornado or hurricane. Count each person that you believe may need to use the shelter in an emergency and multiply that by 7 square feet (0.65 m2) to find the total area your shelter needs to cover.
- For example, if you have a family of 4 people, then you would need a space that covers an area of 28 square feet (2.6 m2).
- Consider adding an additional person or two into your calculations in case you need more space.
-
4Measure the length of your storm shelter walls. The formula for finding the area of a square is to multiply the length of 1 side by the width of 1 side. Find the lengths of your walls based on the square footage or meters that you need. Then, use a ruler or tape measure to measure the lengths on the ground.
- A square shaped shelter will provide the strongest protection against a storm.
For Example: If you need 49 square feet (4.6 m2) of space, then your remaining 2 walls need to be 7 feet (2.1 m) each, because 7 feet (2.1 m) times 7 feet (2.1 m) equals 49 square feet (4.6 m2).


Constructing the Frame
-
1Measure and cut 2 by 6 in (5.1 by 15.2 cm) boards the lengths of your walls. Take 2 by 6 in (5.1 by 15.2 cm) boards, measure the length of your walls and mark the measurements on the boards with a pencil or marker. Then, use a circular saw to cut the boards to size.[1]
- You can also measure your walls and purchase pre-cut boards that fit your measurements.
- Ask an employee at the hardware or home improvement store that you purchase your boards from to cut them to size for you.
-
2Drill 5.5 in (14 cm) holes in the boards and concrete with a hammer drill. A hammer drill is a powerful tool that will allow you to drill into the concrete foundation. Drill holes spaced out about 12 inches (30 cm) apart through both of the boards and into the concrete beneath them.[2]
- The holes will be needed so you can attach the anchor bolts.
- Start the drill slowly and bring it up to full speed to drive through the boards and into the foundation.
- You can rent hammer drills from home improvement stores.
Warning: Use eye and ear protection when operating the hammer drill to avoid damaging your hearing and getting concrete particles in your eyes.
-
3Anchor the boards to the slab with 5.5 in (14 cm) anchor bolts. Align the boards so the holes line up with the ones in the slab. Slide a nut on the threaded end of the anchor bolt to protect it and use a hammer to knock the bolt into the holes. Then, tighten the nut to secure the boards to the concrete slab. Install anchor bolts into all of the holes you drilled in the slab.[3]
- Use a wrench to tighten the bolts as much as you can so the boards are securely fastened.
-
4Screw 2 by 6 in (5.1 by 15.2 cm) boards into the ceiling above the slab. Line up 2 by 6 in (5.1 by 15.2 cm) boards directly above the boards anchored on the ground. Use 6 in (15 cm) wood screws to attach them to the ceiling above the slab.[4]
- You’ll need the boards in the ceiling in order to install your wall studs.
- Make sure the boards are secure in the ceiling.
-
5Attach studs from the floor frame to the ceiling with concrete nails. Take 2 by 6 in (5.1 by 15.2 cm) boards with a length that reaches from the framing board on the slab to the board on the ceiling. Install a double layer of the boards spaced out 12 inches (30 cm) using 6 in (15 cm) wood screws.[5]
- Install at least 2 screws for each end of the stud.
-
6Secure the studs to the ceiling with hurricane ties. Hurricane ties are metal fasteners that are secured to wall studs to allow them to resist the force of hurricane-strength winds. Slide the hurricane ties over the studs where they connect to the boards on the ceiling and nail or screw them into place.[6]
- Use 1 hurricane tie for each stud to make the walls strong enough to withstand strong winds.
- You can find hurricane ties at hardware stores, at home improvement stores, and online.
-
7Drill 14-gauge steel sheets onto the studs of 3 of the walls. Take a power drill and use #10X2-inch (#10X5.2 cm) screws to attach the steel sheets to the wall studs to create a solid structure. Drive the screws through the sheet and into the wooden studs.[7]
- You can find 14-gauge steel sheets at roofing supply stores, at home improvement stores, and online.
- Do not install metal sheeting over the wall where you plan to install the door at this point.
-
8Nail 2 layers of 3⁄4 inch (1.9 cm) plywood over the steel sheeting. Place a sheet of plywood over the steel sheeting and drive #10X2-inch (#10X5.2 cm) screws through sheets and into the wall studs with a power drill. Cover the metal sheeting completely with a layer of the plywood, then attach a second layer for additional support.[8]


Installing the Door
-
1Use a door assembly rated to withstand tornadoes. A door failure can lead to serious injury or death during a catastrophe. Choose a door assembly that includes locks, hinges, frame, and attachment devices that have been tested to withstand the wind, pressure, and impact of serious storms like tornadoes and hurricanes.
- Storm shelter doors are heavy and expensive, but common steel doors that are often used in residential and commercial construction can’t withstand the impact of tornadoes and hurricanes.
- You may be able to find storm-rated doors at home improvement or hardware stores, but you may need to go online to order a specialized storm room door.
Tip: In the US, the Federal Emergency Management Administration (FEMA) has specific guidelines for storm shelter doors. If you’re unsure if a door is suitable for a storm shelter, check to see if it satisfies the FEMA requirements.
-
2Measure and mark the size of the door frame on the open stud wall. Use the measurements of the door you plan to install so you can create an opening that will fit the frame. Measure your door with a ruler or tape measure, then measure the height and width on the studs of the open wall. Use a pencil or marker to mark where you need to cut away the studs.
- Make sure the door frame is at least 7 feet (2.1 m) tall so you can fit through it.
-
3Cut away the studs with a circular saw to fit the door frame. Cut evenly along the lines that you marked on the studs to fit your door frame. Remove just enough of the studs to accommodate your door frame.
- You can lightly sand the cut edges of the studs with 180-grit sandpaper if they’re jagged or uneven.
-
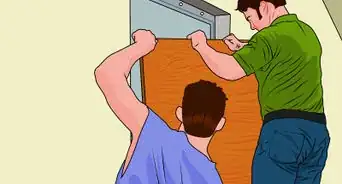
4Install the door in the opening according to the manufacturer’s directions. Position the frame in the opening and then nail it into place with casing nails. Then, install the door by attaching the hinges to the frames as directed by the manufacturer’s directions. Make sure the door is level and the hinges are secure in the frame. Install any additional specialized attachment pieces that are directed.
- Use any screws or nails that are included in the door assembly.
- Open and close the door to make sure it’s working properly.
- Use a level to make sure the frame of the door is even.
-
5Cover the open wall with steel sheets and 2 layers of plywood. Once the door is installed, place steel sheets over the open studs and secure them by driving #10X2-inch (#10X5.2 cm) screws into each of the corners. Then, cover the sheets with plywood and drive #10X2-inch (#10X5.2 cm) screws through them into the wooden studs to secure them. Install an additional layer of plywood to complete the wall.[9]


Community Q&A
-
QuestionHow long should I be in the shelter?
 Community AnswerUntil the source you have for weather, such as a radio, says the tornado is gone and the storm is clearing up. For a hurricane, wait until the storm is at least a few miles away, and you know the area is safe from high winds and storm surge.
 -
QuestionWhat kind of ventilation is needed in a building that has no electricity?Community AnswerThere are ventilation systems with in-built filters available which are powered by turning a crank. I would suggest those.
-
QuestionDo we have to have a city permit to dig an in-ground shelter?
 Community AnswerIt probably depends on your specific municipality, but it is likely you need a permit to build any additions to your property.
Things You’ll Need
- 2 by 6 in (5.1 by 15.2 cm) boards
- Ruler or tape measure
- Pencil or marker
- Circular saw
- Wheelbarrow
- Hammer
- Hammer drill
- 5.5 in (14 cm) anchor bolts
- Concrete nails
- Power drill
- Diameter #10X2-inch (#10X5.2 cm) screws
- 6 in (15 cm) wood screws
- 3⁄4 inch (1.9 cm) plywood
- 14-gauge steel sheets


-Step-13.webp)


References
- ↑ https://youtu.be/3PqS8B7cjp8?t=56
- ↑ https://youtu.be/3JI_9ggbmcY?t=73
- ↑ https://youtu.be/3JI_9ggbmcY?t=112
- ↑ https://youtu.be/3PqS8B7cjp8?t=56
- ↑ https://youtu.be/3PqS8B7cjp8?t=42
- ↑ https://youtu.be/3PqS8B7cjp8?t=56
- ↑ https://youtu.be/3PqS8B7cjp8?t=49
- ↑ https://youtu.be/3PqS8B7cjp8?t=49
- ↑ https://youtu.be/3PqS8B7cjp8?t=49
About This Article