This article was co-authored by wikiHow staff writer, Janice Tieperman. Janice is a professional and creative writer who has worked at wikiHow since 2019. With both a B.A. and M.A. in English from East Stroudsburg University, she has a passion for writing a wide variety of content for anyone and everyone. In her free time, you can find her working on a new crochet pattern, listening to true crime podcasts, or tackling a new creative writing project.
There are 8 references cited in this article, which can be found at the bottom of the page.
The wikiHow Video Team also followed the article's instructions and verified that they work.
This article has been viewed 39,178 times.
Learn more...
Spring roll skins are a delicious and healthy wrap that’s made with rice paper. While most commonly used in their namesake dish, these skins can be used for a variety of purposes. First, practice stuffing and rolling a skin with a traditional filling. Next, try exploring different dishes that you can create or accent with spring roll skins. If you let your culinary creativity flow, there’s no limit to the fun and delicious ways you can use these rice wrappers!
Ingredients
Simple Spring Rolls
- 8 spring roll skins
- 2 oz (57 g) of rice vermicelli
- 8 large cooked shrimp, deveined and halved
- 1⅓ tbsp (1.7 g) of Thai basil
- 3 tbsp (15 g) of fresh cilantro, chopped
- 3 tbsp (4.7 g) of fresh mint, chopped
- 2 leaves (15 g) of fresh lettuce, chopped
Steps
Wrapping Spring Rolls
-
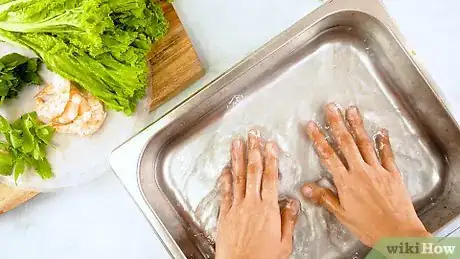
1Soak a single skin in lukewarm water for 10 seconds. Fill a wide, shallow bowl with lukewarm water. Set a single skin in the center of the bowl, submerging it in the water for around 10 seconds. If you don’t soak the spring roll skin ahead of time, there’s a greater chance that it might tear when you place any filling in the center.[1]
- You can fill a plate with water instead of a bowl, if it’s deep enough.
- Aim for the water to be between 90 to 95 °F (32 to 35 °C).[2]
-
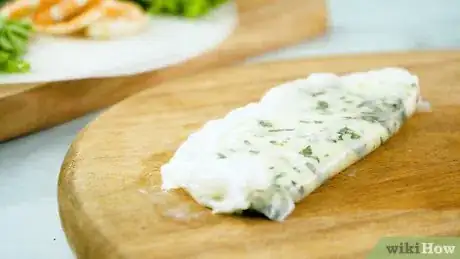
2Lay the damp skin flat on a towel for half a minute to let it dry. Set a clean and dry dish towel along a table or countertop. Once you’ve soaked your skin, place it on top of this towel and allow it to dry for 30 seconds. While you don’t want the spring roll skin to be dripping wet, check that the wrapper is moist before you continue.[3]
- Spring roll skins are less likely to tear when they’re damp.
Advertisement -
3Arrange your fillings in the center of the skin. Set 2 shrimp halves in the center of the skin, along with a small scoop of rice vermicelli and a pinch of mint, lettuce, basil and cilantro.[4] If you’re using long vegetables pieces, like cucumber sticks, try to place these fillings at a 45-degree angle in the center of the skin.[5]
- It’s easiest to place fillings at an angle when you’re using rectangular skins. In this case, angle the vegetables so that they form a diagonal line across the center of the skin.
-
4Flip the bottom left corner of the spring roll to the right to create a tight fold. Take the loose, left flap of spring roll skin and bring it over the central filling. Let this flap rest on the filling, with the edge of the skin facing right. Try to keep this fold as tight as possible, as it will help make your spring rolls more compact.[6]
- If you’re using a square spring roll skin, fold the corner over the filling to form a small triangle. If you’re using a circular wrapper, try to form a semicircle with your folded skin.
-
5Roll the skin and filling sideways, stopping halfway along the spring roll skin. Pinch the folded edge of the spring roll and start rolling the filling to the right. Once you’ve rolled about halfway lengthwise across the skin, pause so you can tuck and secure the rest of the wrapper.[7]
- At this point, check the spring roll to make sure that the filling is evenly spread throughout the length of the roll. If the spring roll seems uneven, feel free to unravel what you have so far and try again.
-
6Fold and tuck the opposite edges of the skin into the rolled portion of skin. Take the shorter, untucked edges of the spring roll skin and fold them forward. Try to fold them into the section of spring roll that you’ve already rolled to make the finished product more secure.[8]
- If these edges don’t want to stay put, dip a fingertip into hot water and rub it across the folded crease to seal them into place.
-
7Keep rolling the skin until the spring roll is secure and closed. Continue pinching the sides of the spring roll skin as you roll it forward to fully surround the filling. Rub a finger along the final loose edge to press it into place. If the flap of spring roll skin refuses to stay, dip a finger into warm water and rub it along the edge to seal it in place.[9]
- Place any leftover spring rolls in the fridge and store them for 2-3 days.[10]
Tip: If you’re making spring rolls ahead of time, be sure to wrap them with a moist paper towel and place them in the fridge to keep them fresh.[11]
Including Spring Roll Skins in Other Recipes
-
1Create healthy chips by slicing and baking spring roll skins. Preheat the oven to 375 °F (191 °C) and use a knife or pizza cutter to slice the skins into triangular, tortilla chip-sized pieces. Arrange the pieces on an oiled baking sheet and season them with spices of your choice. Place the tray in the oven and let the pieces crisp for 4-6 minutes.[12]
- You can also use baked spring roll skins on top of a soup or salad. For these dishes, cut the skins into long, rectangular strips instead.
- Salt and pepper are great seasoning options if you want to stay traditional. If you want to add a burst of flavor to your chips, try using chili powder or cayenne pepper instead.
-
2Finish off a tasty vegan sausage with a spring roll skin casing. When preparing your own meat-free sausages at home, roll up the filling with spring roll skins. Place your sausage filling in the center of the skin, rolling the wrap to the right until it starts forming a cylindrical shape. Finally, tuck in the upper and lower edges of the skin and finish rolling up the sausage to complete its casing.[13]
- Mix your favorite chopped vegetables, some wheat gluten, and the spices of your choice together to create a delicious vegan sausage mixture.
-
3Bake spring roll skins topped with sugar to make a tasty dessert. Preheat your oven to 375 °F (191 °C) while you lay out several skins flat on a baking sheet. Sprinkle about 1-2 tbsp (12.5-25 g) of white granulated sugar over the surface of each spring roll skin, or until it’s fully coated with sweetener. Set this tray in the oven for about 4 minutes, or until the sugar looks carmelized and brown.[14]
Tip: To make these dessert skins extra tasty, try topping them with strawberries, blueberries, and raspberries!
-
4Save time making dumplings by using spring roll skin as the wrapper. Switch up your usual dumpling recipe by using spring roll sheets instead of using dumpling dough. Carefully fold and pinch the filling into the center of the skin, tucking the edges of the spring roll paper around the filling until it resembles a typical dumpling shape.[15]
- To make the cooking process simpler, use a knife to slice the spring roll skins into smaller, 3 to 4 inches (7.6 to 10.2 cm) wide circles.
-
5Fill spring roll wrappers with cheese and spinach to make ravioli. Place a spring roll skin in warm water to soften it, then set it aside on a flat surface. Take a mixture of ricotta cheese, mozzarella cheese, and chopped spinach and arrange them in the center of the wrapper. Fold the skin in half and pinch it along the edges to secure the filling. Finally, melt the cheese by placing the ravioli in a colander over steaming water.[16]
- If you want crispier ravioli, consider baking instead of steaming. Arrange the ravioli pieces on a greased cooking tray and bake them for 8-10 minutes at 375 °F (191 °C).
- Thawed frozen spinach works best for this recipe.
Things You’ll Need
Wrapping Spring Rolls
- Bowl or plate
- Towel
Including Spring Roll Skins in Other Recipes
- Knife
- Pizza cutter (optional)
- Cooking spray
- Baking sheet
- Cooking spray
References
- ↑ https://m.youtube.com/watch?v=JTOgdljDwa0&t=0m20s
- ↑ https://www.uofmhealth.org/health-library/not59770
- ↑ https://whatscookingamerica.net/Appetizers/SpringRolls.htm
- ↑ https://www.allrecipes.com/recipe/24239/vietnamese-fresh-spring-rolls/
- ↑ https://m.youtube.com/watch?v=JTOgdljDwa0&t=0m32s
- ↑ https://whatscookingamerica.net/Appetizers/SpringRolls.htm
- ↑ https://whatscookingamerica.net/Appetizers/SpringRolls.htm
- ↑ https://whatscookingamerica.net/Appetizers/SpringRolls.htm
- ↑ https://whatscookingamerica.net/Appetizers/SpringRolls.htm
- ↑ https://tastesbetterfromscratch.com/fresh-spring-rolls/
- ↑ https://whatscookingamerica.net/Appetizers/SpringRolls.htm
- ↑ https://www.foodnetwork.com/healthyeats/2013/07/top-things-to-do-with-spring-roll-wrappers
- ↑ https://www.foodnetwork.com/healthyeats/2013/07/top-things-to-do-with-spring-roll-wrappers
- ↑ https://www.foodnetwork.com/healthyeats/2013/07/top-things-to-do-with-spring-roll-wrappers
- ↑ https://m.youtube.com/watch?v=TZA0E26VQcA&t=2m47s
- ↑ https://www.foodnetwork.com/healthyeats/2013/07/top-things-to-do-with-spring-roll-wrappers
