This article was co-authored by wikiHow staff writer, Nicole Levine, MFA. Nicole Levine is a Technology Writer and Editor for wikiHow. She has more than 20 years of experience creating technical documentation and leading support teams at major web hosting and software companies. Nicole also holds an MFA in Creative Writing from Portland State University and teaches composition, fiction-writing, and zine-making at various institutions.
There are 7 references cited in this article, which can be found at the bottom of the page.
This article has been viewed 36,328 times.
Learn more...
Install Google Photos on your iOS, Android, macOS, and Windows devices to keep all of your photos backed up to one location. Google Photos will work behind the scenes to automatically back up your photos. Once backed up, you can even delete photos from your device to reclaim precious disk space.
Steps
Setting Up Google Photos for iOS and Android
-
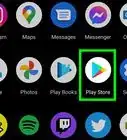
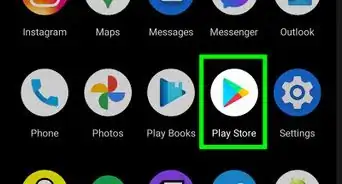
1Open the App Store (iOS) or Play Store (Android). To get the most out of Google Photos features, such as automatic photo backups, install the app from your device’s app store.
-
2Tap the Search box.Advertisement
-
3Type google photos.
-
4Select “Google Photos” from the search results.
-
5Tap GET (iOS) or INSTALL (Android).
- If you see an UPDATE button, Google Photos is installed but out of date. Tap UPDATE to get the latest version of the app.
-
6Tap OPEN.
-
7Tap GET STARTED.
-
8Sign in to your Google account as prompted.
-
9Make sure “Back Up & Sync” is on. This makes it so your photos automatically upload to Google Photos.
-
10Make sure “Use cellular data to back up” is off. Otherwise, your phone will automatically back up your photos when you’re not on Wi-Fi. This can be costly![1]
-
11Tap “Continue.”
-
12Select a photo upload size.[2]
- High quality: This will work great for most people. Photos and videos will upload at a maximum of 1080p full HD resolution and 16 megapixels.
- Original: You’ll be able to upload higher quality photos and videos. Choose this option if you’re a professional photographer who already pays for extra space in the Google cloud.
-
13Tap “Continue.” Now you’ll see a brief tutorial.
-
14Swipe left through the tutorial. When it’s complete, you’ll arrive at the Photos screen.


Setting Up Google Photos on Your Computer
-
1Open a web browser. If you also store photos on a macOS or Windows computer, you’ll want to install Google Photos Backup so they automatically back up to the cloud.
-
2Navigate to http://photos.google.com/apps.
-
3Click DOWNLOAD. Follow your web browser’s prompts to save the installer to your computer.
-
4Run the installer file. This is different depending on your computer.[3]
- Mac: Drag the Google Photos icon to the Applications icon. Then, double-click “Google Photos Backup.” If prompted, click Open to confirm.
- Windows: Double-click the installer in your Downloads folder.
-
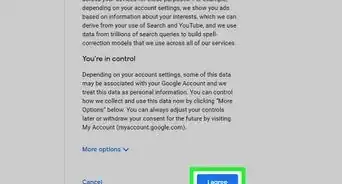
5Click I Agree.
-
6Click Continue.
-
7Sign in to your Google account. Once the sign-in is complete, you’ll see the “Choose Backup Sources” screen.
-
8Place checkmarks next to your photo folders. Any photos stored in one of these folders will be automatically backed up to Google Photos.
- If you don’t see a folder you want to back up, click Add folder and select the correct folder.
-
9Select a photo upload size.[4]
- High quality: This will work great for most people. Photos and videos will upload at a maximum of 1080p full HD resolution and 16 megapixels.
- Original: You’ll be able to upload higher quality photos and videos. Choose this option if you’re a professional photographer who already pays for extra space in the Google cloud.
-
10Click Start backup. A confirmation popup will appear, letting you know that your backup has begun.
-
11Click OK. This will close the window.
-
12Click the Google icon. It’s a rainbow pinwheel icon located at the top right (macOS) or bottom right (Windows) area of the screen (near the clock). A brief menu will appear.
- If you don’t see the icon on your Windows system, click the up-arrow next to the clock to show your hidden icons.
-
13Click “View Uploaded Photos.” Google Photos will open in your default web browser. All of your backed up photos appear here.


Viewing Your Photos
-
1Open the Google Photos app. When you launch the app, you’ll see a list of your photos you’ve added.
- The photos appear in the order in which they were uploaded, with the newest photos appearing first.
- You can also navigate your photos at http://photos.google.com.
-
2Tap a photo to see a larger version. While you’re viewing a photo in this mode, you can:
- Pinch to zoom in and out.
- Swipe left or right to view the next photo in that direction.
- Tap the Share icon to share the photo with other apps.
- Tap the Pencil icon to edit the photo.
- Tap the “i” icon to view photo details, such as the date it was taken and the size of the file.
- Tap the trash icon to delete the photo.
-
3Tap the back button to return to your photos.
-
4Tap the magnifying glass (mobile) or Search box (web). This will open the Search panel.
-
5Scroll through the listed categories. Google Photos has sorted your uploaded photos into those categories to make it easy for you to find what you’re looking for.[5]
- People: Google tries to group similar faces in your photos. See Label Faces in Google for tips on making the most out of this feature.
- Places: Tap a location to view all photos taken there. This feature only works with photos that were taken with location data turned on.
- Things: These are sub-categories of types of photos you may be looking for, such as Selfies, Cats, Screenshots, Sunsets, etc.
-
6Type something into the Search field. Try searching for something you know is in your uploaded photos, such as “dogs” or “selfies.” If there are photos that match what you typed, they’ll appear in the search results.


Editing Your Photos
-
1Open Google Photos. Google Photos has built-in tools that can help improve the quality of your photos. You can access these tools in the mobile app or at http://photos.google.com.
-
2Tap a photo you want to edit.[6]
-
3Tap the pencil icon to enter Editing mode.
-
4Tap the Basic Adjustments icon. If the first icon on the second line of icons is blue, you’re already in this mode. Otherwise, tap that first icon (three broken horizontal lines). Here’s what you can do in this mode:
- Tap “Auto” to have Google Photos automatically correct the photo’s basic elements, such as lighting and color.
- Tap “Light” to access the brightness slider. Move it to the right to make the photo lighter, and to the left to darken.
- Tap “Color” to control the photo’s color saturation. Move the slider to the right to increase saturation, and left to decrease.
- Tap “Pop” to add additional vibrancy to colors and shadows.
- Tap “Vignette” to surround the photo with darkened edges.
- Tap the X to cancel your changes or tap the check mark to save them.
-
5Tap the Filters icon. This is the second icon in the bottom row (a square with a landscape inside).
- Tap any filter to see a preview.
- Move the slider on the screen to increase or decrease the strength of the filter.
- Tap the X to cancel your changes or tap the check mark to save them.
-
6Tap the Crop icon. This is the third (last) icon on the bottom row in Editing mode. This tool helps you crop out just the part of the photo you want to keep.
- Drag the corners inward until you’ve selected just the area of the photo you want to keep.
- Tap the checkmark to save the cropped version of the photo.
- Tap the X to cancel your changes.


Uploading Photos Manually on a Computer
-
1Open a web browser. Automatic backups aren’t the only way to get your photos into Google Photos—you can also upload individual photos (such as photos you’ve downloaded from the internet) to Google Photos manually.
-
2Navigate to http://photos.google.com.
- If you’re not already signed in to Google Photos, sign in when prompted.
-
3Click “Upload.” It’s at the top of the screen, next to “Create.”
-
4Select the photo you want to upload.
- To select more than one photo at a time, hold down ⌘ Cmd (macOS) or Ctrl (Windows) as you click each file.
-
5Click Open. Your photos will now upload to your Google Photos account.


Using Assistant
-
1Open Google Photos. You can use the Google Photos Assistant to organize your photos, create collages, and other creative projects.[7]
-
2Tap the ☰ icon.
-
3Select “Assistant.”
-
4Tap the “+” icon. This is at the top right corner of the mobile app (you won’t see it on the website, but that’s okay).
-
5Choose “Album” to create a new album. This is a great way to organize your photos by criteria that you choose.
- Click or tap the photos you want to add to the album.
- Click “Create.”
- Type a name for your album.
- Click or tap the check mark at the top of the screen to save your album.
- See Organize Photos in Google Photos for more tips on using albums to keep your photos organized.
-
6Choose “Animation” to create a short animation from your photos.
- Click or tap up to 50 photos to appear in your animation.
- Click or tap “Create” to view your animation.
-
7Choose “Collage” to combine several photos into a single image.
- Click or tap up to 9 photos for your collage.
- Click “Create” to view your collage.


Sharing Photos with Others
-
1Open Google Photos. Your photos are private unless you decide to share them with others. With Google Photos, you can share content with others over email, Snapchat, Facebook, Instagram, and many other apps.[8]
- Your sharing options will depend on your device and operating system.
-
2Tap or click a photo you want to share.
- To select more than one photo in the mobile app, tap the ⁝ icon and choose “Select,” then tap your desired photos.
- To select more than one photo on http://photos.google.com, hover the mouse over each thumbnail until you see a circle appear at its top left corner. Click that circle, and then click the circles in other photos you want to send.
-
3Tap the Share icon. If you’re using iOS or macOS, it’s a square with an arrow. On an Android, it’s an angle bracket with dotted ends.
-
4Select your desired sharing method. The options will be different depending on your device.[9]
- Choose “Get link” to create a URL to give to your desired recipient on any platform.
- Enter an email address to email a link to the recipient.
- Enter a phone number to send a text message with a link to the photo.
- Choose a social media app to share the photo with users of that app. The image or link will open in the app.


Clearing Space on Your iOS or Android Device
-
1Open the Google Photos app. Once your photos are backed up to Google Photos, you don’t need to keep them on your phone or tablet. The safest way to reclaim your disk space is to use the “Free Up Space” feature in the Google Photos app.[10]
-
2Make sure your photos are backed up. If you see thumbnails that have a crossed-out cloud icon, those photos are not backed up. Make sure your photos are backed up before attempting this method.
- If your photos are only set to back up on Wi-Fi, make sure your Wi-Fi connection is working properly.
- You can back up photos on Android and iOS devices.
-
3Tap the ☰ icon.
-
4Tap “Settings.”
-
5Tap “Free up device storage.” A popup will appear, letting you know how many photos will be deleted and how much space you’ll reclaim.[11]
-
6Tap “Delete.” The photos will be moved to Trash (Android) or Recently Deleted Photos (iOS), so you can restore them if necessary.
- Photos in these folders still take up space on your device until they expire. That’s 60 days for Android, and 30 days for iOS.
- If you don’t want to wait, continue with this method to learn how to permanently remove deleted photos.
-
7Remove photos from the Trash in Android.
- In Google Photos, tap the ☰ icon and select “Trash.”
- Tap the ⁝ menu and select “Empty Trash.”
-
8Remove photos from Recently Deleted Photos on iOS.
- Return to the home screen.
- Tap the Photos app (the one that came with your phone).
- Tap “Albums” and select “Recently Deleted.”
- Tap “Select” at the top right corner.
- Tap “Delete All.”


Community Q&A
-
QuestionHow can I delete just one photo in Google Photos?
 Community AnswerRight-click on the photo you want to delete, and then choose delete.
 -
QuestionHow do I move photos from one folder to another on a Galaxy 7?
 Community AnswerLong-press on the desired picture, click on the three dots and select the option "Move to Folder". You can then select your folder and you're done!
 -
QuestionIf I go back to my Pictures Program in my PC to delete several photos, will those photos still remain in my Google Photos?
 RubyTop AnswererThey should. Deleting photos from your PC will delete them from only your PC. Google Photos is a separate program, so if they are backed up to Google Photos, they should stay there.


References
- ↑ http://www.tomsguide.com/us/google-photos-tutorial,review-2858.html
- ↑ http://mashable.com/2016/02/23/how-to-get-all-pics-in-google-photos
- ↑ https://www.youtube.com/watch?v=QjzttXdWRbU
- ↑ http://mashable.com/2016/02/23/how-to-get-all-pics-in-google-photos
- ↑ http://www.tomsguide.com/us/google-photos-tutorial,review-2858.html
- ↑ http://www.tomsguide.com/us/google-photos-tutorial,review-2858.html
- ↑ https://support.google.com/photos/answer/6128815?hl=en&ref_topic=6128818
- ↑ https://support.google.com/photos/answer/6131416?co=GENIE.Platform%3DDesktop&hl=en&oco=0
- ↑ https://support.google.com/photos/answer/6131416?co=GENIE.Platform%3DDesktop&hl=en&oco=0
About This Article

1. Download Google Photos.
2. Sign in with your Google account.
3. Set up your backup preferences.
4. Tap a photo to see it larger.
5. Search by subject or location.
6. Pinch to zoom in and out.
7. Tap the pencil on a photo to edit it.
8. View the same photos on all devices.