This article was co-authored by wikiHow Staff. Our trained team of editors and researchers validate articles for accuracy and comprehensiveness. wikiHow's Content Management Team carefully monitors the work from our editorial staff to ensure that each article is backed by trusted research and meets our high quality standards.
This article has been viewed 27,069 times.
Learn more...
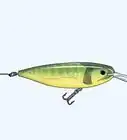
A spinnerbait, made up of a heavy head, a skirt, and attractive blades, is specifically designed to emulate the behavior of injured prey. But to use a spinnerbait, you'll need to be able to tie it to the end of your line with a secure knot. There is much debate within the fishing community as to what the superior knot is, but the most commonly used are either the Palomar knot, the Trilene knot, or the Improved Clinch knot.
Steps
Tying a Palomar Knot
-
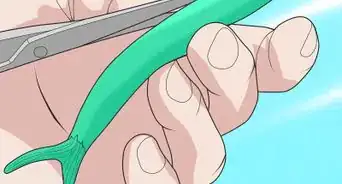
1Measure out 30 centimetres (12 in) of fishing line. To make sure you have enough line to tie the knot, measure out 30 centimetres (12 in) with a ruler and cut the line.
-
2Fold the line over so you have 15 centimetres (5.9 in) of double line. Pinch 1 end of the line between your thumb and index finger, then fold the other end of the line towards the starting end.
- Pinch both ends together so that you now have a line that's effectively halved in size.
Advertisement -
3Create a small loop and pass it through the eye of the bait. Run your thumb and index finger down the line until most of it is flat except a small loop at the end. The loop needs to be just big enough for it to latch onto a hook.
- Aim for a 1 centimetre (0.39 in) sized loop to give you enough slack later on.
- Pass the line through the eye of the spinnerbait and feed it through until the line is halfway through. Grab both ends of the line with both hands and let the spinnerbait dangle loose below.
-
4Tie an overhand knot on the line. Once you are holding both sides of the line and the spinnerbait is dangling beneath, tie an overhand knot with the double line above the spinnerbait.[1]
- As you're tightening the knot, leave enough slack in the loop so that it can pass over the entirety of the bait.
-
5Bring the spinnerbait through the loop of the overhand knot. Once you have finished the overhand knot over the spinnerbait, you should have 1 large loop in the line. Gently pull the loop over the entire bait, making sure not the tighten the entire knot yet.
- If the overhand knot you tied doesn't have a big enough loop, go back a step and retie it so that you can complete this step.
-
6Tighten the knot with the loose ends. Pull the 2 loose ends of line that you have remaining firmly so that the knot begins to tighten. Keep pulling until the loop you put over the spinnerbait secures onto the eye and the knot is secured.[2]
-
7Cut 1 of the loose pieces of line. Because you doubled the line over to begin, you will now have 2 pieces of line dangling off the spinnerbait.
- Cut 1 of them as short as you can, leaving you with 1 piece of line that can be tied onto your rod.


Using a Trilene Knot
-
1Measure out 30 centimetres (12 in) of fishing line. With a ruler, measure out at least 30 centimetres (12 in) of fishing line. The more fishing line you have, the easier it will be to tie the knot.
- If you have too much line by the end, you can just cut off what you don't need.
-
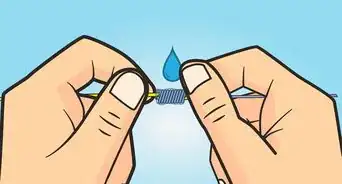
2Pass 1 end of the line through the eye of the bait, twice. Using both hands, gently thread the end of the line through the eye. Thread through most of the line, but leave enough so that the loops you are making are still visible. Then, loop it around and thread it through the eye once more.[3]
- Keep these loops loose, as you'll need the slack later on.
-
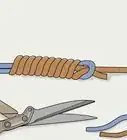
3Wrap the looped end of the line around the standing line. The rest of your line, which will be roughly 25 centimetres (9.8 in) at this point, is known as the 'standing line.' With the end of the line that you've looped through the eye of the bait, start to loop it around the standing line 6 times.[4]
- Thread as much line through the eye of the spinnerbait as needed to have enough to wrap around the standing line. The bait remains where it is and does not need to be wrapped around the standing line.
- Again, don't worry if the line is loose, just keep track of where the end of the line you're threading is.
-
4Feed the end of the line through both loops. You will now have set up 2 loops for the end of the line to pass through. Keeping careful track of your loops, pass the end of the line under both of them and out the other side.[5]
- The first loop is the part of the line that goes from the eye of the bait to the standing line. The second loop is the 1 made by the line around the bait eye.
-
5Pull the knot tight. Take the end of the line and pull it firmly. This will cause the whole line to tighten on the bait eye, resulting in a pretty but firm braid over the top.[6]


Trying the Improved Clinch Knot
-
1Cut roughly 30 centimetres (12 in) of line. Use a ruler to measure out 30 centimetres (12 in) of fishing line, then cut it. If you don't have a ruler with you, cut yourself plenty of line to work with, as you can always cut excess line at the end.
-
2Thread the end of the line through the bait eye. Lay the spinnerbait out on a flat surface. Keeping the line parallel to the bait, thread most of the line through the eye.[7]
- Keeping the thread parallel will help your orientation when completing the next steps.
-
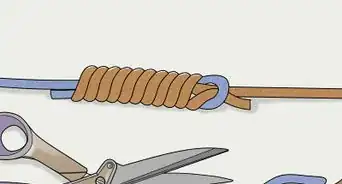
3Loop the end of the line back over the standing line 6 times. With the end of the line that has passed through the bait eye, wrap it over the standing line (the part of the fishing line that has not entered through the bait eye) then pull it under, then wrap it over again, then pull it under once more.[8]
- Repeat this process 6 times until the end of the line has wrapped around the standing line evenly. The loops should be equally spaced from each other and resemble each other closely in shape.
- Keep the line as loose as possible through this process to create natural loops.
-
4Pass the end of the line through the eye again. Down by the eye of the bait there will be a small loop from where the end of the line threaded through the eye to where it wrapped around the standing line. Pass the end of the line through this loop.[9]
-
5Pull the knot taut. Once you pass the line through that loop, pull the end of the line taught until no slackness remains in the knot.[10]


References
- ↑ https://www.animatedknots.com/overhand/
- ↑ https://www.netknots.com/fishing_knots/palomar-knot
- ↑ https://www.animatedknots.com/trilene/
- ↑ https://www.netknots.com/fishing_knots/trilene-knot
- ↑ https://www.netknots.com/fishing_knots/trilene-knot
- ↑ https://www.netknots.com/fishing_knots/trilene-knot
- ↑ https://www.animatedknots.com/improvedclinch/
- ↑ https://www.netknots.com/fishing_knots/improved-clinch-knot
- ↑ https://www.netknots.com/fishing_knots/improved-clinch-knot
About This Article

To tie a spinnerbait using a trilene knot, start by measuring 30 centimeters of fishing line. Then, pass 1 end of the line twice through the eye of the bait to make 2 loops. Holding the loops still, pass the end of the line over and around the rest of its length, 6 times. After the sixth pass, feed the end of the line through both loops you made earlier and pull the knot tight. Alternatively, tie an improved clinch knot by threading the end of your line through the bait's eye. Then, loop the end back over the rest of the line 6 times. After the 6th loop, pass the end of the line back through the eye of the bait and pull the knot taut. For more tips, including how to tie a palomar knot, read on!