wikiHow is a “wiki,” similar to Wikipedia, which means that many of our articles are co-written by multiple authors. To create this article, volunteer authors worked to edit and improve it over time.
This article has been viewed 67,216 times.
Learn more...
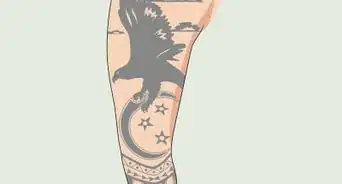
A tattoo is a kind of body modification where ink is inserted into a sub-layer of your skin to stain it permanently in an artistic fashion or design. These days, most tattooing takes place in tattoo parlors, where a professional artist uses modern sterilization equipment and specialized machines to safely apply your chosen design permanently to your body. As this process is difficult to reverse, tattooists are generally required to have rigorous training and licensing before working on clients.[1]
Steps
Preparing to Become a Tattooist
-
1Become skilled in drawing and coloring. There are many techniques one can employ to achieve an artistic effect, and knowing these will make it easier for you to translate your artistic knowledge to a living canvas. Taking collegiate courses in fine arts will ensure you have a good grounding in these principles.
-
2Build your portfolio. You will need to prove your artistic worth before another tattoo artist is willing to invest time in you as an apprentice. Your designs should be similar to common tattoo art, as well as anything that shows off skillful composition and coloring talent.Advertisement
-
3Attempt non-permanent body art. You can also showcase your talent and dedication by performing henna tattoo designs imitating permanent tattoo designs. This will also show to the master tattooist you want to apprentice under that you already have an understanding of what it means to translate a design to the pliant medium of skin.
- Volunteer your services as a face painter at a school festival, local parade or festival, or at a nearby carnival.
-
4Get a tattoo yourself. This will give you first hand experience as to the procedure, atmosphere, and techniques from other tattooists. Also, having a tattoo of your own will show your clients that you can empathize with the experience, which will help put them at ease.


Acquiring an Apprenticeship
-
1Talk to local tattoo artists. Everyone gets a start somewhere, and a member of your local body art community might be able to put you on the trail of a good place to apply. Come prepared to every meeting with a professional: bring your portfolio and any other artistic accreditation you have earned.
- Even if the tattooist you inquire with can't help you, you can always ask for their professional opinion on your work. Maybe you have a flair for a certain style that their colleague is known for, in which case, their recommendation might go a long way.
-
2Apply for your apprenticeship. The avenues for gaining an apprenticeship are few, but by making your presence known at and inquiring for an apprenticeship with local tattoo parlors, you are likely to get some direction.
- If there is a tattoo parlor that you are particularly interested in apprenticing for, be respectful but persistent. Visit the parlor regularly with your art in tow and some small niceties, like coffee. Volunteer your time with cleaning or maintenance.
-
3Take a second job. Depending on the terms of your apprenticeship, this can last for three years and may cost thousands of dollars. You will need to support yourself during this time in addition to covering any additional expenses related to your education as a tattooist.
- The Alliance of Professional Tattooists (APT) recommends a minimum of a three year apprenticeship.[2]
- Generally, after being accepted into an apprenticeship, you will sign a contract either agreeing to pay the tattooist a sum of money in exchange for the apprenticeship, or to work for the tattoo parlor for a number of years following the completion of apprenticeship.
-
4Get your apprenticeship agreement in writing. This will normally come in the form of a contract from the tattooist under which you will apprentice. This will establish the expectations of you as apprentice and the tattooist as the master artist. Read over the terms of this contract carefully and, if you are able, have a lawyer check it as well.
-
5Understand your initial responsibilities. Though you will someday, with enough practice and dedication, be a master tattooist in your own regard, during your apprenticeship, the beginning especially, you will mostly be doing menial tasks in the tattoo shop. You will also be expected to watch carefully as the artist works.


Succeeding in Your Apprenticeship
-
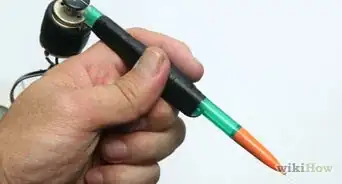
1Study the equipment. Modern tattooist employ a variety of tools. An electric tattoo machine uses groupings of needles to drive ink into the skin up to 150 times a second.[3] These needles are only used once and are packaged separately.
-
2Maintain your equipment. Over the course of your apprenticeship, you will learn how to clean your equipment and keep it running efficiently. This should be done methodically and consistently to prevent contamination or infection, with all the equipment being sterilized by an autoclave after every use.[4]
-
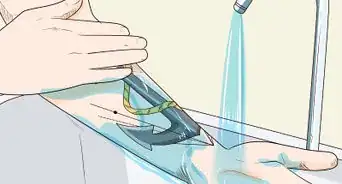
3Observe hygienic measures. You must wash your hands thoroughly to prevent infection in addition to the surgical gloves you will wear while performing the tattooing. The areas of skin you are tattooing must also be kept scrupulously clean.
-
4Educate yourself about skin conditions. These can affect the tattooing process, and in some cases negatively impact even flawless artistic execution. A client can have an allergic reaction to some of dyes, or even the gloves you are wearing; being aware of these issues will help protect you and your client.
-
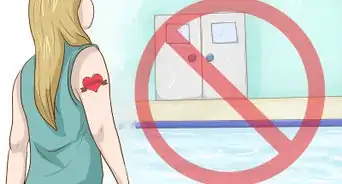
5Learn about infection control. Your clients will need to be instructed on how to look after their tattoos for a period of weeks or months after the tattoo's application. The following rules apply:
- The tattoo should be bandaged immediately and remain covered for two to three hours, after which it should be gently cleaned with antibacterial soap.
- Wear loose clothing that will not rub the tattoo.
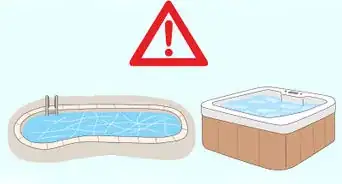
- Do not swim while the tattoo is still healing.
- The tattooed skin must be kept clean at all times, with unscented soap and water. Drying must be done with great care and no rubbing is allowed.
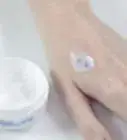
- A moisturizer can be applied to the tattoo a couple of times a day.
- Keep the tattoo out of the sun for a minimum of three weeks. After that, cover it with a high-SPF sunblock.


Tattooing
-
1Be patient. This will be the final stage of your apprenticeship. The tattoo artist you are apprenticing under will only approve you to start work when he or she is certain you are ready and fully trained in all aspects of the art.
-
2Obey hygienic procedure. This includes both washing your hands and putting on surgical gloves. Make sure that your work space is clean and well maintained, as this will make your clientele more comfortable.
-
3Use the autoclave on all necessary equipment. An autoclave is a machine used to sterilize equipment. You should sterilize your equipment in plain view of your client. Think about explaining this process so your client understands you are taking health and hygiene into consideration every step of the way.
-
4Prepare the skin you will be tattooing. You will have to shave and disinfect the area where the tattoo will be applied. You should try to shave in the same direction the hair is growing, to prevent irritation to the skin or cuts.
-
5Apply your tattoo guide. Prior to the actual tattooing, you will transfer a stencil of drawing onto your client’s skin to serve as a guide and help prevent mistakes. Keep the skin taut while doing this so the image is applied to the contours of the skin naturally.
-
6Create the outline of the design. You will start by using your ink and a single tip needle. Using these, complete the outline of your client's design in preparation for the central parts.
- Following this, you should clean the area again.
-
7Tattoo the inside of your outline. At this point you will need to create a single line wider than your first. You will need to use thicker ink and different set of needles for this part of the process.
- Clean the area again after completing your second set of lines.
-
8Overlap the lines of your design. Now that you've tattooed the outside and inside boundary of your outline, you can apply ink to overlap the two to make sure there are no gaps in the design.
-
9Apply the final touches. The tattoo is now finished and fully applied, but you will still need to clean the area one more time before bandaging it. Now your client's ready to head home.


Community Q&A
-
QuestionDo I shave the back of the for tattooing a woman?
 Community AnswerYou don't need to, but it helps and stops the brushes from painfully pulling out the hair.
 -
QuestionShould the skin be shaved before it is tattooed?
 WendyarrowCommunity AnswerYes, you must shave any area before tattooing, even if the hair is very fine, blonde, and invisible.
 -
QuestionIs getting a tattoo painful?Community AnswerYes. The level of pain is different for everybody, and the pain is worse on different parts of the body, such as the ankles and wrists.


References
- ↑ http://study.com/articles/How_to_Become_a_Tattoo_Artist_Career_Guide.html
- ↑ http://study.com/articles/How_to_Become_a_Tattoo_Artist_Career_Guide.html
- ↑ https://www.painfulpleasures.com/community/help-center/information-center/coil-vs-rotary-tattoo-machines/
- ↑ http://www.thetattoocollection.com/tattoo_what_to_expect.htm
About This Article
When you’re tattooing someone, start by shaving and disinfecting the area you’re tattooing so it's clean and safe. Once the area is clean, keep the person’s skin taut and apply the stencil of your drawing to act as a guide for the tattoo. When you’re ready to start, use a single tip needle to trace the outline of the design. Once the outline’s done, switch to a thicker ink and a different set of needles to shade the inside of the design. After you've shaded the design, overlap the inside and outside ink to make sure there are no gaps in the design. When you've finished, clean the area and wrap the tattoo in a bandage to keep it clean. For more tips, including how to get started with designing your own tattoos, read on!