This article was co-authored by Andres Matheu. Andres Matheu is the Owner of Hömm Certified Painting Systems, an Interior and Exterior Residential painting business based in the Washington, DC Metro area. Andres specializes in interior and exterior residential painting, color consultations, cabinet refinishing, wallpaper removal, and epoxy flooring among other services. An EPA Lead-safe Certified Firm, Hömm Certified Painting Systems has been awarded the Best of Houzz 2019 Service, Angie's List Super Service Award 2019, and Northern Virginia Magazine's 2018 Best Home Experts (painters) award.
This article has been viewed 70,491 times.
Once you've fixed a nail hole or other gouge mark in a piece of wood with wood filler, you'll want to stain the wood filler so it matches the rest of the wood. To do this, make sure you're working with a flat surface and test out the stain on a spare piece of wood to see how it reacts to the filler. Once you think the stain will work with the wood filler, apply a thin coat with a foam or paint brush.
Steps
Creating a Stainable Surface
-
1Ensure that the wood filler you’ve used is stainable. The wood filler should state on the packaging whether it’s stainable or not—if it’s water-based or solvent-based, it should hold a stain well. If it isn’t stainable, such as an oil-based wood filler, it won’t hold the color well when you go to paint it. [1]
-
2Sand the wood filler section. Sanding the spot before applying the stain will allow it to adhere evenly. If it’s a small spot such as a nail hole or gouge mark, you can sand it by hand using a piece of sandpaper, while larger sections are easier to sand with a palm sander.[2]
- Use 220-grit sandpaper for a smooth finish that works well with stains.
- Sand in the direction of the wood’s grain.
Advertisement -
3Wipe off excess dust from the wood. Use a wet rag to wipe off the sawdust created from sanding the wood filler section. Follow up with a dry rag to ensure you removed all of the dust, and let the wood dry completely before applying the stain.[3]
- You can also use a small hand vacuum, if necessary.


Forming the Right Color Match
-
1Choose an appropriate color for your wood stain. If you’re touching up wood that you’ve previously stained, all you’ll need is the stain you originally used. If you’re going to stain the entire piece of wood, along with the filler, it’s best to choose a stain that’s closest to the original color of the wood.
- Keep in mind that if you're using a semi-transparent stain, you'll still likely be able to see the area that was patched. If you're using an opaque stain, the color may look uniform, but you still may notice a textural difference in the wood.[4]
-
2Test the stain on spare wood or a small section of the filler. Wood fillers can take stains differently than the wood does, so it’s best to test the stain out beforehand if possible. Apply some wood filler to a spare piece of wood and apply the stain over it to see if it’s too light, too dark, or just right.[5]
- Shake the stain well before using it.
- Wait for the wood stain to dry before deciding if the color is right. The drying time depends on the thickness of the filler, type of stain, variety of wood, and the temperature and humidity.
-
3Thin out the stain if it appears too dark for the wood filler. If you test the stain on a piece of wood and it’s too dark, pour some of the stain into a cup and add few drops of water. You’ll have to experiment to find out what the perfect proportions are, so add very small amounts of water at a time.[6]
- Once you’ve added water, mix it in with the stain and test the stain on a piece of spare wood with filler on it again.
- It’s better to have a stain that’s too light as opposed to too dark, since you can apply additional layers of stain if necessary.


Applying the Stain
-
1Apply the stain to the wood filler using a brush. Use a foam brush or similar tool to carefully stain the wood filler. If it’s a small spot, such as a nail hole, you may need to use a small paintbrush to apply the stain. Use even strokes and apply a thin layer of the stain.[7]
- Allow the stain to dry for several minutes before wiping off the excess.
- Stains often take at least 1-2 days to dry on wood completely, so check the directions on your stain to find out specific drying time.
-
2Add another coat of stain if it’s too light. If the wood filler is still too light after it’s been stained, repeat the process using a brush and apply another thin coat. Wait for it to dry completely before adding another layer to see how dark it truly is.
- You can repeat this process of applying additional layers of stain until the wood filler matches the color of the stained wood.
-
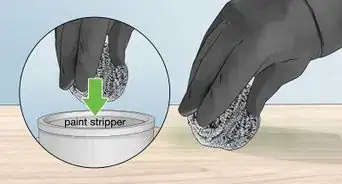
3Remove the wood stain if it’s too dark. If it’s a thin layer of stain, you may be able to use a palm sander to sand off the top layer of the stain. If you can't sand off the top layer, apply a stain stripper to the wood according to the directions on the package. Let the liquid sit for the recommended amount of time, then wipe it away with a clean, lint-free cloth.[8]
- You can either try to strip the stain from the small section that contains wood filler, or you can remove the stain from the entire piece of wood.
- Apply the stain again to the even, unstained surface for better results.
- Alternatively, you can apply the stain to the surrounding area to match the wood to the wood filler section.


Expert Q&A
Did you know you can get expert answers for this article?
Unlock expert answers by supporting wikiHow
-
QuestionHow do you match stain on wood filler?
 Andres MatheuAndres Matheu is the Owner of Hömm Certified Painting Systems, an Interior and Exterior Residential painting business based in the Washington, DC Metro area. Andres specializes in interior and exterior residential painting, color consultations, cabinet refinishing, wallpaper removal, and epoxy flooring among other services. An EPA Lead-safe Certified Firm, Hömm Certified Painting Systems has been awarded the Best of Houzz 2019 Service, Angie's List Super Service Award 2019, and Northern Virginia Magazine's 2018 Best Home Experts (painters) award.
Commercial PainterIf you patch a hole with wood filler, you're always going to be able to tell where that hole was filled, even if your stain matches perfectly. If it's a semi-transparent stain, you'll be able to see the difference in the substrate, but even if it's an opaque stain, there will be a textural difference that you may be able to see.
Support wikiHow by unlocking this expert answer.


References
- ↑ https://www.youtube.com/watch?v=MHQCqnoTBXM
- ↑ https://www.thesprucecrafts.com/match-wood-fillers-with-stained-wood-3536505
- ↑ https://www.thesprucecrafts.com/match-wood-fillers-with-stained-wood-3536505
- ↑ Andres Matheu. Commercial Painter. Expert Interview. 28 July 2020.
- ↑ https://www.bobvila.com/articles/how-to-use-wood-filler/
- ↑ https://www.bobvila.com/articles/how-to-use-wood-filler/
- ↑ https://www.youtube.com/watch?v=asn7Xk-dm0U
- ↑ https://www.bobvila.com/articles/how-to-remove-varnish/
About This Article

Staining wood filler is the best way to help the filler blend in with the rest of the wood around it. Before you paint, sand the spot you used wood-filler on with 220-grit sandpaper to smooth out the surface. Then, wipe away any excess dust from the wood with a wet rag. Use a brush to apply a thin layer of stain to the wood filler. After a few minutes, wipe away the excess stain. If, after 1-2 days, the stain is still too light, add another coat. If the stain ends up too dark to match the rest of the wood, apply some stain stripper with a rag. After a few minutes, wipe the stain stripper away and let it dry completely. To learn how to test the color of wood stain, read on!