This article was co-authored by wikiHow Staff. Our trained team of editors and researchers validate articles for accuracy and comprehensiveness. wikiHow's Content Management Team carefully monitors the work from our editorial staff to ensure that each article is backed by trusted research and meets our high quality standards.
This article has been viewed 10,813 times.
Learn more...
Signing your woodworking projects is a great way to take credit for a piece of work you take pride in. If your business is woodworking, a signature is also a way for people to learn who you are and it can potentially generate future business. There are many different ways to sign wood, so you can choose to make your signature as simple or as elegant as you like.
Steps
Branding Iron
-
1Order a custom electric branding iron of your signature. Choose a signature that includes either your initials or your first and last names. Add any other information you want to include in your brand, such as the words “Hand Crafted by” above your name.[1]
- There are many companies that sell electric branding irons online. Search something like “order electric branding iron” to bring up a bunch of options.
- Branding is a good option if you want to include a longer signature, such as your full name, because a custom brand can be as large as you want.
-
2Practice using your brand on a scrap piece of wood first. Choose a scrap piece of the same type of wood as the woodworking project you want to brand is made from. Turn the branding iron on and wait a few minutes for it to heat up. Make a few different brands on the scrap wood, applying different amounts of pressure and holding it for different amounts of time, to find what looks most clear.[2]
- How much pressure you have to apply and how long you have to hold the brand against the wood depends on the specific type of wood, so that’s why it’s best to always practice on a scrap first before you brand your actual project.
Advertisement -
3Brand your signature into an unfinished spot on the project. Choose an unfinished area like the back or bottom of the piece for your signature. Press the heated branding iron firmly against the wood and hold it there for the amount of time you found works best for your signature to show up clearly.[3]
- For example, if you’re signing a coffee table, brand the underside of the tabletop somewhere. If you’re branding a set of dresser drawers, brand the back of the piece or the inside of a drawer.
- If you’re finishing your whole woodworking project, apply your signature before you finish the wood! Otherwise, the finish might get ruined.
- Note that branded signatures don’t always show up well on dark woods. A solution to this problem is to cut a small placard out of very thin, light-colored wood. Brand this placard, then glue it in an inconspicuous spot on your project.


Medallion
-
1Order metal or wood medallions with your signature engraved in them. Include your name or initials and any other information you want to be part of your signature. A personal logo looks really nice on a medallion, for example.[4]
- Type something like “order engraved medallions” into a search engine to pull up sites to order custom medallions from.
- The size of your signature medallion is up to you. If you aren’t sure, a medallion that has a 1 in (2.5 cm) diameter and is 1⁄8 in (0.32 cm) thick is a good size.
- A signature that includes initials or a logo is a good choice for medallions, since including your full name might look crowded or too small.
-
2Cover the area you want to sign with masking tape. Pick the spot on your woodworking project where you want to place your signature, such as the inside of a drawer or the underside of a tabletop. Place a piece of masking tape that’s longer and wider than your medallion across the whole area to protect the surrounding wood.[5]
- For example, if you’re signing a wooden chest with a medallion, set it into the bottom of the chest. If you’re putting your mark on a shelf, set it into the underside of one of the shelves or onto the back of the piece.
- Medallions can be applied to either finished or unfinished wood.
-
3Drill a hole to the width and depth of your medallion with a Forstner bit. Attach a Forstner bit that has the same diameter as your medallion to a power drill. Center the bit over the piece of masking tape and carefully drill down only as deep as the thickness of your custom medallions.[6]
- For example, if your medallions are 1⁄8 in (0.32 cm) thick and have a diameter of 1 in (2.5 cm), use a 1 in (2.5 cm) Forstner bit and drill down 1⁄8 in (0.32 cm) into the wood through the masking tape.
-
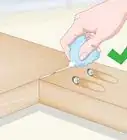
4Glue a medallion in the indentation with clear epoxy. Brush a thin layer of clear epoxy into the recess. Press your medallion firmly into the hole and hold it for a few minutes while the epoxy starts to set. Peel up the masking tape and discard it.[7]
- Refer to the manufacturer’s instructions for the epoxy you’re using for specific instructions for use and exact curing times.


Engraving
-
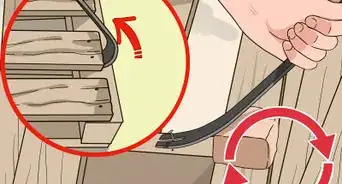
1Use a powered engraving tool with a fine ball-nose bit to sign wood. Any kind of electric wood carving tool works for this, such as a rotary tool with a ball-nose wood carving bit. This allows you to quickly inscribe basic information using letters and numbers.[8]
- For example, use a Dremel tool to engrave your signature.
- Engraving works best for simple signatures, such as ones that include your initials and the date you finished your woodworking project.
-
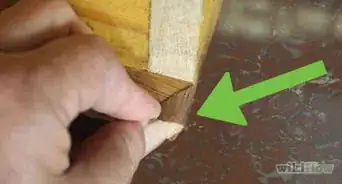
2Practice engraving your signature into a scrap piece of wood. Grab a scrap of wood that’s the same type as the project you want to sign. Try engraving your signature in the wood several times to get a feel for how the tool works on the wood before you do it on your project.[9]
- Keep in mind that the tip of the engraving tool tries to follow the grain of the wood.
-
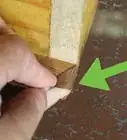
3Carve your signature and any other details you want into your project. Press the tip of the engraving tool against the spot on the wood you want to sign. Slowly and firmly engrave your name or initials and any other information you want to include, such as the date.[10]
- For example, if you’re signing a desk, engrave your signature into the underside of the desk’s tabletop. If you’re signing a small box, engrave the bottom or the inside of the lid.
- Note that an engraved signature will show up more on finished wood, but it’s fine to carve into either a finished or unfinished surface.
- If you’re worried about your signature being crooked, stick a piece of masking tape onto the wood to use as a line to carve along.


Permanent Marker
-
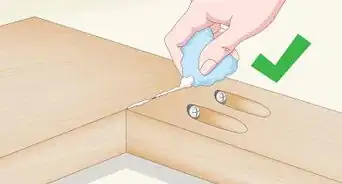
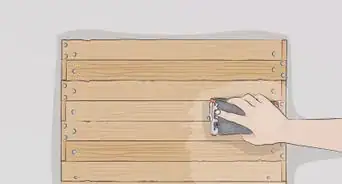
1Choose a black permanent marker to sign your work with. Other colors of markers fade more easily over time. Try out different tip sizes on a scrap piece of wood to decide which size works best for your signature and the type of wood you’re signing.[11]
- Keep in mind that though this method is fast and easy, a signature made in permanent marker is not as pretty and elegant as other types of signatures.
- Permanent marker works for signatures of all lengths.
-
2Sign your project in an inconspicuous spot before you finish the wood. Choose somewhere that your signature won’t be obvious like the back or bottom of the piece. Sign the wood with your name or initials and the date or any other info you want to include.[12]
- For example, if you’re signing a nightstand with a drawer, sign the back of the drawer. If you’re signing a chair, sign the underside of the seat somewhere.
- Alternatively, feel free to sign a project with a visible personal message if it’s a personal gift for someone.
-
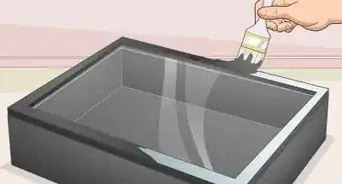
3Apply clear wood finish over the top of your signature with a brush. Wait at least a few minutes for the permanent ink to dry completely. Cover the permanent marker with a clear wood finish to preserve it.[13]
- If your signature smudges or bleeds, sand it off and try again. To prevent blotchy lettering, put a coat of clear finish down before you sign the project, then apply another coat on top after you sign it.


Warnings
- Be careful not to touch a hot branding iron when you’re using it to sign a woodworking project. You probably don’t want your signature permanently branded on your hand!⧼thumbs_response⧽
Things You’ll Need
Branding Iron
- Custom electric branding iron
- Scrap piece of wood
Medallion
- Custom metal or wood medallions
- Masking tape
- Power drill
- Forstner drill bit
- Epoxy kit
Engraving
- Electric engraving tool
- Fine ball-nose engraving bit
- Scrap wood
- Masking tape (optional)
Permanent Marker
- Black permanent marker
- Scrap wood
- Wood finish


References
- ↑ https://www.woodworkersjournal.com/signing-off-in-a-manner-of-speaking/
- ↑ https://www.woodcraft.com/blog_entries/makers-mark
- ↑ https://www.woodmagazine.com/woodworking-how-to/how-should-i-sign-my-woodworking-projects
- ↑ https://www.woodcraft.com/blog_entries/makers-mark
- ↑ https://www.woodcraft.com/blog_entries/makers-mark
- ↑ https://www.wwgoa.com/article/sign-your-work/
- ↑ https://www.woodmagazine.com/woodworking-how-to/how-should-i-sign-my-woodworking-projects
- ↑ https://www.woodcraft.com/blog_entries/makers-mark
- ↑ https://www.wwgoa.com/article/sign-your-work/
About This Article