This article was co-authored by wikiHow Staff. Our trained team of editors and researchers validate articles for accuracy and comprehensiveness. wikiHow's Content Management Team carefully monitors the work from our editorial staff to ensure that each article is backed by trusted research and meets our high quality standards.
The wikiHow Video Team also followed the article's instructions and verified that they work.
This article has been viewed 625,439 times.
Learn more...
Scalded milk helps make breads, cakes, and other baked goods both light and fluffy. The process of scalding kills off the protein that's in milk, which helps the gluten to remain unbroken, and it aids the dissolving process of sugar and yeast, which in turn makes fluffier breads and sweets. Learn how to scald milk both in the microwave and on the stovetop by gently bringing the temperature up and stopping before it actually starts to boil.
Steps
Scalding Milk in the Microwave
-
1Pour the required amount of milk into a microwave-safe bowl. You can use whole milk, skim milk, or powdered milk. You can try using other milks, like almond, cashew, and soy, but your baked goods probably won't have the same results because the non-dairy milks don't have the same proteins that are changed by the scalding process.
- Glass bowls are the safest to use in the microwave. If you're using a plastic bowl, make sure it's specified that it's safe to microwave.
- Use a bowl that is deep enough that the milk won't easily splash over the sides.
-
2Put a wooden chopstick in the dish before microwaving the milk. You can also use a bamboo skewer or some other microwaveable tool that has a long handle. The chopstick breaks the surface of the milk and keeps it from boiling over while it's in the microwave.
- It's okay if the chopstick or skewer touches the wall of the microwave. It will simply move around the bowl if your microwave has a turntable.
Advertisement -
3Microwave the milk for 30 seconds on medium-high heat. You don't need to put a cover on the dish—heating for 30 seconds at a time will keep the milk from overheating and splattering all over the interior of your microwave.
- It may be tempting to just put the dish in the microwave for 3-4 minutes at once, but doing this will cause the milk to heat unevenly and may even scorch or burn the milk.
-
4Remove the dish with hot pads and stir the milk with a wooden spoon. This helps to disperse the heat evenly throughout the milk. You can also use a silicone spoon—you just want to avoid using anything that has metal in it, as the metal can react with the milk's proteins in an undesirable way.
- You can buy wooden or silicone spoons from any local home goods store, or you can buy them online.
-
5Check the milk's temperature using a candy thermometer. Put the thermometer into the milk in the middle of the bowl. Don't let it touch the bottom or sides of the dish. Hold it in place for 10-15 seconds or until the probe stops moving.[1]
- You can buy an inexpensive candy thermometer from any department store or order one online.
-
6Keep heating, stirring, and checking the temperature every 30 seconds. Heating the milk gradually rather than all at once keeps your milk from boiling, burning, or getting too hot. It generally takes about 3-4 minutes for milk to get to the appropriate temperature in the microwave, so you will repeat the process of heating and stirring about 6-8 times.
- Stirring also helps prevent the milk from developing a film across the top.
-
7Stop microwaving the milk once it reaches 180 °F (82 °C). Don't let it exceed 212 °F (100 °C). If it does exceed 212 °F (100 °C), you will need to start over again with fresh milk. The proteins and chemistry of the milk changes when it boils and won't react the same way in your recipe as scalded milk would.
- Always use your hot pads to remove the bowl from the microwave.
-
8Let the milk cool to room temperature before adding it to your recipe. It may seem strange to heat milk only to let it cool down again before using it, but it's not the temperature of the milk that matters—it's what happens to the proteins during the scalding process. Let the milk cool to at least 105 °F (41 °C) before using it in your recipe.
- Putting hot milk into your recipe could ruin the other ingredients. For example, really hot milk could curdle or cook eggs, or it could kill off essential yeast.


Using the Stovetop
-
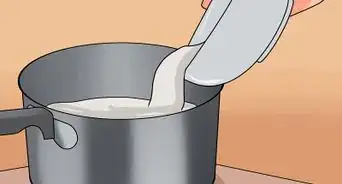
1Pour the measured milk into a saucepan on the stove. Measuring the milk beforehand helps ensure you don't waste milk by using too much, or end up with too little for your recipe. Plus, it makes it easier to just pour the milk in with your other ingredients without having to use another measuring cup after it has been scalded.
- A heavy-bottom pan is best for scalding milk because it will help it heat more evenly.[2]
- Whole, skim, or powdered milk works best for scalding. Milks like almond, soy, cashew, or coconut lack the essential proteins that are affected by the scalding process.
-
2Turn the oven heat to medium-low. This low temperature will keep your milk from heating too quickly, which in turn prevents it from burning. You want the milk heated through but you don't want it to actually boil or stick to the bottom of the pan.
- Watch your milk during the entire heating and scalding process. It should only take 4-5 minutes to scald.
-
3Stir frequently until you see steam and bubbles appearing at the edge. Stirring helps prevent a protein film from developing on the surface of the milk, which would be unusable in a baking recipe. It also helps to disperse the heat evenly.[3]
- You can use either a wooden or silicone spoon to stir the milk. Don't use anything with metal in it as that can react with the milk proteins.
-
4Remove the pan from the heat as soon as the milk starts to bubble. You will see small bubbles appear across the entire body of milk, but you don't want to let those little bubbles progress to a roiling boil (like you see when you boil water for pasta).[4]
- Make sure to place the pan onto a heat resistant surface. You can move it to another part of the stove, or put it onto a hot pad or trivet on the counter.
-
5Let the temperature cool down to about 105 °F (41 °C). Putting freshly scalded milk in with your other ingredients could kill off yeast or actually cook eggs, which would drastically change the outcome of your baked good. It will take 5-10 minutes for the milk to cool down sufficiently. Use that time to continue prepping the rest of the ingredients in your recipe.
- Use your candy thermometer to check the temperature of the milk. Just put it in the milk, making sure it doesn't touch the bottom or the sides, and wait about 15 seconds, or until the gauge stops moving.


Community Q&A
-
QuestionCan I use skim milk to make scalded milk?
 Community AnswerYes. It won't have the creaminess of whole milk, but it will scald just fine. Try adding a teaspoon of melter butter to a cup of skim milk to increase the fat content.
 -
QuestionWhat is the temperature of scalded milk? And what temperature does it need to cool off to?
 Community AnswerHeat up to 185-195F (or 85-90C). Cool down to about 105F (or about 40C). Letting it cool down appropriately is essential so the hot milk doesn't alter other ingredients.
 -
QuestionCan cashew milk be used to make scalded milk?
 Sarah BattilanaCommunity AnswerNo; cashew milk doesn't have the same proteins as milk from a cow, so the scalding process won't have the same effect.
Things You'll Need
Scalding in the Microwave
- Measuring cup
- Microwave safe bowl
- Wooden chopstick or bamboo skewer
- Wooden or silicone spoon
- Candy thermometer
- Oven mitts or hot pads
Using the Stovetop
- Heavy saucepan
- Measuring cup
- Candy thermometer
- Wooden or silicone spoon


References
About This Article

To scald milk, start by pouring it into a saucepan on the stove. Then, heat the milk over medium-low heat, which will prevent it from burning or sticking to the bottom of the pan. Keep stirring the milk for 4-5 minutes. When you notice steam and bubbles forming near the edge on the pan, take the milk off the stove. Let it cool for 5-10 minutes before using it in your recipe. To learn how to scald milk in the microwave, keep reading!