This article was co-authored by Grant Wallace and by wikiHow staff writer, Hunter Rising. Grant Wallace is a Landscaper and Owner of Grantlanta Lawn in Atlanta, Georgia. With over seven years of experience, he specializes in lawn maintenance and landscape installation. In 2012, he earned his BA from the University of West Georgia. Grant has been profiled in Shoutout Atlanta, Canvas Rebel, and Voyage ATL.
There are 12 references cited in this article, which can be found at the bottom of the page.
This article has been viewed 111,478 times.
Automatic lawn sprinklers make it easy to water your yard, but the timers stop working over time. Luckily, replacing a unit is easy to do as long as you have a few simple tools. When it’s time to replace your lawn sprinkler timer, all you need to do is remove the old one and connect the wires to the new one. Once they’re plugged in, you can reset the program so your lawn gets watered on schedule!
Steps
Removing the Old Controller
-
1Turn off power to the old controller. Sprinkler timers are either plugged into an outlet or hardwired into your home’s electrical system. If the system is plugged into an outlet, unplug it from the wall. If your timer is hardwired, turn off the circuit that controls the timer. Check that the display on the timer is off before continuing.[1]
- Never work on your sprinkler timer while it’s plugged in since you could get shocked.
Tip: Write down your sprinkler program times before disconnecting the power so they’re easier to remember when starting the new unit.
-
2Remove the access panel or faceplate on your timer. The access panel can usually be found near the bottom of your existing timer. Pop off the panel cover to remove it. If the timer doesn’t have an access panel that pops right off, you may need to use a screwdriver to remove the faceplate.[2]Advertisement
-
3Disconnect the power wires from your timer. The power wires are usually white, black, and green. Unscrew the wire caps connecting the wires if there are any and untwist the wires. Separate the wires from one another so you can pull the timer unit out without damaging the power wires that run to your sprinklers.[3]
- Some timer models may have the power wires in a different access panel along the wall.
-
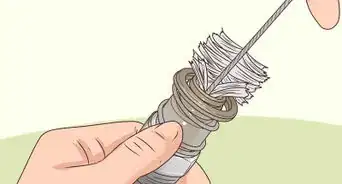
4Label the sprinkler wires with pieces of tape. Your sprinkler wires can be found plugged into a numbered section inside your timer. Wrap a small piece of masking tape around each of the sprinkler wires and label them with the number of the port they’re plugged into. That way, you’ll know what stations to plug your wires back into when you put in your new unit.[4]
- If you don’t have any tape or labels, many sprinkler wires are differently colored so you can tell which wires control an area.
-
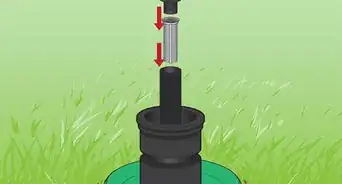
5Pull the sprinkler wires out of the timer. If your unit has the wire attached with screws, use a screwdriver to loosen the connection and pull the wire out. If your timer has tabs, press down on the tab with the end of your screwdriver to make it easier to remove the wire. Once they’re disconnected, pull out the wires from the bottom of your timer.[5]
-
6Unscrew the controller from the wall to remove it. Your timer should have mounting screws in the middle of the unit on the top and bottom. Use either a flathead or Philips screwdriver to loosen the top screw and to remove the bottom screw completely. Lift your unit up and off of the wall to remove it entirely.[6]
- Many times, you can use the top screw again to hang your new sprinkler unit but the bottom screw may not be in the same place.


Installing the New Timer
-
1Get a timer that has enough stations for the number of sprinklers you have. Make sure the timer unit that you purchase has the same number of stations as you need for your sprinklers. It’s okay if the unit has more stations that you need, but will not work if you have less.[7]
- Most units come with 6-12 stations built into the system.
-
2Mount the timer to the wall with screws. Hang the top of the timer on the mounting screw already attached to your wall. Tighten the screw inside the unit with a screwdriver so the timer is held securely to the wall. Find the mounting hole near the bottom of the timer and attach another screw there so the unit is sturdy on the wall.[8]
- If you’re mounting on drywall or concrete, use anchor screws to hold your timer securely.
- If the unit plugs directly into the wall, make sure the cord can reach the outlet.
Tip: Some newer models can be programmed over a wi-fi connection. Make sure your timer is within wi-fi range if your model connects to the Internet.
-
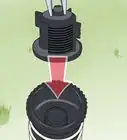
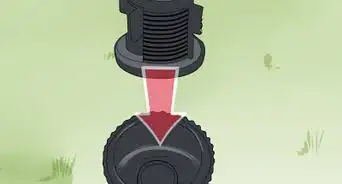
3Feed the station wires into your timer and plug them into the proper zones. Push the wires through the bottom opening of the new unit so they’re in the access panel. Put the wires into the stations that match their label. If the unit has screw connections, hold the wire underneath the head of the screw, and tighten the screw with a screwdriver until it holds the wire securely. If your timer has tab connections, press the tab down with a screwdriver and feed the wire into the port. Release the tab so it has a tight grip.[9]
- If you have a white wire, attach it to the port labeled “Common.”
-
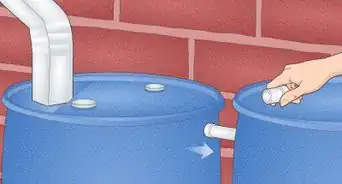
4Reconnect the power wires to the new timer. Locate the black, white, and green power wires in the unit and match them with the power wires that run out to your sprinklers. Twist the ends of the wires of matching colors together so the current can run between them. Cover the exposed ends of the wires by twisting wire caps on top of them.[10]
- If your wires are in an outdoor timer unit, make sure to use waterproof wire caps.
-
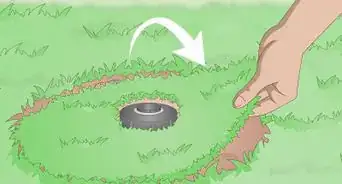
5Turn on the power and test the sprinklers to see if the timer works. Reconnect your sprinkler timer to power by plugging it in or turning on the circuit it’s connected to. The display on your timer may flash for a few seconds before turning on completely. Turn your controller to the manual setting to test each sprinkler connection. Make sure the sprinklers are all operating correctly.[11]
- If the sprinklers aren’t working, turn off the power again and check for loose wire connections inside the unit.
-
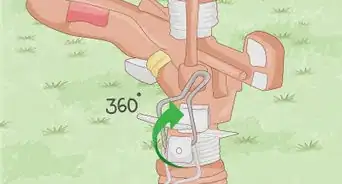
6Reprogram your sprinkler schedule on the new unit. Go into the settings of your timer and set the current time and date so your sprinklers will run at the correct times. Turn the dial to “Set Watering Start Times” or select it on your display and change the time when you want your sprinklers to turn on. Then set how long the sprinklers will run during that watering session. You can choose to let your sprinklers run every day or pick specific days of the week.[12]
- Follow the manufacturer’s instructions for your model to learn specific details on how to set the schedule.
- If your timer uses a wi-fi connection, you can set the program from your computer or mobile device.


Community Q&A
-
QuestionDo all sprinkler timers come with a 24-volt connection that goes to a contactor to start the irrigation pump?
 TC WilliamsCommunity AnswerMost all controllers have a pump control port, but in most cases that only sends a signal to a separate Pump Start Relay that matches to the specific pump in horsepower and voltage to actually start the pump running. In some controllers the 'Master Valve' port may double as a pump control.
 -
QuestionI bought a replacement Rainbird timer and it does not seem to put out enough current to open all my valves. Why is this?TC WilliamsCommunity AnswerThe controller only sends a 24-volt charge to the valve solenoid and usually only to one valve at a time in sequence. There is also a certain distance and correct size of wire to be used to carry the correct load. There may also be damage to the wire, exposing it to short out, incorrect wire connections and\or a bad controller to valve ground\common connection.
-
QuestionMy timer for the time of day works and manually the sprinker heads come up, but not on the time and day I have chosen. What do I do?TC WilliamsCommunity AnswerMake sure the correct day, month and time is programmed first to keep the controller accurate from day to day. Check to see if there are multiple start times for valves as there only needs to be one start time for whole series of valves and check other programs (A,B,C) do not have start times and days programmed as well.
Warnings
- Never try to replace the sprinkler timer while it’s still connected to power or else you could get electrocuted.⧼thumbs_response⧽
Things You’ll Need
- Screwdriver
- Masking tape
- Pen
- Screws
- Wire caps


Expert Interview
Thanks for reading our article! If you'd like to learn more about setting up a lawn sprinkler, check out our in-depth interview with Grant Wallace.
References
- ↑ https://youtu.be/3CxqAtr_Ff0?t=73
- ↑ https://youtu.be/OYt6iHEjNow?t=24
- ↑ https://youtu.be/3CxqAtr_Ff0?t=95
- ↑ https://youtu.be/OYt6iHEjNow?t=58
- ↑ https://youtu.be/3CxqAtr_Ff0?t=112
- ↑ https://youtu.be/3CxqAtr_Ff0?t=119
- ↑ https://youtu.be/3CxqAtr_Ff0?t=33
- ↑ https://youtu.be/OtX-5Gd6514?t=69
- ↑ https://youtu.be/OtX-5Gd6514?t=119
About This Article

It’s normal for older lawn sprinkler timers to stop working, but luckily, they’re fairly simple to replace with just a few simple tools. First, turn off power to the old controller so you don’t risk shocking yourself. Then, pop the cover off the access panel and disconnect the power wires from the old timer using a screwdriver. These wires are usually white, black, and green. Put tape on the sprinkler wires so you can keep track of them, then pull them out of the timer. After you've removed it, take the old timer from your wall and mount the new timer in place with screws. Then, feed the station wires into your timer and plug them into the proper zones. Once you’ve done this, you can reconnect the power wires and turn the power back on to test the sprinklers. For advice on reprogramming your sprinkler schedule, read on.