This article was co-authored by wikiHow Staff. Our trained team of editors and researchers validate articles for accuracy and comprehensiveness. wikiHow's Content Management Team carefully monitors the work from our editorial staff to ensure that each article is backed by trusted research and meets our high quality standards.
This article has been viewed 315,218 times.
Learn more...
Rain Bird sprinklers are a common brand of outdoor sprinklers that you can use on your lawn or in your garden. These sprinklers can be adjusted in several different ways to control the distance and amount of water that is distributed. You can change the watering direction and distance on the sprinklers. You can also adjust the spray pattern to direct how the water sprinkles onto your lawn. Over time, you may also need to change the sprinkler nozzle so the sprinkler functions properly.
Steps
Changing the Watering Direction and Distance
-
1Set the fixed left edge on the sprinkler head. Before you adjust the watering direction or distance, you will need to set the starting point for the water rotation. Find the center cap on the rotor case. Move it all the way to the right until it stops and you can no longer turn it. Then, move it to the left until it stops. Rotate the entire rotor case to line up the left edge in the correct position.[1]
- Do not rotate the rotor case past the left edge, as this can damage the case.
- The instructions to set the fix left edge will work for the Rain Bird 2SA, 42SA, 42SA+, 52SA Series.
-
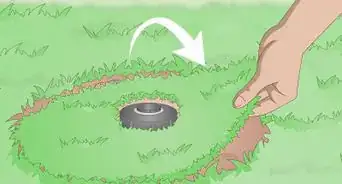
2Move the sprinkler head by hand to adjust the watering direction. Grip the spray head between two fingers. Then, rotate it by hand so it is aimed at the direction you want the water to spray.[2]
- For example, if you want the water to spray towards the right, rotate the head to the right. If you want the water to spray more to the left, rotate the head to the left.
Advertisement -
3Adjust the spray distance using a flat-bladed screwdriver. You can have the water on or off when you adjust the spray distance, though it may be easier with the water off. Take a flat-bladed screwdriver and place it on the center screw on the head. Then, turn the screw clockwise to decrease the spray distance up to 25 percent.[3]
- Be careful not to turn the screw so far that it goes into the head. It should sit just in front of the nozzle so the head is secure.
- The spray distance on Rain Bird models is 19 to 32 feet (5.8 to 9.8 m). If you want the distance to be any higher or shorter, you will need to change the rotor nozzles or adjust the water pressure.


Adjusting the Spray Pattern
-
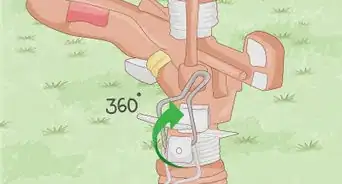
1Twist the collar to the left or right if you have an adjustable sprinkler head. If you have a Rain Bird sprinkler model that has an adjustable head (the 18/15/12 AP series), you can use your fingers to twist the collar. It can be adjusted from 0-360 degrees. To increase the spray pattern, move the threaded collar to the left. To decrease the spray pattern, move the threaded collar to the right.[4]
- Adjust the spray pattern while the sprinkler is on so you can determine how much of an increase or decrease you want.
- Adjusting the spray pattern is useful if you want to water a certain area of your lawn or spray only to a certain point in your yard.
-
2Find the adjustable tab if you have the Rain Bird 2SA, 42SA, 42SA+, or 52SA Series. These models have an adjustable tab for the spray pattern on the top of the head. The tab will have a plus and minus symbol.[5]
- There will also be a screw in the center of the plus and minus symbol.
-
3Adjust the arc adjustable tab with a screwdriver. Take a flat-headed screwdriver. Place it on the screw on the top of the head. Then, twist the screw towards the plus symbol, or clockwise, to increase the spray pattern. To decrease the spray pattern, twist the screw towards the minus symbol, or counterclockwise.[6]


Changing the Sprinkler Nozzle
-
1Shut off the sprinkler. Make sure the sprinkler is not hooked up to running water. This will make changing the sprinkler nozzle easier.[7]
- You may want to change the sprinkler nozzle if it stops working properly.
- You can also remove the nozzle and check the filter screen if the water dribbles or does not spray properly. You can then clean it or change it.
-
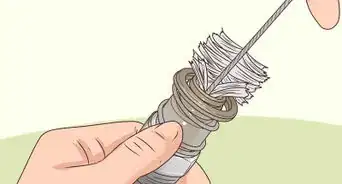
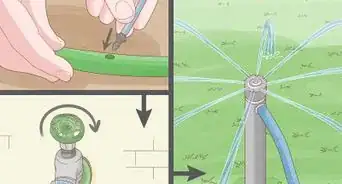
2Twist off the nozzle with pliers. Use pliers to grip the nozzle. Then, turn the nozzle to the left, or counterclockwise, to unscrew the nozzle from the sprinkler head.[8]
-
3Take out the filter screen below the nozzle. Look into the sprinkler head. You should see a small filter screen in the head, below where the nozzle sits. Use your fingers or small pliers to carefully remove the filter screen.[9]
-
4Clean or replace the filter screen, depending on its condition. Look for any dirt, debris, or buildup on the filter screen. You may opt to rinse off the debris with water to clean the filter screen and reuse it if it is still in good condition.[10]
- If the filter screen is old or in rough shape, replace it with a new one.
- You can buy filter screens for the Rain Bird sprinkler at your local hardware store or online. You can use a standard sprinkler filter screen for all Rain Bird sprinkler models.
-
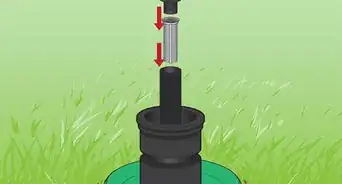
5Place the filter screen in the sprinkler head. Once you have cleaned or replaced the filter screen, put it in the sprinkler head.[11]
-
6Put the new nozzle on. Use pliers to place the new nozzle on the sprinkler head. Then, turn it to the right, or clockwise, until it is secure.[12]
- You can buy a new nozzle online or at your local hardware store. Look for the Rain Bird nozzle that matches the Rain Bird sprinkler model you own.


Things You'll Need
- A flat-bladed screwdriver
- A filter screen
- A new sprinkler nozzle


References
- ↑ http://www.rainbird.com/homeowner/support/rotoradjustment.htm
- ↑ https://www.rainbird.com/documents/diy/man_sprayheads.pdf
- ↑ https://www.rainbird.com/documents/diy/man_sprayheads.pdf
- ↑ https://www.rainbird.com/documents/diy/man_sprayheads.pdf
- ↑ http://www.rainbird.com/homeowner/support/video-RotorArcAdjust.htm
- ↑ https://www.rainbird.com/documents/diy/man_sprayheads.pdf
- ↑ https://www.rainbird.com/documents/diy/man_sprayheads.pdf
- ↑ https://www.rainbird.com/documents/diy/man_sprayheads.pdf
- ↑ https://www.rainbird.com/documents/diy/man_sprayheads.pdf
About This Article

To adjust your Rainbird sprinklers, twist the spray head to the right or left if you want to change the water's direction. To reduce the spray distance, use a flat-bladed screwdriver to turn the screw on the nozzle clockwise. If it's the spraying pattern you want to change, rotate the collar left or right if your model has an adjustable head. Alternatively, look for a tab on the head of your sprinkler marked with a plus or minus sign to make the change. For tips on how to change the sprinkler nozzle, keep reading!