This article was co-authored by wikiHow staff writer, Eric McClure. Eric McClure is an editing fellow at wikiHow where he has been editing, researching, and creating content since 2019. A former educator and poet, his work has appeared in Carcinogenic Poetry, Shot Glass Journal, Prairie Margins, and The Rusty Nail. His digital chapbook, The Internet, was also published in TL;DR Magazine. He was the winner of the Paul Carroll award for outstanding achievement in creative writing in 2014, and he was a featured reader at the Poetry Foundation’s Open Door Reading Series in 2015. Eric holds a BA in English from the University of Illinois at Chicago, and an MEd in secondary education from DePaul University.
There are 12 references cited in this article, which can be found at the bottom of the page.
This article has been viewed 22,586 times.
Learn more...
Anodization is the process of electrically charging a metal to change its color and create a protective coating. This is commonly done with small aluminum, steel, and titanium objects to keep them from bending or breaking over time. You can find anodized metal on computer parts, toys, screws, brackets, and smaller vehicle components. Due to the fact that anodization protects metal and makes it stronger, the only good reason to remove an anodized layer is to change the way it looks.
Steps
Setting Up
-
1Remove the anodization if you like the look of unfinished metal. Anodized metals are stronger and more resilient than their unfinished counterparts. Stripping anodization requires the use of a caustic chemical and it will undoubtedly weaken the metal surface. With this in mind, the only reason to strip anodization is if you like the look of bare metal. Unless you love the way bare metal looks, there’s no real reason to do this.[1]
- If you’re stripping the anodization on a screw, bearing, nut, or computer part, recognize that there’s probably a reason the part was anodized in the first place. Unless the object is purely ornamental, you’re probably better off leaving it the way it is.
-
2Put on some rubber gloves, a dust mask, and protective eyewear. You cannot remove anodization without using a caustic chemical, so get some thick rubber gloves to protect your hands. Put on a dust mask or respirator to protect your lungs. Wear some protective eyewear to protect your eyes from splashes and fumes.[2]
- Do this outside if you can. If you want to do this indoors, do it near an open window and turn a fan on.
Advertisement -
3Get a liquid rust remover or oven cleaner. Any cleaner that lists hydrochloric or sulfamic acid as an ingredient can be used to remove anodization. The two most common household cleaners that contain these ingredients are rust removers and oven cleaners. If you don’t have one of these at home, pick one up at your local cleaning supply store.[3]
Variation: You can use an aerosol version of these products if you prefer, but it may require multiple attempts to remove all of the anodization. Soaking the item in a liquid is much easier and it won’t take nearly as long to do.[4]
-
4Fill a bowl or cup with your cleaning agent. Get a large glass or plastic bowl that is bigger than the object you’re stripping. You can use a glass if your metal object is small enough to fit inside. Pour your oven cleaner or rust remover into the bowl or glass. Fill it with enough liquid to completely submerge your object.[5]
- if you’re using an aerosol cleaner, spray the bottom of the glass or bowl with a thin layer of your oven cleaner or rust remover.
-
5Disassemble your object or remove any pieces you want to keep clean. If your anodized object is attached to a larger item, like a screw in a computer, take it out. Remove any washers, rubber pieces, or fasteners that don’t need to be stripped. If the anodized object can be disassembled, like a small toy, take it apart the best that you can. The cleaner will not work its way into airtight surfaces and it may destroy non-metal objects, so remove non-anodized pieces or take your object apart if possible.[6]
- If you don’t need to disassemble anything, go ahead and skip this step.
- If your anodized surface is attached to another item and you cannot remove it, there’s no consistent way to strip the anodization without damaging the object that it’s attached to. You can try wiping the surface with a towel soaked in your cleaner, but you’re highly likely to damage the surface around the anodized metal.


Stripping Your Anodized Metal
-
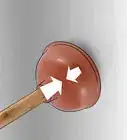
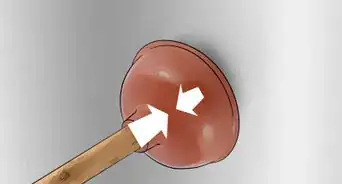
1Drop your anodized object gently into the bowl or cup. Hold your anodized item 1–3 inches (2.5–7.6 cm) above the surface of your bowl or cup. Gently lower the object and release it into the liquid. Move your hands away from the bowl or cup quickly to avoid any splashes from getting on to your skin.[7]
- If you’re using an aerosol stripping agent, hold the nozzle 6–8 inches (15–20 cm) away from the surface of the object and spray it until the object is completely covered in the cleaner.
-
2Let the object soak for 15-30 minutes to strip the anodization. The acid in the cleaner will automatically begin sizzling as it starts eating away the anodization. Leave the object in the liquid for at least 15 minutes. If the cleaner is clear, you will see the anodization changing the color of the liquid. This is normal, and it isn’t anything to worry about. [8]
- You don’t need to mix the stripping agent while your object is submerged. Simply let it be and wait for the anodization to disappear.
-
3Remove the object and set it out on a towel to check the color. With your rubber gloves on, reach into the cleaner and lift the object out. Set it down a clean towel and inspect the metal to see if the color is entirely gone. If the color is completely stripped, the metal is no longer anodized. If there’s still a shade of anodization on the object, drop it back into the cleaner and let it sit for another 15 minutes.[9]
Warning: You can use tongs or a spoon to scoop the object out if you really want to, but you’re actually more likely to spill some acid if you do this. This can actually be more dangerous than physically lifting the object out of the liquid. Your gloves will keep your fingers safe.
-
4Rinse the object thoroughly under a steady stream of water. Take your metal object to a nearby sink, or set it down on the sidewalk or grass and grab a hose. Rinse the metal thoroughly with water for 2-3 minutes. Turn the object around in your hands while you’re rinsing it to remove all of the cleaning agent. Let the metal air dry or wipe it clean with a dry towel.[10]
- Do not take your gloves off while doing this. Even water-diluted cleaners can still irritate your skin.
-
5Pour the excess cleaner out and wash your hands thoroughly. You can pour the oven cleaner or rust remover down the sink if you dilute it with water. Set the bowl or cup in your sink and turn the water on. Fill the bowl and cup with water and pour it down your sink. Keep the water running and rinse your gloves thoroughly under the water to remove the cleaner before taking them off. To finish, wash your hands, glove, and bowl with a dish soap and water.[11]
- If you want to neutralize the acid on your gloves before removing them, pour baking soda on to your gloves and rub the powder around in the rubber. Then, rinse the baking soda off before removing your gloves. This is really only necessary if you had a spill or splash, though.[12]


Warnings
- You can remove anodization by mixing lye into water and submerging your metal, but it’s much more dangerous than using an oven cleaner or rust remover. It also takes longer and it may damage your metal if you let it soak for too long. On top of that, if lye gets on your skin, it can cause a chemical burn. It is also a serious lung irritant and can blind you if it gets in your eyes. You’re better off sticking with an oven cleaner or rust remover[13]⧼thumbs_response⧽
- Never take your gloves, dust mask, and protective eyewear off while you’re performing this task.[14]⧼thumbs_response⧽
Things You’ll Need
- Rubber gloves
- Protective eyewear
- Dust mask or respirator
- Oven cleaner or rust remover
- Bowl or glass
- Water
References
- ↑ https://www.ncbi.nlm.nih.gov/pmc/articles/PMC3481963/
- ↑ https://youtu.be/SntTC97fcn0?t=39
- ↑ https://youtu.be/SntTC97fcn0?t=91
- ↑ https://gato-docs.its.txstate.edu/jcr:e15648ec-4e92-4f65-93fa-995bea5741dc/EasyOff%20Aerosol.pdf
- ↑ https://youtu.be/SntTC97fcn0?t=168
- ↑ https://youtu.be/SntTC97fcn0?t=147
- ↑ https://youtu.be/SntTC97fcn0?t=192
- ↑ https://youtu.be/SntTC97fcn0?t=325
- ↑ https://youtu.be/SntTC97fcn0?t=234
- ↑ https://youtu.be/YCZNbozXHbo?t=110
- ↑ https://tamut.edu/About/Administration/Environmental-Health-and-Safety/Information%20Folder/Chemical%20disposal.pdf
- ↑ https://tamut.edu/About/Administration/Environmental-Health-and-Safety/Information%20Folder/Chemical%20disposal.pdf
- ↑ https://youtu.be/eloW43EZdQw?t=56
- ↑ https://youtu.be/SntTC97fcn0?t=39
About This Article