This article was co-authored by Michael Noble, PhD and by wikiHow staff writer, Jennifer Mueller, JD. Michael Noble is a professional concert pianist who received his PhD in Piano Performance from the Yale School of Music. He is a previous contemporary music fellow of the Belgian American Educational Foundation and has performed at Carnegie Hall and at other venues across the United States, Europe, and Asia.
wikiHow marks an article as reader-approved once it receives enough positive feedback. This article received 16 testimonials and 84% of readers who voted found it helpful, earning it our reader-approved status.
This article has been viewed 580,909 times.
Proper finger position is crucial for learning piano, even when you're just starting out and playing simple songs or practicing scales. Start by sitting at the middle of the keyboard with good posture. Curve your fingers over the keys in a relaxed way, with your right thumb on middle C. If you train your hands and fingers early, you'll find it easier to progress to more complex pieces of music.[1]
Steps
Maintaining Proper Hand Position
-
1Sit on the edge of the piano bench. The piano bench should be far enough away from the piano to allow you to sit on the front edge with your feet flat on the floor. Ideally, your legs will extend out from the piano bench with your knees at right angles.[2]
- Your thighs shouldn't rest on the bench. If they are, you're seated too far back.
- Eventually you may be using the pedals, so your legs should be free to move forward enough to reach them. For now, rest your feet flat on the floor.
-
2Align your head and shoulders. Proper posture will give you greater ability to reach all the keys as you play and keep you from developing back problems later on. Roll your shoulders back so that your shoulder blades fall in line alongside your spine.[3]
- Relax your neck and look straight forward. Hunching over the keys will limit the mobility of your hands as you play.
Advertisement -
3Keep your elbows in front of you. If your arms are in the correct position, your elbows are in front of your body. Your elbows should be bent slightly, with the inner elbow creases facing upward toward the ceiling.[4]
- Move the piano bench back a little if your elbows are by your sides. On the other hand, if you find that you're reaching straight out without any bend in your elbows, move the piano bench closer to the piano.
- Avoid sticking your elbows out. This can cause wrist problems as you start playing more often. Your forearms should be perpendicular to the piano keyboard.
-
4Arch your fingers over the keys. You want to play the piano with the tips of your fingers. While your thumb should be straight, the rest of your fingers should curve loosely over the keys, as though you're holding a ball.[5]
- If necessary, you can practice the correct position by holding a tennis ball in your hand. The way your fingers curl around the ball is the way they should curve over the keys.
-
5Relax your arms and shoulders. Tensing your arms or shoulders can cause strain. You may want to shake out your arms a bit and do basic stretches for your arms and back to loosen up your muscles before you sit down to play.[6]
- As you play, check your posture periodically and release any tension in your arms or shoulders. After some time, a relaxed posture will become automatic.
-
6Let your arms follow your fingers. As you move your hands up and down the keyboard, keep your arms more or less perpendicular to your hands. This avoids twisting and excessive strain on your wrists.[7]
- Think about using the bigger muscles in your arms, and even in your back, to press the keys, rather than simply your fingers.
-
7Keep your fingernails trimmed short. If you plan to play piano frequently, long nails will get in the way of proper hand position. Long nails also click on the keys, which can ruin the song you're playing.[8]


Using Correct Fingering
-
1Number your fingers. All sheet music uses the same universal numbering for the fingers and thumb on each hand. If you memorize the number for each finger, you'll be able to read finger positioning notations.[9]
- The numbering starts with your thumb at number 1 and goes to your pinky finger at number 5.
- The left hand is a mirror image of the right hand, using the same numbers for the same fingers.
-
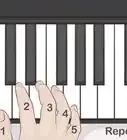
2Start at middle C. To play the piano, place finger 1 of your right hand on middle C. The other fingers of your right hand naturally fall on the white keys to the right of your thumb. This is the natural five-finger placement for the right hand.[10]
- Your left thumb is supposed to sit on middle C as well. However, if you're playing with both hands, you'll move your left hand over a key rather than trying to play middle C with both thumbs.
-
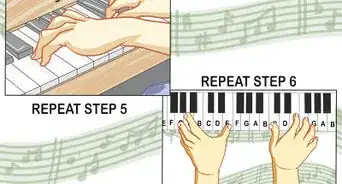
3Pass your thumb under your other fingers to move upward. You'll be using more than 5 keys when you play the piano. To move your hand upward, you want to cross your thumb under your other fingers to rest on the next key. Practice this movement with scales until it becomes habit.[11]
- Since you only use your pinky to start or end a scale, you're generally passing your thumb under your 3 middle fingers.
- To move your hand downward, pass your ring finger over your other fingers and place it to the left of your thumb.
-
4Play longer keys with your shorter fingers. If you look at the keyboard, you'll see longer white keys and shorter black keys. Your shortest fingers are your thumb and your pinky, and typically they will only play white keys.[12]
-
5Play the shorter keys with your longer fingers. If you're playing music with sharps or flats, you'll need to play the shorter black keys. Generally, you'll use your index, middle, and ring fingers to play these keys.[13]
- As you're playing the shorter keys, you'll want to flatten your fingers out a little more so that you can reach them more easily. This way you don't have to keep moving your hands forward and back over the keys. Instead, you can keep them in the same place they would be when you were playing the white keys.
-
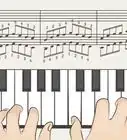
6Keep your left and right hand symmetrical. Your left and right hands are mirror images of each other, even if they're moving in different directions or playing different patterns. Try to arrange your fingering so that you're using the same fingers at the same time.[14]
- It will become easier to play more complex pieces of music if you can maintain this symmetry in your fingering. When your hands are in sync, the music will flow more naturally.

Practicing with Scales
-
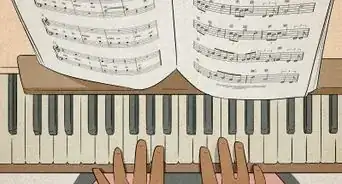
1Learn all the scales with proper fingering. Scales are one of the basic building blocks of music, and if you practice scales with proper fingering, your fingers will automatically know where to go when you see parts of a scale in a piece of music.[15]
- Keep in mind that fingers are not notes. For example, just because you start playing middle C with your right thumb doesn't mean your right thumb will always play middle C. There may be pieces of music where this is awkward or unnatural.
-
2Use your fifth finger only for starting or ending a scale. Generally, your pinky is weakest and will be the least used finger on your hand. As you play a scale, you'll pass your thumb under your middle fingers to slide your hand over and play the next notes, only playing the last note with your pinky.[16]
- Likewise, if you're playing a downward scale rather than an upward scale, you'll start with your pinky.
-
3Find the best fingering for arpeggios. Arpeggios, or broken chords, typically have standard fingerings. Depending on the notes in the chord, that standard fingering may not work for you. If it's more comfortable for you to use different fingers, do so – just make sure you're consistently using the same fingers every time and that the arpeggios sound even.[17]
- Practicing arpeggios is a good way to memorize basic chords up and down the keyboard.
-
4Adapt standard fingerings for your own hands. You may find fingering notations on sheet music, and this can be a good place to start when you're learning a new song. However, standard fingerings don't necessarily work for all hands.[18]
- For example, if you have small hands, you may find it's easier to pass your thumb under just your index and middle finger when you need to move your hand up.
- If you change the standard fingering, make sure you keep it consistent. If you switch up the fingering within the same piece, you won't develop muscle memory for that song and may find yourself making more errors.
-
5Write your fingerings on your sheet music. Especially when you're just starting to learn piano, writing down the number of the finger that will play each note enables you to progress more quickly.[19]
- After you've played for a while, writing down fingerings may start to feel like a waste of time. If it's not helping you anymore, don't do it. However, keep this practice in mind for extremely complex pieces.
Expert Q&A
Did you know you can get expert answers for this article?
Unlock expert answers by supporting wikiHow
-
QuestionWhich fingers go on which piano keys?
 Michael Noble, PhDMichael Noble is a professional concert pianist who received his PhD in Piano Performance from the Yale School of Music. He is a previous contemporary music fellow of the Belgian American Educational Foundation and has performed at Carnegie Hall and at other venues across the United States, Europe, and Asia.
Professional PianistThis depends on what piece or song you are playing. Generally, beginners start in C position, so place the five fingers of the left hand from C to G (pinky on C). Place the thumb of your right hand on a higher C and place the next four fingers on the next four white keys.
Support wikiHow by unlocking this expert answer.
-
QuestionHow many hand positions are there for piano?Michael Noble, PhDMichael Noble is a professional concert pianist who received his PhD in Piano Performance from the Yale School of Music. He is a previous contemporary music fellow of the Belgian American Educational Foundation and has performed at Carnegie Hall and at other venues across the United States, Europe, and Asia.
Professional PianistThere are countless hand positions. As a beginner, you would start in C position.Support wikiHow by unlocking this expert answer.
-
QuestionWhat is the proper piano technique?Michael Noble, PhDMichael Noble is a professional concert pianist who received his PhD in Piano Performance from the Yale School of Music. He is a previous contemporary music fellow of the Belgian American Educational Foundation and has performed at Carnegie Hall and at other venues across the United States, Europe, and Asia.
Professional PianistGenerally, the proper technique is to use curved fingers, no tensions, and quick facility.Support wikiHow by unlocking this expert answer.


-Step-17-Version-4.webp)


References
- ↑ https://yourmusiclessons.com/blog/the-five-finger-position/
- ↑ https://www.hoffmanacademy.com/blog/top-ten-tips-for-good-piano-posture/
- ↑ https://www.hoffmanacademy.com/blog/top-ten-tips-for-good-piano-posture/
- ↑ https://www.hoffmanacademy.com/blog/top-ten-tips-for-good-piano-posture/
- ↑ http://www.dummies.com/art-center/music/piano/perfect-piano-playing-hand-posture/
- ↑ https://www.hoffmanacademy.com/blog/top-ten-tips-for-good-piano-posture/
- ↑ http://www.keytarhq.com/piano-fingering.html
- ↑ http://www.dummies.com/art-center/music/piano/perfect-piano-playing-hand-posture/
- ↑ http://www.dummies.com/art-center/music/piano/perfect-piano-playing-hand-posture/
- ↑ http://www.keytarhq.com/piano-fingering.html
- ↑ http://www.keytarhq.com/piano-fingering.html
- ↑ http://www.keytarhq.com/piano-fingering.html
- ↑ http://www.keytarhq.com/piano-fingering.html
- ↑ https://www.key-notes.com/blog/piano-fingering
- ↑ https://www.key-notes.com/blog/piano-fingering
- ↑ http://www.keytarhq.com/piano-fingering.html
- ↑ https://www.key-notes.com/blog/piano-fingering
- ↑ https://www.key-notes.com/blog/piano-fingering
- ↑ https://www.key-notes.com/blog/piano-fingering
About This Article

To place your fingers properly on piano keys, find the Middle C, which is a white key in the middle of the keyboard, just to the left of two black keys. Put your right thumb on the middle C and let the rest of your fingers fall naturally on the white keys to the right of them. Your left thumb usually starts in the same place, but move it one key to the left if you are playing with two hands. Make sure you are playing with the tips of your fingers by arching your fingers as if you were holding a ball. Use good posture to relax and move more fluidly. To learn more from our Concert Pianist co-author, like how to practice your scales once your fingers are in the right position, keep reading the article!


-Step-17-Version-4.webp)


