This article was co-authored by Virginia Kelley, MA, a trusted member of wikiHow's volunteer community. Virginia Kelley is an artist and art teacher from New York with over 30 years of experience. She has both a Bachelor's and a Master's degree in Art Education from SUNY-Buffalo State and has taught art at the K-12 and college levels. For the last 20 years, she has focused her work and teaching on watercolor.
This article has been viewed 23,860 times.
Learn more...
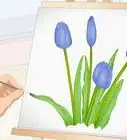
The Geranium is also called Crane’s Bill, because the seed capsule resembles the beak of a crane. This hardy flower comes in white, pink and reds ranging from orange red to deep red, with stark Christmas or primary red in between. It became popular in America around two hundred years ago. It can be found in hanging baskets and window boxes and is loved for its fat red blossoms surrounded by bright green leaves. Artists Matisse, Van Gogh and Winslow Homer immortalized the geranium in paintings. The geranium lends itself to many styles of interpretation and all are easy and fun to do.
Steps
Preparing to Paint
-
1Get a live geranium or two to study up close. Bring the small potted flowers indoors and set them in view on your work table. Really look at them, from all angle, and in different types of light. They are comprised of two extreme elements; fat balls of flowers and round leaves connected by thin stems which go off in all directions, sometimes crossing each other. The lines made by these stems give a humorous aspect to the plant in that they shoot off at will, paying no mind to what an elegant, upstanding, well behaved flower ought to do.
-
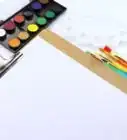
2Use 11" X 14" sheets of watercolor paper. Unless instructed otherwise, leave the pages connected to the pad and the cardboard back will act as a support board for your work.Advertisement
-
3Gather an array of watercolor brushes, #8 - #12 pointed, a ½” flat, a liner, and a white squirrel wash brush.
-
4Set out a full palette of primary and secondary tube watercolor paints. Keep the colors at the edges of your palette to allow room for mixing in the middle.
-
5Get a water vessel. You’ll also need an aluminum disposable pan or plastic storage box. This should be large enough to fill half way with water to soak your paper for wet-into-wet painting. Assemble paper towels or an old terry towel, and tissues to soak up runs. Sharpen your #2 yellow pencil and put an eraser cap on it. Get, also, a pink eraser.
Trying Different Subjects and Techniques
-
1Do an abstract painting. Doing an abstract painting is fun. You might title this work, “Geraniums in my Sleep.” In it, you will be responding to the colors you see before you, eliminating all details. If you look at your subject and squint, what do you see? Bright red balls on spindly stems, grounded by green, round leaves. Remove paper from the pad. Immerse your watercolor paper in clear, cold water for a few minutes to thoroughly saturate it. Pull it out of the water, give it a shake and set it on towels to begin to dry.
- Avoid dabbing or helping it dry, just let the air do its job. When the surface of the paper starts to go dull, it’s time to paint. Note you will paint directly, no preliminary drawing.
- Charge a large brush with barely diluted pasty paint. Add only a small amount of water to make the paint the consistency of toothpaste. The water is already on the paper. Pretend you are communicating only the most elemental aspects of this flower. Purposely try to make shapes that are telling, but without details. The paint will fuzz out from where you put it.
- Wait a little longer to start painting if your colors dissipate too much. Think of your work as a jig-saw puzzle and work in general shapes and areas. Fill in missing areas between your initial spots of color with other random colors. Quit sooner than later and allow to air dry. It will not only glow, it will have energy and may or may not resemble the geranium. It will say things about the subject in a primal way.
-
2Try doing a painting called, “Summery Geraniums.” Painting on saturated paper much like painting on super-soaked paper. Follow the same procedure as for the abstract work, remove the paper and put it to soak, only allow the paper to dry much longer before painting on it. The paint you apply will stay where you put it. Since it won’t move and fuzz as much you can put in much more detail. You will also do a preliminary drawing to guide your strokes.
- In this piece, you will be attempting to paint what you see before you, trying to capture its shape and details. Go slower and think about where you are putting the colors. Again, use rich colors, barely diluted because there is so much water in the paper. Thinner paints will dissipate and details will be lost.
-
3Try the simple “Geraniums in Distressed Pots.” It employs a resist technique using wax crayons. Sketch a row of geraniums in terracotta pots. Give the pots some texture using wax crayons. Press hard to get a lot of wax on the pots and don’t over think it. Just scribble. The pots will be a featured element of the painting because you are giving them this interesting texture.
- Using a loaded brush, wet the paper with water. Wait a minute or two before you begin to paint. Paint the red circles for the blossoms while the paper is still quite wet to give them the opportunity to fuzz and spread. Immediately, accent the wet blossoms with spots of orange. Move to the leaves and paint them green. Do the pots in a red-brown color to resemble the most basic of garden pots. The wax will cause the paint to separate and resist the color.
-
4Put the viewer's focus away from the flowers. In “Leaves and Buds Predominant,” the geranium’s leaves and the buds are the primary elements. Sketch out the row of flowers at the top third of the page and leaves in the bottom third. Join the two with stems going in various directions, even overlapping. As you paint, think of how to vary the greens of the leaves and the reds of the flowers. Work spots of even paler body color behind the row of geraniums and when dry, those pale spots will give depth by suggesting flowers in the background. Spend some time on the buds and make them very visible hanging off and below the blossoms.
-
5Play with focus in “Flowers and Leaves In and Out of Focus”. This shows how depth can be achieved by keeping some parts of the painting in sharp focus and allowing other parts to be vague. This technique is used on both the blossoms and the leaves. The colors are also fainter and many of the edges are blurred into the background creating what is called “lost edges.” Texture is used on the leaves for interest and the centers of the flowers are carefully painted and accented in black. Tackle a wet-into-wet and wet on dry paper.
-
6Keep it “Childish and Simple.” This is wet color applied to wet paper in places and wet color applied to dry paper in places. Begin with a light sketch in pencil on your paper, indicating the main ball shapes, stems and circles for leaves. You can see by the amount of blurring which areas were painted on wet paper.
-
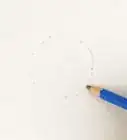
7Let a wet water spot create a flower. This technique is fun and easy. On your paper, sketch a number of abstract circles for geranium blossoms. Keep the paper flat and dry, but generously wet the circles. Add enough water for it to rise above the paper's surface. Let it soak a minute or two. Drop in color from the tip of your brush and let them merge at will. Leave them completely alone to dry naturally. This will take some time, but resist the urge to help things along. The paint will be pulled to become outlines for the flower shapes. Now is the time to paint, by clarifying the flower's mass into separate, little blossoms with a small, pointed brush. Paint the stems, leaves as you wish, using the wet-into-dry method, or a combination of that and wet-into-wet. However you do it, it is sure to shine and show off the geranium in a lovely way.
-
8Try showing many views of the same geranium. “Many Views, One Geranium” on one page allows you to try various colors for the flowers, and other


About This Article