This article was co-authored by wikiHow staff writer, Jessica Gibson. Jessica Gibson is a Writer and Editor who's been with wikiHow since 2014. After completing a year of art studies at the Emily Carr University in Vancouver, she graduated from Columbia College with a BA in History. Jessica also completed an MA in History from The University of Oregon in 2013.
There are 10 references cited in this article, which can be found at the bottom of the page.
The wikiHow Video Team also followed the article's instructions and verified that they work.
This article has been viewed 68,019 times.
Learn more...
There's something a little nerve-racking about trying to paint a perfect circle, especially if you're attempting to do it freehand. Fortunately, you can make your job a little easier by using a stencil or drawing a faint guideline with pencil before you paint. Whether you're making a bold accent circle on the wall or adding polka dots to a project, you'll get the hang of it in no time!
Steps
Painting Over a Stencil
-
1Paint your surface and let it dry before you work on the circle. Whether you're painting an accent circle on the wall or painting on a canvas, start with a base color that's dry. If you have to paint a basecoat on a wall, give it at least 4 hours to dry completely before you paint circles onto it. This way, your circle will have clear, defined edges.[1]
- If you want your circle to have a blurred effect, don't let the base dry before you paint the circle. If you're making a watercolor painting, overlap a few circles to give the painting depth, for instance.
-
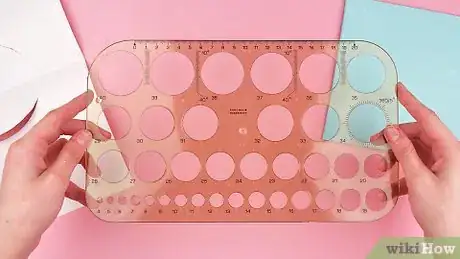
2Buy a sturdy circular stencil in any size. A stencil is a lifesaver when you're painting exact shapes like circles. Check the paint aisle at your local hardware store for pre-made stencils. These are made of plastic or vinyl material that you can re-use for tons of projects. If you want to paint circles in different sizes, buy a circle stencil set. This way, you can paint large accent circles down to tiny polka dots![2]
- If you're painting circles on a canvas, you might be able to find small circle stencils at a craft or art supply store.
Advertisement -
3Make your own stencil out of vinyl if you don't want to buy one. If you don't have time to run to the store, get out a piece of stencil vinyl or sturdy cardboard and find something circular that's the size you want to paint your circle. Put the item on the vinyl and trace around the circle. Then, put the vinyl on a cutting mat and cut out the circle with a craft knife. Be really careful since a craft knife blade is super sharp![3]
- Try using a plate for a medium-sized circle or a cup to make a small circle.
- In a pinch, you can hold a plate or cup against your surface and trace around it with a pencil. This makes a circular guideline that's easy to paint in. Ask a friend to help if you're having trouble holding the object and tracing at the same time.
-
4Tape the sides of the stencil onto your canvas or wall. Decide where you want to paint the circle. Hold your stencil in place so it's flat and position the center right where the center of the circle will be. Then, tear off painter's or masking tape and stick down each side of your stencil to keep it from sliding around while you paint.[4]
- If you're painting circles on a wall, tape up the stencil. Then, step back and decide if you're happy with the placement before you paint.
- It's a good idea to tape down the stencil even if you're painting a small circle since it's easy to accidentally slide the stencil when you're holding it by hand.
-
5Paint in your stencil with a paintbrush or paint roller. Pour your paint into a tray or squeeze it onto your palette. Then, dip a 1 1⁄2 in (3.8 cm) angled paintbrush, foam paintbrush, or paint roller into the paint. Start painting from the outer edge of the stencil towards the middle of the circle. Then, paint across the center of the stencil to completely fill in your circle.[5]
- To get a sharp, crisp edge, work from the edge towards the middle. This trick keeps paint from seeping underneath the edges of the stencil!
- Switch to a smaller paintbrush or a little foam roller if you're painting a tiny circle or polka dots.
- A paint roller is a great choice for painting a large circle on your wall since it covers a big area quickly.
-
6Pull off the stencil and let your paint circle dry. When you're ready to reveal your beautiful circle, carefully pull away 1 of the taped sides of the stencil. Move the stencil away from you so you don't accidentally drop it or drag it through your wet circle. Then, let it dry![6]
- To use your stencil again, just tape it down on your wall or canvas. When you're all done painting as many circles as you like, wash off the stencil with warm soapy water. Now it's ready for your next project!
Painting inside a Pencil Outline
-
1Clean the wall or start with a dry canvas. If you're adding a circle to a painting, let your canvas dry before you sketch the circle. To make a feature circle on a wall, paint a basecoat and let it dry or clean the wall before you start.[7]
- Lightly scrub the wall with soapy water if you're not painting a basecoat. This is really important if the wall is dusty or has grease stains!
-
2Cut a piece of string that's half the size of the circle you want to paint. Measure the size of the circle and figure out half of that size. Then, cut a piece of string that's a little longer than this size so when you pull the string taut and draw a loop, the circle will be the size you want.[8]
- For example, if you want a circle with a 2 ft (0.61 m) diameter, cut the string about 1 foot (0.30 m) long.
-
3Tie a loop at the end of the string and slide a pencil through it. Make a simple loop at 1 end and slide a sharpened pencil through it. Pull the string to tighten it around the pencil so it doesn't slide out.[9]
- If you're having trouble keeping the pencil tied to the string, tape the sides of the pencil to the string loop.
-
4Tape the other end of the string to your wall or canvas. Tear off a piece of masking tape or painter's tape and stick it onto the end of the string that doesn't have the pencil. Then, push it onto the wall or canvas where you want the center of your painted circle.[10]
- If you're painting the circle on the wall and want the string to be securely attached, stick a pushpin through the string into the wall instead of taping it down.
-
5Pull the string taut and draw a light circle with the pencil. Bring the pencil away from the center of your circle until the string is taut. Then, put the point of the pencil onto your wall or canvas and slowly swing it around to make a smooth circle. Try to draw the circle in a steady, even movement so you get a smooth shape.[11]
- Don't worry if you accidentally bump the pencil or make a mistake! Just erase it and try again.
-
6Take away the string and paint the inside border of the circle. Unpeel the tape to remove the string. Then, dip a small angled paintbrush into your paint. Instead of putting the paintbrush right on the outline, set it a few centimeters inside the circle so when you press down, the bristles just touch the outline. Slowly paint along the inside edge of your circle guideline to get a crisp edge.[12]
- Don't worry if you accidentally paint beyond the pencil guideline. Just wipe off the excess paint or drips with a damp cloth and try again!
- If you want to use a paint roller, start with a brush first. Paint the outline so you have more control and then move onto the paint roller.
-
7Use a brush or paint roller to fill in the circle and let it dry. You can keep painting with the same paintbrush or dip a paint roller into a paint tray. Work from the painted edge in towards the center of the circle until it's completely filled in. Then, leave the circle alone until it's totally dry and enjoy your handiwork![13]
- A roller is a great choice for painting a large circle or painting the circle on a wall since it gives you smooth coverage.
Community Q&A
-
QuestionIs there a circle diameter to which this method is restricted? Does it work for oils?
 ZackTop AnswererThis method is only restricted by your own physical limitations, such as how large of a space in which you have available to work. This method should work with oil paint as well.
Things You'll Need
Painting Over a Stencil
- String
- Tape or a pushpin
- Scissors
- Pencil
- Paint
- Paintbrush or roller
Painting inside a Pencil Outline
- Circular stencil
- Painter's tape
- Paint
- Paintbrush or roller
- Plates or cups, optional
- Stencil vinyl, optional
- Craft knife, optional
References
- ↑ https://www.sherwin-williams.com/homeowners/how-to/painting/decorative-techniques/polka-dots-swiss-dots
- ↑ https://youtu.be/-eUun55hadU?t=67
- ↑ https://suncatcherstudio.com/stencils/how-to-make-stencils/
- ↑ https://diyprojects.com/stencil-wall/
- ↑ https://youtu.be/Ntvh9tQ2XUg?t=42
- ↑ https://www.sherwin-williams.com/homeowners/how-to/painting/decorative-techniques/polka-dots-swiss-dots
- ↑ https://diyprojects.com/stencil-wall/
- ↑ https://youtu.be/Pto6vpz5ThU?t=28
- ↑ https://msms.sd33.bc.ca/sites/msms.sd33.bc.ca/files/2020-01/8.1-Text.pdf

