This article was co-authored by California Science Center and by wikiHow staff writer, Megaera Lorenz, PhD. The California Science Center presents science learning for all ages through interactive exhibits, live demonstrations and exciting giant screen films. Its integrated approach includes an elementary school and education resource center, all in one location. In 2020, the Science Center's Virtual Hands-On Science Astroland and Adventureland Camp was run in partnership with wikiHow.
This article has been viewed 29,094 times.
Have you ever sped around a track in a go-kart? What if you could make your own tiny electric go-kart and send imaginary riders on a wild race? With a few simple parts, like a button battery, a small motor, and the head of a toothbrush, you can do just that! Once you’ve built your electric racer, make a track for it out of popsicle sticks and see how fast it can go.
Steps
Building Your Car
-
1Stick the double-sided tape on the back of the brush head. Peel the paper backing off of one side of your double-sided tape. Stick it onto the back of the toothbrush head, opposite the bristles.
- Leave a little space behind the tape, where the narrow cut-off stem of the toothbrush starts. You’ll need this space for the spinner on your motor.
-
2Attach the motor to the double-sided tape. Peel the backing off of the top side of the double-sided tape. Push your motor onto it so that the spinner faces the back of the brush (where the handle used to be) and the wires face the front.
- Test the spinner on the back of the motor by turning it with your finger. Make sure it can move freely, since it will need to spin for your car to work!
Advertisement -
3Bend the red wire and stick it onto the tape. Take the red wire on the motor and bend it into a semi-circle. Push the metal tip of the wire onto the tape in front of the motor so it sticks.
- Don’t push the wire in so hard that it sticks deep in the tape. Otherwise, it might not be able to make good contact with the battery.
-
4Push the battery onto the tape on top of the red wire. Take your button battery and stick it on the piece of tape so that the “+” side faces up. Make sure the metal end of the wire is underneath the battery.
- Leave a gap between the battery and the front end of the motor.
-
5Touch the blue wire to the battery to test the motor. Take the metal end of the blue wire and touch it to the top of the battery. The spinner on the motor should start to spin and make your toothbrush vibrate!
- If the motor doesn’t start spinning, make sure the red wire is making good contact with the underside of the battery.
- You can also double check to make sure the spinner isn’t sticking to the tape.
Did you know? Vibrations, like the ones that make your car move, create energy. Scientists have been testing ways to capture energy from natural vibrations to create electrical currents![1]
Testing It Out
-
1Set the car down on a flat surface. Now it’s time to see how your car runs! Put it down on a flat, smooth surface, like a table or a hard floor. Make sure the bristles on the toothbrush are facing down.
- Your car may not move very well on a soft or bumpy surface, like a carpet or a blanket.
-
2Push the blue wire against the battery to make your car go. Touch the wire to the battery and see what happens. Does the wire stay in place when you let your car go? Does your car move around? Does it stay upright?
Think about it: When both wires are touching the battery, they create a circuit, which is a path for electrical energy to follow as it moves between the battery and the motor. Tiny particles, called electrons, move through the circuit and create an electric current.[2] What happens when your remove one of the wires from the circuit?
-
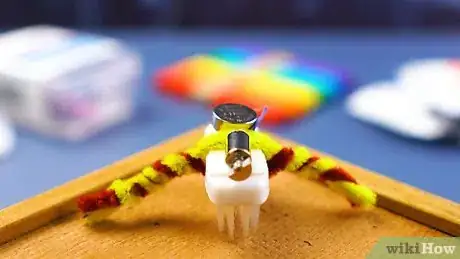
3Add pipe cleaners to help your car work better. Now that you’ve tested your car, think about ways you can improve its performance. Grab the pipe cleaners that came with your kit. Try fitting them into the space between the motor and the battery.
- Can you use them to help your car balance better? How?
- Can they help hold the blue wire in place?
- Keep testing the car until it works the way you want it to!
Designing a Track
-
1Make 2 guardrails using popsicle sticks and clay. Grab a popsicle stick and make 2 small balls of clay. Stick a piece of clay on the edge of the popsicle stick next to each end. Set it down so that it stands up on its side like a railing or fence, with the clay balls supporting it. Get another popsicle stick and do the same thing.
- If your rails don’t stand up, squish the bottoms of the clay balls a little bit to create a flat base.
-
2Set the rails side by side to create a path for your car. Put the 2 guardrails down next to each other so that they’re parallel (both facing the same way). Make sure there’s enough room in between them for your mini racecar to go through!
-
3Release your car at the entrance of the path and watch what happens. Turn on your racecar and put it at the start of the path you made with the popsicle stick guardrails. What does the car do? Does it follow the path?
- Does your car travel differently when it’s between the railings than it does when you let it run loose?
-
4Add more popsicle sticks to make a longer track. Build more guardrails and put them together to make a nice, long track for your race car. Get creative and make the track any shape you want!
- Try adding some turns to your track. What happens when your car comes to a turn?
- Use a stopwatch or a watch that shows seconds to time how long it takes your car to complete the track.
-
5Project Completed! Test out your new electric race car.
Things You’ll Need
-
Bristle Bot Kit
- Toothbrush head
- Double-sided tape
- Motor
- Button battery
- Pipe cleaners
- 30 popsicle sticks
- Model Magic clay
References
About This Article
To make your own electric race car, you'll need a Bristlebot kit, which comes with a toothbrush head, double-sided tape, a motor, a button battery, and pipe cleaners. You'll also need 30 popsicle sticks and model magic clay. Start by sticking the double-sided tape on the back of the toothbrush head. Then, attach the motor to the double-sided tape, and bend the red wire into a semi-circle and stick it to the tape. Press the battery down on top of the red wire, then touch the blue wire to the top of the battery to start the motor. Finally, place your race car on a flat surface and test it out! To learn how to design a track for your electric race car, keep reading!

