This article was co-authored by wikiHow Staff. Our trained team of editors and researchers validate articles for accuracy and comprehensiveness. wikiHow's Content Management Team carefully monitors the work from our editorial staff to ensure that each article is backed by trusted research and meets our high quality standards.
There are 9 references cited in this article, which can be found at the bottom of the page.
This article has been viewed 815,730 times.
Learn more...
A xylophone is a percussion instrument that consists of musical keys that a musician strikes with mallets. You can use wood or electrical metal tubing to make your own xylophone at home. If you measure the xylophone's materials and put it together carefully, a homemade xylophone can work just as well as storebought options. Once you pair your xylophone with a set of wooden mallets, your xylophone will be finished and ready to use in no time!
Steps
Making a Wooden Xylophone
-
1Choose a dense, hard wood to make your xylophone keys with. The dense and sturdier the wood is, the clearer your sound will be. Your xylophone will also be more resistant to scratches and dings if made from a hard piece of wood.[1]
- Rosewood is recommended as an ideal and traditional wood for xylophones. Cedar wood, cardinal wood and purple heartwood are also popular choices.[2]
-
2Cut your wood into 9 1.5 in (3.8 cm) wide strips. Put on safety goggles and ear protection, and use a table saw or another power tool to cut the wood into strips. Always keep your hands at least 6 in (15 cm) from the blade to prevent injury. In terms of length, your xylophone keys should match the following measurements.[3]
- 9.875 in (25.08 cm)
- 9.75 in (24.8 cm)
- 8.63 in (21.9 cm)
- 8.31 in (21.1 cm)
- 8.06 in (20.5 cm)
- 7.75 in (19.7 cm)
- 7.43 in (18.9 cm)
- 6.81 in (17.3 cm)
- 6.43 in (16.3 cm)
Advertisement -
3Mark where you will attach the keys to the xylophone box. You will need to attach the key about 1/5 of the way above or below one of the ends. Mark the spots where you will attach the keys with a piece of chalk, then mark the other side of the xylophone key at about 1/5 of the way from the end.[4]
- Repeat this process with all of your keys.
- To test the spot that you're planning to attach the key, hit it with a xylophone mallet while holding it with your fingers in that spot. If your key produces a clear sound, you've chosen a good spot.
-
4Mark a wide arc in between the 2 spots on the sides of the keys. Use a piece of chalk to draw a wide arc on 1 side of the xylophone key. You will be cutting the wood below this line with your power tool.[5]
- For a precise cut, measure and draw the line with a protractor.
-
5Cut along the arc with your power tool. Use the line you drew as a guide as you shape your keys. Again, make sure to keep your hands at least 6 in (15 cm) as you cut the wood.[6]
- Cutting an arc in the keys will help their sound resonate more clearly.
-
6Purchase plywood, pine, or hardwood for the xylophone box. Because the xylophone box does not need to resonate, you have more flexibility with what wood you use to make it with. If you choose plywood, look for 5- or 7-ply furniture grade plywood with a thin laminate to give your xylophone a strong finish.[7]
-
7Measure and cut the sides for your xylophone box. Cut the box wood into 5 pieces using a table saw or another power tool, using all necessary safety precautions. Measure the side pieces beforehand to make sure they meet the following sizes:[8]
- 4.63 in (11.8 cm) by 22.38 in (56.8 cm) (2)
- 4.63 in (11.8 cm) by 5.38 in (13.7 cm) (1)
- 4.63 in (11.8 cm) by 2.38 in (6.0 cm) (1)
- 22.38 in (56.8 cm) with 2.38 in (6.0 cm) and 5.38 in (13.7 cm) sides, forming a trapezoid (1)
-
8Glue the box together with wood glue. Before you glue your box, clamp the 4 top sides together and slide the bottom side beneath it. Make sure all 5 pieces fit together before gluing them. If they don't, make adjustments with your table saw or power tool until they fit neatly.[9]
- When you've finished cutting the wood, sand it down to smooth out rough edges.[10]
- If your box has too many gaps between the sides, it will interfere with your xylophone's resonation.
-
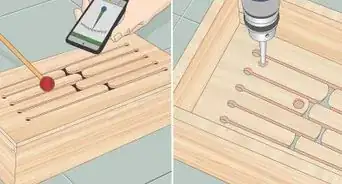
9Mark spots for nails along the top of the box. Make the places for your nails at 1.25 in (3.2 cm) apart on both sides of the box. On one side, start positioning the nails at 1.25 in (3.2 cm). On the other side, start positioning them at 2.5 in (6.4 cm) from the end.
- These will be where you place your xylophone keys.
-
10
-
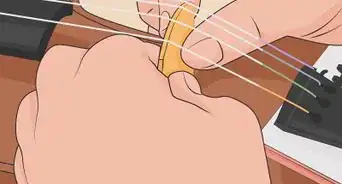
11Hitch rubber bands over the nails. Loop a rubber band over the first nail, twist it around the second, and then hook it in place on the third. Repeat this process on all of the xylophone nails until you have hooked and looped rubber bands along all of them.[12]
- The rubber bands will keep the xylophone keys from moving out of place.
-
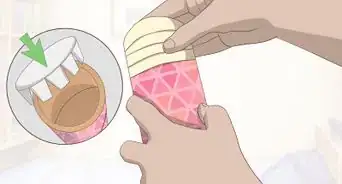
12Drill a hole into each xylophone key. Use the chalk marking you made earlier as a guide for where to drill the hole. Make the hole about the same diameter as the top of the nail so the xylophone key can slide into place.[13]
- If you want to stain or varnish the xylophone keys, do so after drilling the holes.
-
13Secure the xylophone keys into the box. The undrilled end should rest between 2 nails on one side, and the drilled end should rest over a nail on the opposite side. Test the xylophone's sound with a pair of mallets. If they give a clear, resonating sound, your xylophone is finished.


Making a Pipe Xylophone
-
1Purchase electrical metal tubing and a shelf board from a hardware store. Make sure the electrical metal tubing you buy is the standard 10 ft (3.0 m) size. This should make a xylophone of 13 pipes. For the instrument's base, buy a 3⁄4 in (1.9 cm) shelf board about 11 in × 23 in (28 cm × 58 cm).[14]
-
2Cut the pipes to precise measurements. The length of each pipe determines what sound it makes. Longer pipes make lower pitches, and shorter pipes make higher pitches. Use a hacksaw or a pipe cutter to divide the pipes into the following measurements, using all necessary safety precautions while handling the power tool:[15]
- Pipe 1: 11.25 in (28.6 cm)
- Pipe 2: 11 in (28 cm)
- Pipe 3: 10.4 in (26 cm)
- Pipe 4: 10.125 in (25.72 cm)
- Pipe 5: 9.6 in (24 cm)
- Pipe 6: 9.1 in (23 cm)
- Pipe 7: 8.75 in (22.2 cm)
- Pipe 8: 8.2 in (21 cm)
- Pipe 9: 7.8 in (20 cm)
- Pipe 10: 7.25 in (18.4 cm)
- Pipe 11: 7.1 in (18 cm)
- Pipe 12: 6.6 in (17 cm)
- Pipe 13: 6.2 in (16 cm)
-
3Use a metal file to grind the ends smooth. Pipe cutters or hacksaws can make the edges rough and dangerous to handle. File the edges of each pipe until they are flat. Check the edges with your finger when you're done filing to make sure they're no longer sharp.[16]
- Wear a sturdy pair of work gloves while handling the metal file to avoid injuring yourself.
-
4Cut strips of polyurethane foam into 28 blocks. Each block should be about 5⁄8 in × 1.25 in (1.6 cm × 3.2 cm). Measure your strips with a ruler and mark their approximate lengths on the foam before cutting them to make them precise.
- You can purchase polyurethane foam from most hardware or home improvement stores.
-
5Arrange the blocks on opposite ends the shelf board. The length should match the size of a corresponding tube in descending order. Space the blocks about 1 in (2.5 cm) apart, and adhere them to the board with wood glue.
- Let the wood glue dry before continuing to build your xylophone. On average wood glue takes about 6-8 hours to dry, but check its packaging for specific details.
-
6Place the tubes on top of each foam block. Use craft glue to secure the tubes in place. Wait for the glue to dry, which should take anywhere from 3-6 hours depending on the glue's instructions.
- Do not touch the tubes until the glue dries. If the tubes shift out of place, their sound may become muffled.
-
7Test your xylophone with a mallet. You should be able to play a variety of melodies using the 13 pipes on your xylophone. If your xylophone's sound seems dull or muted, you may need to adjust the pipe's lengths.
- If you want to precisely measure your xylophone's sound, use an instrument tuner.


Constructing Xylophone Mallets
-
1Purchase 2 2 in (5.1 cm) wooden balls and 2 12 in (30 cm) wooden dowels. These will form the mallet for your xylophone. You can purchase these materials online or from a hardware or craft store.[17]
-
2Drill a hole into one end of the wooden balls. The hole you drill should match the diameter of your wooden dowel. If your wooden dowel is too wide to comfortably fit into the hole after you've drilled it, pare its sides down with a sharp knife and sand the ends.[18]
- Wear a sturdy pair of work gloves while paring the dowels to protect yourself.
-
3Glue the dowels into the wooden balls. Coat the dowel end lightly in glue and fit it into the wooden ball's hole. Let the wood glue dry for 6-8 hours, depending on the instructions on the glue's packaging.
- Do not use the xylophone mallets until they've had time to completely dry.


Community Q&A
-
QuestionWhat kind of wood is the base of a xylophone?
 Community AnswerBirch, oak, or pine.
 -
QuestionHow do the keys vibrate if they're screwed down?
 Community AnswerThe holes of the nodes are slightly bigger than the nails or screws, so the keys will be able to resonate properly.
 -
QuestionHow does the xylophone change notes?Community AnswerThe larger the bar, the lower the note. This is because a larger bar/key creates a larger wavelength, creating a lower pitch.
Warnings
- Take safety precautions while handling pipe cutters, table saws, or other power tools. Always wear eye and ear protection to keep yourself safe.⧼thumbs_response⧽
Things You'll Need
Making a Wooden Xylophone
- Hard, dense wood (like rosewood, cedar wood, purple heartwood, or cardinal wood)
- Hardwood, pine or plywood
- Chalk
- Table saw or woodcutting power tool
- Wood glue
- Nails
- Drill
- Rubber bands
- Protractor
- Wood stain or varnish (optional)
Making a Pipe Xylophone
- 10 feet (3.0 m) electrical metal tubing
- 3⁄4 inch (1.9 cm) shelf board(11 by 23 inches (28 cm × 58 cm))
- Pipe cutter or hacksaw
- Metal file
- Polyurethane foam
- Craft glue
- Wood glue
- Work gloves
- Xylophone mallets
- Ruler
Constructing Xylophone Mallets
- 2 2 inches (5.1 cm) wooden balls
- 2 12 inches (30 cm) wooden dowels
- Wood glue
- Drill
- Paring knife
- Work gloves


References
- ↑ https://www.youtube.com/watch?v=yo-hYnumkxw&feature=youtu.be&t=14
- ↑ http://www.madehow.com/Volume-6/Xylophone.html
- ↑ https://makingmusicfun.net/htm/f_mmf_music_library/build-your-own-orff-xylophone-step-by-step-woodworking-plans.php
- ↑ https://www.youtube.com/watch?v=yo-hYnumkxw&feature=youtu.be&t=69
- ↑ https://www.youtube.com/watch?v=yo-hYnumkxw&feature=youtu.be&t=82
- ↑ https://www.youtube.com/watch?v=yo-hYnumkxw&feature=youtu.be&t=84
- ↑ https://makingmusicfun.net/htm/f_mmf_music_library/build-your-own-orff-xylophone-step-by-step-woodworking-plans.php
- ↑ https://makingmusicfun.net/htm/f_mmf_music_library/build-your-own-orff-xylophone-step-by-step-woodworking-plans.php
- ↑ https://makingmusicfun.net/htm/f_mmf_music_library/build-your-own-orff-xylophone-step-by-step-woodworking-plans.php
- ↑ https://ourpastimes.com/how-to-make-wooden-xylophones-12175780.html
- ↑ https://ourpastimes.com/how-to-make-wooden-xylophones-12175780.html
- ↑ https://ourpastimes.com/how-to-make-wooden-xylophones-12175780.html
- ↑ https://ourpastimes.com/how-to-make-wooden-xylophones-12175780.html
- ↑ https://www.motherearthnews.com/diy/homemade-xylophone-zmaz81ndzraw
- ↑ https://www.motherearthnews.com/diy/homemade-xylophone-zmaz81ndzraw
- ↑ http://lumberjocks.com/projects/75130
- ↑ https://ourpastimes.com/how-to-make-wooden-xylophones-12175780.html
- ↑ https://ourpastimes.com/how-to-make-wooden-xylophones-12175780.html
About This Article

To make a xylophone, start by choosing a dense, hard wood for the keys. Next, cut the wood into strips with arcs on the bottom side and mark where you’ll attach the keys to the xylophone box. To make the box, form a trapezoid with your wood and glue it together. Then, drive nails into the spots where the keys will go, and hook and loop rubber bands along all the nails to keep the keys from moving out of place. Once the base is ready, drill holes in the keys and set them between the nails. To learn how to make a xylophone mallet, keep reading!