This article was co-authored by Connie Tao. Connie Tao is a Bridal Designer and the Founder of Connie Tao Designs in Pasadena, California. Connie has over 12 years of experience and specializes in creating handmade custom wedding dresses and evening gowns. She and her team also do alterations and redesigns to existing garments. Connie received her Bachelors Degree in Fashion Design from Otis College of Art and Design.
wikiHow marks an article as reader-approved once it receives enough positive feedback. In this case, 100% of readers who voted found the article helpful, earning it our reader-approved status.
This article has been viewed 574,538 times.
Whether you're an aspiring ballet dancer or just want to pretend to be one for Halloween, this article will show you how to make your own voluminous tutu from tulle.
Steps
Making a No-Sew Tutu
-
1Get your tulle. Being so sheer, a lot of tulle is necessary to create a wearable tutu. For a small tutu skirt (child size) use between 2–4 yards (1.8–3.7 m) of fabric. For a medium tutu, you will need between 5–7 yards (4.6–6.4 m) of tulle. A large tutu can be made using 8–10 yards (7.3–9.1 m) of tulle.
-
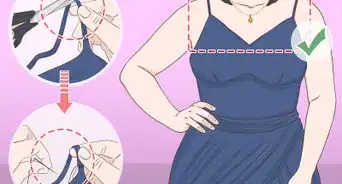
2Create your waistband. The waistband of a no-sew tutu is simply an extra long piece of ribbon tied around the waist. Choose a ribbon that is at least ½ inch thick and is wire-free in a hue that matches the tulle. Wrap it around your waist where you want the tutu to sit, and add an extra 2 feet (0.6 m) of length before cutting.Advertisement
-
3Cut your tulle into strips. Lay your tulle out flat, and cut it into dozens of long strips measuring between 2–3 inches (5.1–7.6 cm) wide. For a fluffier, fuller skirt, use wide strips. To create a tutu that lays down a bit more and looks more intricate, use thin strips of fabric.
-
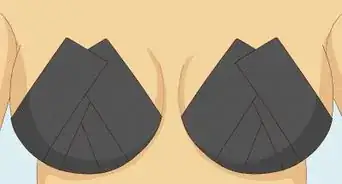
4Fold the strips in half. In order to add the tulle strips to the ribbon, they must all be folded in half first. You can choose to do this as you work, or fold them all in half at the get-go. This should leave two tail ends together at one end with a loop at the other.
-
5Add your first strip. Place a strip folded in half over the top of the ribbon. Move it so that the loop overlaps the ribbon with about 2 inches (5.1 cm) sticking out over the top. Wrap the tail ends in the opposite direction away from the loop, and then pull them around and through the loop over the top of the ribbon. This will create a classic hacking knot.
-
6Add additional strips. Continue the process of adding strips via hacking knot to the ribbon. Pull the tail ends tight to minimize the ‘knot’ around the ribbon and to make space for other pieces. Slide them together to keep the tutu organized and smoothed out.
-
7Finish adding your strips. The ribbon needs 1 foot (0.3 m) of length on either end to be used as ties for the skirt. When you have added enough tulle strips that the ribbon is completely covered except for these two tail ends, your tutu is finished.
-
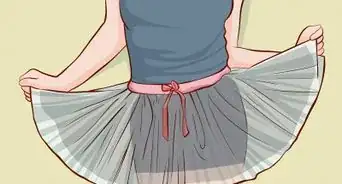
8Sport your new tulle tutu. Wear your tutu around town by wrapping the ribbon around your waist and tying it in a knot or bow at the small of your back. Gently fluff up the tulle strips to add volume to your skirt, making your tutu more fun and adding to the classic look.


Sewing a Tutu
-
1Select your supplies. For a tutu that you sew, you will need to get plenty of fabric. For a small child’s tutu, get between 2–4 yards (1.8–3.7 m). A medium sized tutu can be made using 5–7 yards (4.6–6.4 m), and a large one with 8–10 yards (7.3–9.1 m). You will also need elastic for the waistband, matching thread, and a sewing machine.
- You can hand stitch your tutu, but it will take a very long time and a lot of effort.
- For a short skirt, your tulle needs to be at least 54” thick. Find tulle that is wider than this for a longer tutu.
-
2Fold your tulle. Fold your the entire piece of your tulle in half width-wise (making your 54” into 27”). Then, fold your skirt in half again in the same direction, thus creating four layers of tulle.
-
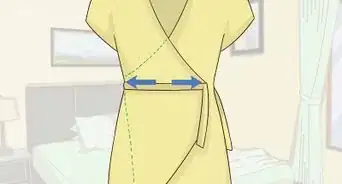
3Cut your elastic. Wrap the elastic band around your waist where you want the tutu to sit. Pull the elastic taut so that there is no space between it and your skin. Cut the elastic to this length, with no overlap of the ends.
-
4Sew the elastic casing. Sew directly across the length of the tulle using a straight stitch, about 2” (or slightly wider than your elastic) down from the top of the fold. You should be sewing along the edge of the tulle that you have folded twice, through all four layers of tulle.
-
5Add the elastic. Use a crochet hook or similarly long, sturdy device to scrunch up the tulle along the top by the casing. When it has been pushed together, slide the elastic through the casing. Make sure to keep both ends outside of the casing; a safety pin can be used to keep the elastic in place as you pull it through.
-
6Sew the elastic band. Pull the two ends of the elastic together, and sew them together about ¼ an inch from the edge with a straight stitch. Then fold the loose ends back onto the elastic waistband and sew them flat with a zig-zag stitch.
-
7Sew the skirt together. Your tutu is nearly finished, but needs to be sewn together along the back side where the two ends of the tulle meet. Pin the edges of the tulle together, and sew down about ¼ of an inch from the edge with a straight stitch. Make sure to sew through all four layers of fabric, and not just the top layer.
-
8Finish your tutu. Separate all the layers of the tutu with your hands to fluff it up. You can add optional decorations to your tutu, including small rhinestones, fake flowers, and ribbons.[1]


Community Q&A
-
QuestionWhy do you need to add an extra 2 feet of ribbon before you cut it?
 Community AnswerYou need that extra ribbon to tie into a bow in back (about one foot for each side). It looks nicer and is easier to tie when the ribbon is longer.
 -
QuestionHow do I tie the knot correctly?
 Community AnswerFold your piece of tulle in half, then place it at the back of your elastic with about 2 inches (give or take) and pull the tulle that is hanging at the bottom through the top section.
 -
QuestionDo I just need to cut the ends, or should I fold and sew them?
 Community AnswerI would recommend folding and sewing the ends.


About This Article

If you want to make a tulle tutu, you will need a lot of tulle. A medium tutu calls for 5 to 7 yards of the sheer fabric. Create a waistband out of a piece of ribbon at least 1/2 inch thick that will wrap around the waist, and add an extra 2 feet so you can tie the tutu on. Then cut the tulle into dozens of long strips around 3 inches wide. Create a classic hacking knot by folding the strips in half, overlapping the loop on the ribbon, wrapping the tail ends in the opposite direction, then pulling them through the loop. Repeat this process until you have a full tutu. For tips on how to sew the tutu instead of tying it, read on!