wikiHow is a “wiki,” similar to Wikipedia, which means that many of our articles are co-written by multiple authors. To create this article, 18 people, some anonymous, worked to edit and improve it over time.
This article has been viewed 67,284 times.
Learn more...
Making a real sword requires years of practice and dedication. The world's few capable swordsmiths don't give away their secrets easily, and even high-quality wooden practice swords such as the bokken (solid wood aikido practice sword) and shinai (bamboo kendo practice sword) require patience and artistry to successfully complete. However, just about anyone with time and a few power tools can make a fun play sword for sparring with friends or having adventures with a son or daughter. Read the steps below to learn how to make a toy sword of your own.
Steps
Wooden Toy Sword
-
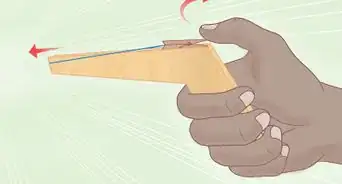
1Draw a sword on paper. More specifically, draw the outline of a sword. Use rulers to make it reasonably straight, and be as creative with the design as you want. It doesn't have to be perfect. This will be the master stencil for your sword.
- To make a long sword using this method, you'll need longer paper. Consider using a length of butcher paper, or buy oversized sheets of craft paper from a craft store.
-
2Cut and copy the stencil. Carefully cut the sword stencil out of the paper, and then lay it down on the wood you plan to use, which should be a fairly thin (no more than 1” thick) board of whichever wood you like. Copy the stencil onto the wood, and then copy the hilt (the handle and crosspiece) of the stencil twice more.
- The hilt will be thicker than the blade, so you'll cut three pieces of wood for it and glue them together.
Advertisement -
3Cut your wood. Using a jigsaw, cut out the three pieces of wood you've outlined – two hilt pieces and one full sword design. The cuts will probably be fairly rough; that's fine. Be sure to cut a little wide rather than a little narrow: wide can be sanded down, but narrow can't be fixed so easily.
-
4Mix epoxy and glue the pieces. The next step is to take a strong epoxy wood glue and mix it to activate it. Mix it on a piece of paper for easy cleanup. Once the mixture is active, spread it evenly on one side of each hilt piece and glue them firmly to the center piece, one on each side.
- Once the pieces are glued, wait for the epoxy to dry fully, at least 10 minutes.
- Get the pieces as evenly lined up as you can, but don't worry if they aren't perfect yet.
-
5Sand your sword. Start with the hilt area. Use fine-grit sandpaper to sand down rough edges and even up all three parts. You can use a rotary tool to expedite the process, if you want. Once the hilt is even, use your sandpaper to bevel each side of the blade, making it “sharp.”
-
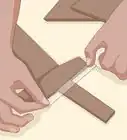
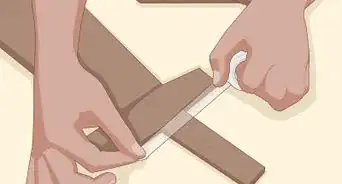
6Check your hilt and make final adjustments. Check to be sure your sword's hilt isn't too thick to hold easily; if it is, sand in from each side to make it more slender. Lay your sword on a graph-lined surface and check to be sure both sides of the crosspiece are even, and the blade is reasonably even on both sides. Sand down uneven parts until your sword looks more or less symmetrical.
-
7Add decoration. Begin by painting your sword. At the very basic level, you should spray paint it with a gray primer coat. Once the primer has dried, you can add metallic paint for a shiny blade, or colors like blue or red to make a “lightsaber.” Once the paint is dry, add a grip. Duct tape works well, as does wrapped cloth held in place with glue. You can also wrap leather cord around the grip and tie it off. Finally, using whatever decorative elements you want, add finishing touches.
- If you cover the hilt of your sword when you spray the paint and primer, you can leave it with a natural wood appearance. Alternatively, consider spraying the hilt gold and the blade silver.
- Try gluing large rhinestones to decorate the center of the crosspiece and the pommel (base of the hilt).
- Once you're done spray painting, you can use small paintbrushes and acrylic paint to add details, if you want.


Boffer Sword
-
1Start with a length of PVC pipe. The pipe should be firm but wobbly when shaken. 1” to 1.5” diameter pipe works well. Using a saw, cut the pipe down to the length of the combined handle and sword blade. Think about whether or not you want the sword to be usable with two hands, or one-handed only.
-
2Wrap with foam rubber. Cut a piece of closed-cell foam rubber (which comes in a cylindrical shape, with a hole for pipe in the center) down to the length of your sword plus a few inches. Slide the tube onto your PVC pipe.
-
3Add a crosspiece. If you want to, add a crosspiece by sliding a four-way pipe fitting onto the hilt end of your main PVC piece. Cut two short pieces of PVC pipe, both the same length. Slide one piece into each open side of the fitting to create a crosspiece. Once you're happy with the width and positioning, use plastic cement to secure each piece in place.
-
4Add more foam. If you want, to make the sword safer to use, add small pieces of closed-cell foam to each end of the crosspiece and the base of the hilt. This has the added benefit of creating a “pommel” of sorts.
-
5Unleash the duct tape. Start by wrapping your grip in duct tape. Cut it when you reach the base of the crosspiece and smooth it flat. Next, wrap duct tape thickly around the base of each piece of foam rubber, helping secure it to the pipe. Add straps of duct tape pulled tightly around the foam to further secure it. Finally, wrap the entire foam blade in duct tape from bottom to top.
- The last few inches of the foam should extend past the PVC tip for safety; feel free to wrap this “soft tip” as well, closing off the hole in the top.
-
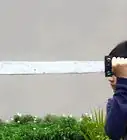
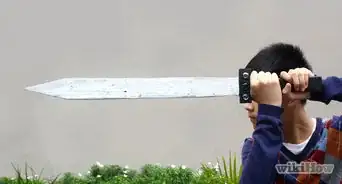
6Wrap up and have fun. Completely wrap any other pieces of foam you added with duct tape as well. The duct tape gives them a shiny metallic look, and protects the form from the elements. Once your weapon is finished, it can be used to stage fun sword fights with your boffer-wielding friends. The weapons are soft enough to prevent any serious injury, so have at it!


Metal Ruler “Katana”
-
1Purchase your supplies. You'll need a metal yardstick or meter stick, a thick dowel with a diameter the same as the width of your ruler, rough steel wool, sandpaper, primer, and cloth or duct tape for wrapping the grip, as well as contact cement or metal epoxy adhesive. You'll be using a saw to cut and split your dowel; a vise clamp is also recommended, but not strictly necessary.
-
2Scour your ruler. Use plenty of steel wool and scour the ruler as much as you can to roughen and clean the surface. If your ruler's markings are painted onto the surface, the wool might also get rid of them; feel free to scour them away, if this is the case. When you're done, wipe the ruler clean with a dry cloth.
-
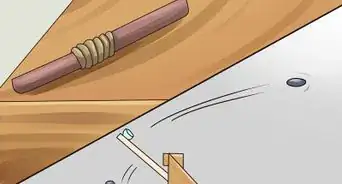
3Cut the dowel. Measure out a length of dowel that will work well as a handgrip, and cut that piece off the end of the dowel. Measure and mark across one end at the midway point, then carefully saw the dowel into two even, semi-cylindrical halves, using a saw guide to hold the dowel steady.
-
4Attach the dowel grip. Lightly sand the flat insides of each dowel half with very fine grit sandpaper. Following the instructions for your metal epoxy or contact cement, evenly glue one half of the dowel to each flat side of the base of the ruler, and let it dry completely.
- If you have a vise clamp, clamp the pieces firmly (without damaging the soft wood) and let it dry that way to improve the bond.
-
5Sand and prime. Once the dowel grip is secure, sand away any excess glue from the seams, and then heft it in your hand. If the grip feels awkward, try sanding down the sides a little bit at a time, alternating evenly on each side, until the grip becomes a bit more oblong and can be held more easily. When you're satisfied, cover the grip with painter's tape and spray a coat of primer onto one side of the blade, then the other. Apply another coat to completely obscure any markings on the ruler. Let both coats dry completely.
-
6Wrap the grip. Remove the painter's tape from the grip and sand it with ultra-fine grit sandpaper to remove potential splinters, then wrap it in adhesive medical tape, duct tape, or leather cord to make a soft grip. Your new katana is complete! The flexibility of the ruler blade will ensure that it wobbles rather than breaks or bends when you hit things with it.
- This sword may have a square tip and a flat blade, but it can still cause a lot of pain. Be very careful when you play with it. Only hit inanimate objects, like practice dummies.


Community Q&A
-
QuestionIs the metal ruler katana durable when the blade is sharp?
 Community AnswerIt most likely is durable, but it mainly depends on the width and flexibility of the metallic ruler.
Warnings
- As always, treat your tools with respect and wear proper safety equipment while making these swords.⧼thumbs_response⧽
- Even a toy sword can cause injury if used irresponsibly. Supervise children with toy swords, and use restraint and discretion when you use them yourself. Assault with a wooden sword is assault nonetheless.⧼thumbs_response⧽


References
About This Article
To make a wooden toy sword, start by drawing the stencil for the sword on a piece of paper. Next, trace the stencil onto a piece of wood board and make 2 separate copies of the hilt. Then, cut out the pieces with a jigsaw and spread epoxy wood glue on 1 side of each hilt piece. Glue the parts firmly to the hilt on the sword piece, 1 on each side, and let the epoxy dry for at least 10 minutes. Finally, use fine-grit sandpaper to smooth out rough edges and bevel each side of the blade. To learn more, including how to make a sword with foam rubber and PVC pipe, scroll down.