X
wikiHow is a “wiki,” similar to Wikipedia, which means that many of our articles are co-written by multiple authors. To create this article, volunteer authors worked to edit and improve it over time.
This article has been viewed 2,913 times.
Learn more...
Do you want to make customized coasters that will perfectly fit any room décor? In this article, you will learn how to create a personalized resin coaster to fit any room décor.
Steps
-
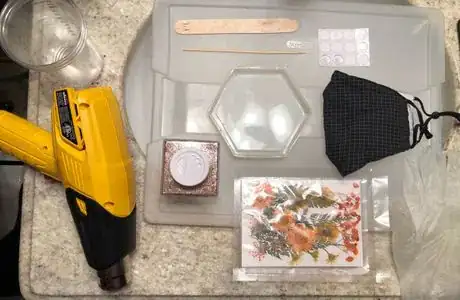
1Obtain the materials ahead of time to make the crafting process as smooth as possible. You will need:
- Two parts epoxy resin
- Silicone coaster mold
- Disposable cups and stirring utensils
- Toothpick or similar item to pop bubbles
- Heat gun (recommended) or lighter
- Your choice of decorative objects, pigments, glitter, etc. for your coaster design
- Felt or rubber tips for bottom of coaster to prevent table scratches
- Face mask
-
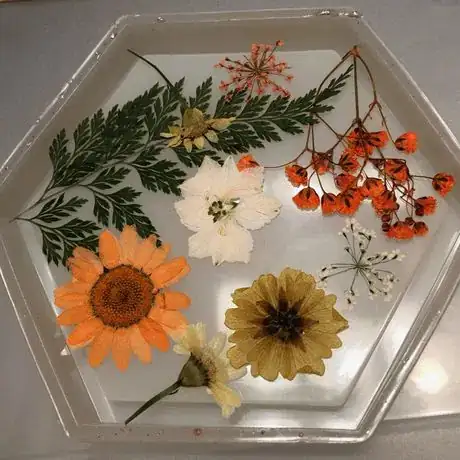
2Plan out your coaster design. You can add pigment powders, little objects, glitter, photos, anything that'll fit in the coaster. Plan out your design by laying your items into your mold to help you when placing your items in the resin.Advertisement
-
3Remove your objects from your mold and thoroughly wipe clean the mold with a cloth or anything you have available.
-
4Pour the appropriate ratio of your two-part resin into two separate cups. Read your label and follow the ratio it provides you. For a typical coaster, you will only need 2 fluid ounces total amount of resin.
-
5Prepare all your materials before mixing your parts of resin together. The materials you should have ready before you mix should include:
- heat gun or alternative tool
- your personal preference of items to add to your coaster. Photos, flowers, etc.
- tooth pick or similar object for assisting in popping bubbles deep inside the resin
- paper towel in case of spills
-
6Take your two parts of resin in your appropriate ratio and pour the two liquids into a new cup. If desired, you can add any glitters or pigments to the mixed solution. Mix thoroughly the two parts together until it looks completely combined (roughly 3 minutes). It is important to mix thoroughly to ensure your coaster hardens properly.
-
7Add your first layer of resin into your mold. Slowly pour the resin into the mold. If you are adding items such as a photo, flowers, etc. to your coaster, then pour only enough resin to cover the base of your mold.
-
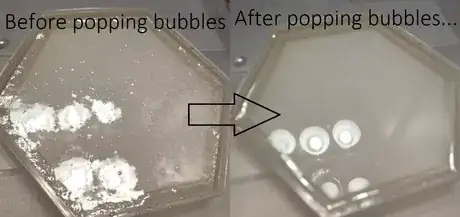
8Remove any bubbles present in your resin. To remove these bubbles, you can either use a toothpick to pop as many bubbles you can or you can use the most effective way of removing bubbles: a heat gun. If using a heat gun, turn on the heat gun and point the heat towards the poured resin inside the mold. You will instantly see the bubbles popping. Repeat this step after every layer of resin you pour to get rid of as many bubbles as you can.
-
9Fill your mold completely and pop bubbles until you reach the top or you can stop after this first layer and add any decorative items. If you choose to add items inside the mold, grab your items and carefully place them face down into the resin however you planned to in the earlier step. To avoid air bubbles where you placed your items, carefully poke your item with a toothpick all over to squeeze out any bubbles that may be caught underneath. You can now pour the remaining resin on top of your items and fill the rest of your mold and pop bubbles as you do so.
-
10Readjust any items in case they have shifted while you were pouring layers on top of them. Take this time to clean up any spills you've noticed, discard any used cups, utensils, etc.. It's important to do this now because if you wait until the resin has cured then the cleaning process will be a lot more difficult.
-
11Place your mold in a spot it will be undisturbed for the 24 hour curing time. Occasionally check on your mold to ensure no new bubbles or dust has appeared on the surface.
-
12Press your finger into the resin and check if it seems hard enough to safely remove. To remove, gently lift up the edges of the mold until your resin easily pops out.
-
13Add felt or rubber tips to the bottom of the coaster to prevent table scratches.
Advertisement
Warnings
- Wear gloves and a face mask⧼thumbs_response⧽
- Careful with clothing items, hair, and surfaces with resin since it is hard to remove⧼thumbs_response⧽
- If using a heat gun, do not hold the heat gun onto the resin for longer than 30 seconds, this can cause the resin to overheat and create smoke, and can also melt your mold.⧼thumbs_response⧽
Advertisement
About This Article
Advertisement
